Camera Setting When Using Underwater Filter ?
When using an underwater filter, it is recommended to adjust the camera settings accordingly to achieve the best results. Some important settings to consider include:
1. White Balance: Set the white balance manually or use the underwater preset to compensate for the color cast caused by the water. This helps to restore natural colors in your images.
2. ISO: Use a lower ISO setting to minimize noise and maintain image quality. Start with a lower ISO value and increase it if necessary based on the available light.
3. Aperture: Choose a smaller aperture (higher f-number) to increase the depth of field and ensure that both the foreground and background are in focus.
4. Shutter Speed: Adjust the shutter speed based on the available light and the effect you want to achieve. A faster shutter speed can freeze motion, while a slower speed can create a sense of motion blur.
5. Focus: Use manual focus or select the appropriate autofocus mode to ensure sharpness. Underwater environments can sometimes confuse autofocus systems, so it may be necessary to manually focus on the subject.
Remember to experiment with different settings and review your images to make any necessary adjustments.
1、 White Balance Adjustment for Underwater Filter Photography
When using an underwater filter for photography, it is important to make the necessary camera settings to achieve the best results. One crucial setting to consider is the white balance adjustment.
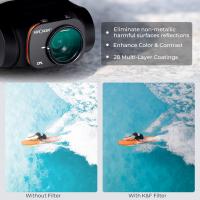
Underwater photography often presents challenges in terms of color accuracy due to the way water absorbs and scatters light. The use of an underwater filter helps to correct this issue by restoring the natural colors of the underwater scene. However, to maximize the effectiveness of the filter, it is essential to adjust the white balance setting on your camera.
White balance adjustment allows you to calibrate the camera to the specific lighting conditions underwater. This adjustment ensures that the colors captured by the camera are as accurate as possible. Different underwater environments may have varying color casts, so it is important to experiment with different white balance settings to find the most suitable one.
The latest point of view suggests using a custom white balance setting when using an underwater filter. This involves taking a reference photo of a white or gray card underwater and using it as a reference for setting the white balance. This method provides the most accurate color reproduction and helps to eliminate any color casts caused by the water.
Additionally, shooting in RAW format is highly recommended when using an underwater filter. RAW files contain more color information and allow for greater flexibility in post-processing, enabling you to fine-tune the white balance and other aspects of the image.
In conclusion, adjusting the white balance setting is crucial when using an underwater filter for photography. It helps to restore accurate colors and eliminate color casts caused by the water. Experimenting with different white balance settings and using a custom white balance reference can greatly enhance the quality of your underwater images.
2、 Exposure Compensation Techniques for Underwater Filter Photography
When using an underwater filter for photography, it is important to consider the camera settings to achieve the best results. One crucial setting to adjust is the exposure compensation. Exposure compensation allows you to manually adjust the exposure level of your image, compensating for the loss of light and color underwater.
Underwater photography often requires a positive exposure compensation to counteract the loss of light and color caused by the water. The exact amount of compensation needed will vary depending on factors such as water clarity, depth, and available light. It is recommended to start with a +1 or +2 exposure compensation and make adjustments as necessary.
Additionally, it is important to shoot in RAW format when using an underwater filter. RAW files contain more data and allow for greater flexibility in post-processing, especially when it comes to adjusting exposure and recovering details in shadows and highlights.
Another important camera setting to consider is the white balance. Underwater filters are designed to correct the color cast caused by the water, so setting the white balance to auto or using the appropriate underwater white balance preset can help achieve more accurate colors in your images.
Lastly, it is crucial to use a fast enough shutter speed to freeze the motion of your subject and minimize blurriness caused by water movement. This may require increasing the ISO or using a wider aperture to allow more light into the camera.
In conclusion, when using an underwater filter, adjusting the exposure compensation, shooting in RAW, setting the white balance, and using an appropriate shutter speed are key camera settings to consider. However, it is important to note that the latest point of view may vary depending on advancements in camera technology and underwater filter systems. It is always recommended to consult the specific instructions and recommendations provided by the manufacturer of your underwater filter for the best results.

3、 Shutter Speed Considerations for Underwater Filter Photography
When using an underwater filter for photography, it is important to consider the camera settings, particularly the shutter speed. The shutter speed determines how long the camera's sensor is exposed to light, and it plays a crucial role in capturing sharp and well-exposed images underwater.
One of the main challenges of underwater photography is the reduced amount of available light. Water absorbs and scatters light, resulting in a loss of color and contrast. Therefore, it is essential to use a faster shutter speed to minimize motion blur caused by the movement of the subject or the photographer.
The ideal shutter speed for underwater filter photography depends on various factors such as the depth of the water, the available light, and the desired effect. Generally, a shutter speed of 1/125th of a second or faster is recommended to freeze the motion and capture sharp images. However, in low-light conditions or when shooting fast-moving subjects, a faster shutter speed of 1/250th or even 1/500th of a second may be necessary.
It is also important to consider the aperture and ISO settings in conjunction with the shutter speed. A wider aperture (lower f-stop number) allows more light to enter the camera, while a higher ISO setting increases the camera's sensitivity to light. Adjusting these settings accordingly can help achieve a well-exposed image while maintaining a fast enough shutter speed.
Additionally, advancements in camera technology have introduced features like image stabilization and higher ISO capabilities, which can further enhance the quality of underwater filter photography. These advancements allow photographers to use slower shutter speeds without compromising image sharpness.
In conclusion, when using an underwater filter, it is crucial to consider the shutter speed along with other camera settings to capture sharp and well-exposed images. The ideal shutter speed will depend on various factors, and it is important to adapt and experiment with different settings to achieve the desired results.
4、 Aperture Selection for Underwater Filter Photography
When using an underwater filter for photography, it is important to consider the camera settings, particularly the aperture selection. The aperture setting determines the depth of field in the image, which is crucial for capturing sharp and detailed underwater shots.
Underwater photography often presents unique challenges, such as reduced light and color distortion. Therefore, selecting the appropriate aperture setting is essential to achieve the desired results. Generally, a smaller aperture (higher f-number) is recommended for underwater photography with a filter. This helps to maximize the depth of field, ensuring that both the foreground and background are in focus.
A smaller aperture also allows for a slower shutter speed, which can be advantageous in low-light conditions underwater. This helps to capture more light and reduce motion blur, resulting in sharper images. However, it is important to note that using a smaller aperture may require a higher ISO setting to compensate for the reduced light.
Additionally, the choice of aperture can also impact the amount of diffraction in the image. Diffraction occurs when light waves bend around the edges of the aperture blades, causing a loss of sharpness. To minimize diffraction, it is recommended to use an aperture setting that is slightly smaller than the maximum available on the lens.
It is worth mentioning that the optimal aperture setting may vary depending on the specific underwater filter being used, as different filters can have different effects on light transmission and color rendition. Therefore, it is advisable to experiment with different aperture settings and evaluate the results to determine the best setting for a particular underwater filter.
In conclusion, when using an underwater filter for photography, selecting the appropriate aperture setting is crucial. A smaller aperture is generally recommended to maximize the depth of field, capture more light, and reduce motion blur. However, it is important to consider the specific characteristics of the underwater filter being used and experiment with different aperture settings to achieve the desired results.










There are no comments for this blog.