How To Build Metal Detector ?
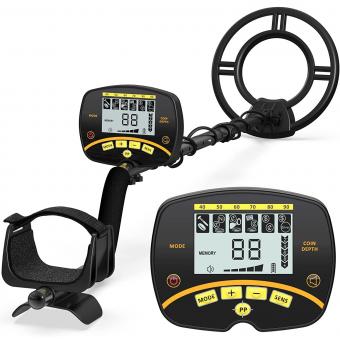
To build a metal detector, you will need a few key components. First, you will need a search coil, which is the part that detects metal objects. This can be made using a coil of wire and a non-metallic material, such as PVC pipe. Next, you will need a metal detector circuit, which can be built using a combination of electronic components such as resistors, capacitors, and transistors. This circuit will amplify the signals received by the search coil and convert them into audible or visual signals. Finally, you will need a power source, such as a battery, to power the metal detector. By assembling these components and following a schematic or guide, you can build your own metal detector. Keep in mind that building a metal detector requires some knowledge of electronics and soldering skills. It is also important to check local regulations regarding the use of metal detectors, as some areas may have restrictions or require permits.
1、 Circuit Design and Components for Metal Detectors
Building a metal detector requires a basic understanding of circuit design and knowledge of the components involved. Here is a general guide on how to build a metal detector:
1. Start by gathering the necessary components: a search coil, a frequency generator, an amplifier, and a speaker or headphones for audio output.
2. Begin by designing the search coil, which is the most critical component of a metal detector. The coil should be wound around a non-metallic frame and connected to the frequency generator.
3. The frequency generator produces an alternating current that is passed through the search coil. This current generates a magnetic field that interacts with any nearby metal objects.
4. The amplifier is used to amplify the weak signals received from the search coil. It boosts the signal strength to a level that can be detected by the audio output device.
5. Connect the amplifier to the audio output device, such as a speaker or headphones. This allows you to hear the audio signals produced when the metal detector detects a metal object.
6. Test the metal detector by sweeping it over different metal objects. Adjust the sensitivity and threshold settings to optimize the detection capabilities.
7. Consider adding additional features to enhance the metal detector's performance, such as a discrimination circuit to differentiate between different types of metals.
It is important to note that the design and components used in metal detectors can vary depending on the desired application and level of sophistication. Advanced metal detectors may incorporate microcontrollers, digital signal processing, and advanced filtering techniques to improve accuracy and reduce false alarms.
Additionally, it is recommended to consult online resources, books, or seek guidance from experienced hobbyists or professionals to ensure a successful metal detector build.

2、 Coil and Antenna Design for Metal Detectors
Coil and Antenna Design for Metal Detectors
Building a metal detector requires a good understanding of coil and antenna design. The coil is the most critical component of a metal detector as it is responsible for detecting the presence of metal objects. The design of the coil determines the sensitivity and depth of detection.
To build a metal detector, you will need to follow these steps:
1. Determine the type of metal detector you want to build. There are various types available, such as VLF (Very Low Frequency), PI (Pulse Induction), and BFO (Beat Frequency Oscillator). Each type has its own advantages and disadvantages, so choose the one that suits your requirements.
2. Design the coil. The coil consists of a wire wound in a specific pattern. The size and shape of the coil will depend on the type of metal detector you are building. Generally, larger coils provide better depth detection, while smaller coils offer higher sensitivity. You can find coil design formulas and calculators online to help you determine the optimal dimensions.
3. Wind the coil. Once you have the design, you will need to wind the wire around a non-metallic form, such as PVC or fiberglass. Make sure to follow the design specifications and maintain a consistent winding pattern. The number of turns will depend on the desired sensitivity and frequency of operation.
4. Connect the coil to the metal detector circuit. The coil is connected to the oscillator circuit, which generates the electromagnetic field. The changes in the field caused by the presence of metal objects are detected and amplified by the circuit.
5. Test and calibrate the metal detector. Once the circuit is complete, you will need to test the metal detector and calibrate it for optimal performance. This involves adjusting the sensitivity and discrimination settings to minimize false signals and maximize detection accuracy.
It is important to note that the latest advancements in metal detector technology have led to the development of more sophisticated and efficient designs. These include digital signal processing, multi-frequency operation, and advanced discrimination algorithms. Incorporating these advancements into your metal detector design can enhance its performance and accuracy.
In conclusion, building a metal detector requires a good understanding of coil and antenna design. By following the steps outlined above and considering the latest advancements in metal detector technology, you can create a functional and efficient metal detector for various applications.

3、 Signal Processing and Discrimination Techniques in Metal Detectors
To build a metal detector, you will need a few key components and a basic understanding of signal processing and discrimination techniques. Here is a general overview of the process:
1. Coil Design: The first step is to design and construct the search coil. This coil is responsible for generating and detecting electromagnetic fields. The size and shape of the coil will depend on the desired sensitivity and target detection depth.
2. Oscillator Circuit: The next step is to build an oscillator circuit that generates a continuous wave signal. This signal is then passed through the search coil, creating an electromagnetic field.
3. Induction Balance: The received signal from the search coil is then passed through an induction balance circuit. This circuit measures the phase shift and amplitude of the received signal, which can indicate the presence of a metal object.
4. Signal Processing: The received signal is then processed using various signal processing techniques. This can include filtering, amplification, and noise reduction to improve the detection accuracy.
5. Discrimination Techniques: Discrimination is an important aspect of metal detectors, as it helps differentiate between different types of metals. Different metals have unique electromagnetic signatures, which can be analyzed using pattern recognition algorithms or frequency analysis techniques.
6. Audio and Visual Output: Finally, the detected metal objects are indicated to the user through audio and visual output. This can include a tone or beep, as well as a display that shows the type of metal detected.
It is important to note that the field of metal detection is constantly evolving, with new advancements in signal processing and discrimination techniques. For example, recent research has focused on using machine learning algorithms to improve the accuracy and reliability of metal detectors. Additionally, advancements in sensor technology have led to the development of more compact and sensitive coils, allowing for better detection capabilities.

4、 Calibration and Sensitivity Adjustment of Metal Detectors
Calibration and Sensitivity Adjustment of Metal Detectors
Metal detectors are widely used in various industries and applications, including security screening, archaeology, and industrial manufacturing. Calibration and sensitivity adjustment are crucial steps in ensuring the accurate and reliable performance of metal detectors.
To calibrate a metal detector, follow these steps:
1. Start by selecting a known metal object, such as a standard test piece or a metal sample with a known size and composition. This will serve as a reference for calibration.
2. Place the metal object on a flat surface and turn on the metal detector. Ensure that the detector is in the correct operating mode and settings for the intended application.
3. Slowly move the metal object towards the detection coil of the metal detector. Observe the detector's response, which may include an audible alert, visual indication, or both.
4. Adjust the sensitivity settings of the metal detector until it reliably detects the metal object at the desired distance. This can be done by either increasing or decreasing the sensitivity level, depending on the detector's response.
5. Repeat the process with different metal objects of varying sizes and compositions to ensure the detector's calibration is accurate across a range of targets.
Sensitivity adjustment is an ongoing process that may be required periodically or when environmental conditions change. Factors such as temperature, humidity, and electromagnetic interference can affect the performance of metal detectors. Therefore, it is essential to regularly test and adjust the sensitivity settings to maintain optimal performance.
In recent years, advancements in technology have led to the development of more sophisticated metal detectors with advanced calibration and sensitivity adjustment features. Some detectors now offer automatic calibration and self-adjustment capabilities, reducing the need for manual calibration. Additionally, digital displays and data logging features provide real-time feedback on the detector's performance, allowing operators to make informed adjustments.
In conclusion, calibration and sensitivity adjustment are critical for the accurate and reliable operation of metal detectors. Following the proper calibration procedure and regularly testing and adjusting sensitivity settings will ensure optimal performance and enhance the detector's ability to detect metal objects effectively.
