How To Connect A Wifi Camera ?
To connect a WiFi camera, follow these general steps:
1. Power on the camera and ensure it is within range of your WiFi network.
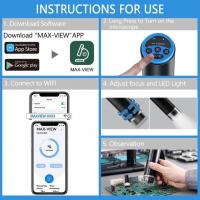
2. Download and install the camera's mobile app on your smartphone or tablet.
3. Open the app and follow the on-screen instructions to connect the camera to your WiFi network.
4. Once connected, you should be able to view the camera's live feed and adjust settings through the app.
Note that the specific steps may vary depending on the make and model of your camera. Be sure to consult the camera's user manual or manufacturer's website for detailed instructions.
1、 Check camera compatibility with your wifi network
How to connect a wifi camera is a common question among those who want to monitor their homes or businesses remotely. The process of connecting a wifi camera is relatively simple, but it requires some basic knowledge of networking and wifi technology.
The first step in connecting a wifi camera is to check the camera's compatibility with your wifi network. Most wifi cameras are designed to work with standard wifi networks, but some may require specific network configurations or hardware. It is important to check the camera's specifications and user manual to ensure that it is compatible with your wifi network.
Once you have confirmed compatibility, the next step is to connect the camera to your wifi network. This typically involves connecting the camera to your router using an Ethernet cable and then configuring the camera's wifi settings using a web browser or mobile app. Some cameras may also support wireless setup, which allows you to connect the camera to your wifi network without using an Ethernet cable.
After the camera is connected to your wifi network, you can access it remotely using a web browser or mobile app. This allows you to view live video feeds, adjust camera settings, and receive alerts when motion is detected.
In recent years, wifi cameras have become increasingly popular due to their ease of use and affordability. Many cameras now offer advanced features such as facial recognition, night vision, and two-way audio, making them a powerful tool for home security and surveillance. However, it is important to ensure that your wifi network is secure and that you follow best practices for protecting your privacy and data.

2、 Connect camera to power source
How to connect a wifi camera? The first step is to connect the camera to a power source. This can be done by plugging the camera into an electrical outlet or by using a power adapter. Once the camera is connected to power, it can be turned on and connected to a wifi network.
To connect the camera to a wifi network, you will need to follow the manufacturer's instructions. This typically involves downloading an app or software onto your smartphone or computer and following the prompts to connect the camera to your wifi network. You will need to enter your wifi network name and password to complete the setup process.
It is important to ensure that your wifi network is secure and that you have a strong password to prevent unauthorized access to your camera. You may also want to consider setting up additional security measures, such as two-factor authentication or a virtual private network (VPN), to further protect your camera and your home network.
In summary, connecting a wifi camera involves connecting it to a power source and then following the manufacturer's instructions to connect it to your wifi network. It is important to prioritize security when setting up your camera to protect your privacy and prevent unauthorized access.
3、 Download camera app and create account
How to connect a wifi camera? The first step is to ensure that your wifi camera is compatible with your wifi network. Once you have confirmed compatibility, you can proceed to connect your wifi camera to your wifi network. To do this, you will need to download the camera app and create an account.
The camera app is usually available for download on the manufacturer's website or on the app store. Once you have downloaded the app, you will need to create an account. This account will be used to access your camera remotely and to receive alerts when motion is detected.
After creating an account, you will need to connect your wifi camera to your wifi network. This can be done by following the instructions provided by the manufacturer. Typically, you will need to connect your camera to your wifi network using a wired connection. Once the camera is connected, you can disconnect the wired connection and your camera will be connected to your wifi network.
The latest point of view on connecting a wifi camera is that it is becoming easier and more user-friendly. Many manufacturers are now providing step-by-step instructions and video tutorials to guide users through the process. Additionally, some cameras now come with built-in wifi connectivity, making the process even simpler. Overall, connecting a wifi camera is a straightforward process that can be completed by anyone with basic technical knowledge.
4、 Connect camera to wifi network
Connect camera to wifi network:
Connecting a wifi camera to your home network is a simple process that can be done in a few easy steps. First, ensure that your camera is powered on and within range of your wifi network. Then, follow these steps:
1. Download the camera's app: Most wifi cameras come with a companion app that you can download from the App Store or Google Play Store. Download and install the app on your smartphone or tablet.
2. Connect the camera to your phone: Open the app and follow the instructions to connect your camera to your phone. This usually involves scanning a QR code or entering a unique code provided with the camera.
3. Connect the camera to your wifi network: Once your camera is connected to your phone, you can use the app to connect it to your wifi network. Simply select your network from the list of available networks and enter your wifi password.
4. Test the connection: Once your camera is connected to your wifi network, test the connection by viewing the camera's live feed on your phone. If everything is working properly, you should be able to see a live video stream from your camera.
It's important to note that some wifi cameras may have slightly different setup procedures, so be sure to consult the user manual that came with your camera for specific instructions. Additionally, it's always a good idea to keep your camera's firmware up to date to ensure that it's functioning properly and to address any security vulnerabilities that may arise.
