How To Connect A Wireless Mic ?
To connect a wireless microphone, follow these steps:
1. Turn on the wireless microphone and the receiver.
2. Make sure the receiver is set to the same frequency as the microphone.
3. Connect the receiver to the sound system using an audio cable.
4. Adjust the volume levels on the microphone and the sound system.
5. Test the microphone to ensure it is working properly.
Note: The specific steps may vary depending on the type and brand of wireless microphone and receiver being used. It is important to refer to the manufacturer's instructions for detailed guidance.
1、 Check compatibility with device

How to connect a wireless mic:
Connecting a wireless microphone is a simple process that can be done in a few easy steps. First, make sure that the microphone and the device you want to connect it to are both turned on. Then, locate the wireless receiver and plug it into the device's audio input jack. Next, turn on the wireless microphone and wait for it to sync with the receiver. Once the microphone is synced, you should be able to use it to record or transmit audio wirelessly.
It's important to note that different wireless microphones may have different connection methods, so it's always a good idea to consult the manufacturer's instructions before attempting to connect your microphone. Additionally, some devices may not be compatible with certain types of wireless microphones, so it's important to check compatibility before making a purchase.
Check compatibility with device:
Before purchasing a wireless microphone, it's important to check its compatibility with the device you plan to use it with. This can be done by checking the device's specifications or by contacting the manufacturer directly. Some devices may only be compatible with certain types of wireless microphones, so it's important to do your research before making a purchase.
It's also worth noting that some newer devices may not have a dedicated audio input jack, which can make connecting a wireless microphone more challenging. In these cases, you may need to use an adapter or a specialized wireless microphone that is designed to work with your device.
Overall, connecting a wireless microphone is a simple process that can be done in just a few steps. However, it's important to check compatibility and follow the manufacturer's instructions to ensure that your microphone works properly and delivers high-quality audio.
2、 Turn on both mic and receiver

How to connect a wireless mic? The first step is to turn on both the mic and the receiver. Once both devices are turned on, you need to pair them. This can be done by pressing the pairing button on the receiver and then on the mic. Once the devices are paired, you should be able to hear sound coming from the mic through the receiver.
It is important to note that different wireless mic systems may have slightly different pairing procedures. It is always a good idea to consult the user manual for your specific system to ensure that you are following the correct steps.
In addition to pairing the devices, it is also important to ensure that the mic is set to the correct frequency. This can be done by adjusting the frequency settings on both the mic and the receiver. It is important to choose a frequency that is not being used by other wireless devices in the area to avoid interference.
Finally, it is important to test the mic to ensure that it is working properly. This can be done by speaking into the mic and checking that the sound is coming through the receiver. If there are any issues with the sound quality, it may be necessary to adjust the mic or receiver settings or to move the devices to a different location to avoid interference.
Overall, connecting a wireless mic is a relatively simple process that can be done by following a few basic steps. By ensuring that the devices are paired and set to the correct frequency, you can enjoy high-quality sound without the hassle of wires and cables.
3、 Pair devices via Bluetooth or Wi-Fi

How to connect a wireless mic? Connecting a wireless microphone is a simple process that can be done in a few easy steps. First, make sure that the wireless microphone is turned on and that the receiver is plugged into the sound system. Then, follow the instructions provided by the manufacturer to pair the microphone with the receiver. This usually involves pressing a button on both the microphone and the receiver to initiate the pairing process.
Pairing devices via Bluetooth or Wi-Fi is another way to connect a wireless microphone. Many modern wireless microphones come with Bluetooth or Wi-Fi connectivity options, which allow them to be paired with smartphones, tablets, or other devices. This can be useful for recording audio or streaming live performances.
When pairing devices via Bluetooth or Wi-Fi, it is important to ensure that both devices are compatible and that they are within range of each other. It is also important to follow the manufacturer's instructions carefully to ensure that the pairing process is successful.
In recent years, advancements in wireless microphone technology have made it easier than ever to connect and use wireless microphones. Many wireless microphones now come with features such as automatic frequency selection and interference detection, which help to ensure that the microphone is always connected and producing high-quality audio. Additionally, some wireless microphones now come with built-in rechargeable batteries, which can save users money on replacement batteries over time.
4、 Adjust mic volume and settings
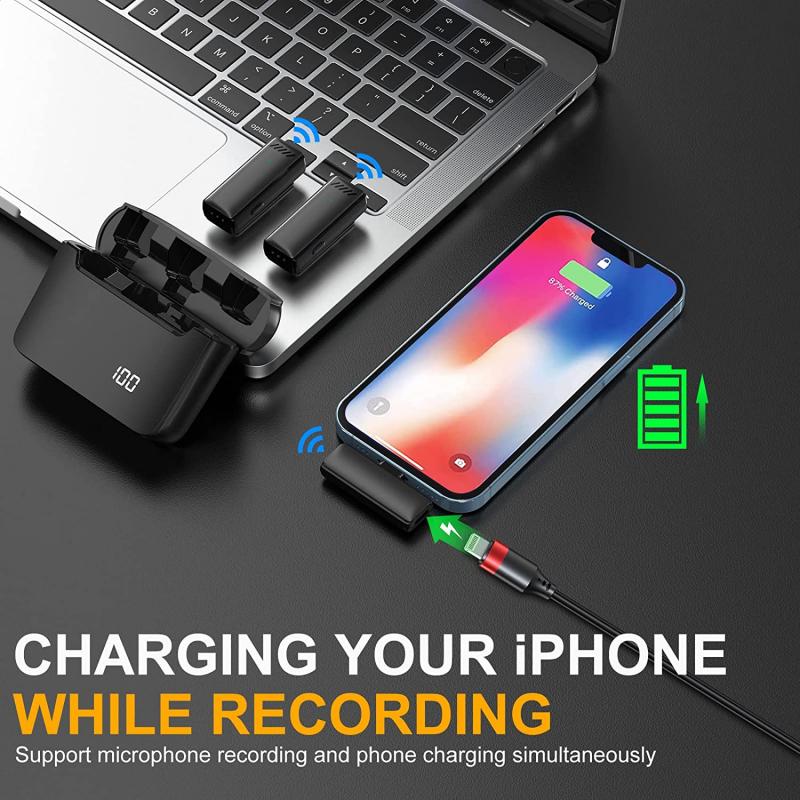
How to connect a wireless mic:
Connecting a wireless microphone is a simple process that can be done in a few easy steps. First, make sure that the microphone and the receiver are both turned on and have fresh batteries. Then, locate the input jack on the receiver and plug in the microphone's transmitter. Once the transmitter is securely connected, turn on the microphone and test it to ensure that it is working properly.
Adjust mic volume and settings:
Once the wireless microphone is connected, it is important to adjust the volume and settings to ensure that it is working optimally. Most wireless microphones have a volume control on the transmitter, which can be adjusted to increase or decrease the volume as needed. Additionally, some microphones have settings that can be adjusted to optimize the sound quality, such as a bass boost or treble boost.
It is also important to consider the environment in which the microphone will be used. If there is a lot of background noise, it may be necessary to adjust the microphone's sensitivity to reduce unwanted noise. Similarly, if the microphone is being used in a large room, it may be necessary to adjust the gain to ensure that the sound is clear and audible.
In conclusion, connecting and adjusting a wireless microphone is a simple process that can greatly enhance the quality of sound in a variety of settings. By following these easy steps, you can ensure that your wireless microphone is working optimally and providing clear, high-quality sound.












There are no comments for this blog.