How To Connect Lav Mic To Iphone ?
To connect a lavalier microphone (lav mic) to an iPhone, you will need an adapter that converts the microphone's connector to the iPhone's Lightning port. This adapter is called a TRRS to Lightning adapter. Once you have the adapter, simply plug the lav mic into the adapter's input jack, and then connect the adapter to the iPhone's Lightning port. Make sure the microphone is securely connected and positioned correctly for optimal audio capture. You may also need to adjust the audio input settings on your iPhone to ensure the microphone is recognized and functioning properly.
1、 Using a TRRS to TRS adapter for iPhone connection
To connect a lav mic to an iPhone, you can use a TRRS to TRS adapter. This adapter allows you to connect a microphone with a TRS (Tip, Ring, Sleeve) connector to the iPhone's TRRS (Tip, Ring, Ring, Sleeve) headphone jack.
The TRRS to TRS adapter has three rings on the male end and two rings on the female end. The male end plugs into the iPhone's headphone jack, while the female end is where you connect your lav mic with a TRS connector.
To connect the lav mic to the iPhone, follow these steps:
1. Plug the male end of the TRRS to TRS adapter into the iPhone's headphone jack.
2. Connect the lav mic's TRS connector to the female end of the adapter.
3. Open the recording app on your iPhone and make sure the microphone input is set to the headphone jack.
4. Test the microphone by speaking into it and checking if the audio is being recorded.
It's important to note that newer iPhone models, starting from the iPhone 7, do not have a dedicated headphone jack. In this case, you will need to use a Lightning to headphone jack adapter to connect the TRRS to TRS adapter to the iPhone.
Using a TRRS to TRS adapter is a simple and cost-effective way to connect a lav mic to an iPhone. It allows you to capture high-quality audio for various purposes such as interviews, vlogging, or podcasting.
2、 Using a lightning to 3.5mm headphone jack adapter
To connect a lav mic to an iPhone, you can use a lightning to 3.5mm headphone jack adapter. This adapter allows you to connect a standard 3.5mm audio cable to the lightning port on your iPhone.
First, make sure you have the lightning to 3.5mm headphone jack adapter. This adapter is usually included with newer iPhone models that do not have a built-in headphone jack. If you don't have one, you can purchase it separately from Apple or other third-party retailers.
Once you have the adapter, plug it into the lightning port on your iPhone. Then, connect one end of the lav mic's audio cable to the 3.5mm port on the adapter. The other end of the lav mic's cable should be connected to the microphone itself.
After connecting the lav mic, open the app you want to use for recording audio on your iPhone. Make sure the app is set to use the external microphone as the audio input source. This setting can usually be found in the app's settings or preferences menu.
It's important to note that the latest iPhone models, such as the iPhone 11 and iPhone 12, no longer include a headphone jack or come with the lightning to 3.5mm headphone jack adapter. Instead, these models rely on wireless or lightning-compatible audio accessories. Therefore, if you have one of these newer models, you may need to consider using a wireless lav mic or a lightning-compatible lav mic that directly connects to the lightning port on your iPhone.
3、 Using a lightning-enabled lav mic with direct iPhone compatibility
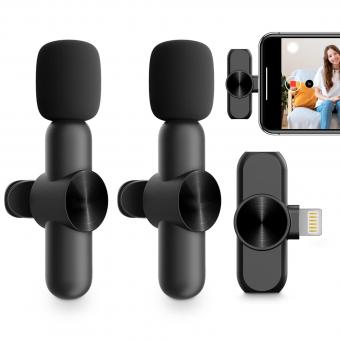
Using a lightning-enabled lav mic with direct iPhone compatibility is a straightforward process that allows you to capture high-quality audio for your recordings or live streams. Here's how you can connect a lav mic to your iPhone:
1. Purchase a lightning-enabled lav mic: Look for a lav mic that specifically mentions iPhone compatibility and has a lightning connector. There are several options available in the market, ranging from budget-friendly to professional-grade.
2. Plug in the lav mic: Once you have the appropriate lav mic, simply connect it to the lightning port on your iPhone. The lightning connector ensures a direct and secure connection, eliminating the need for any additional adapters or converters.
3. Configure audio settings: By default, your iPhone should recognize the connected lav mic and automatically route audio input through it. However, it's always a good idea to double-check your audio settings. Go to "Settings" on your iPhone, select "Sounds & Haptics," and then tap on "Input." Ensure that the lav mic is selected as the preferred audio input device.
4. Test the audio: Open your preferred recording or streaming app and test the audio input. Speak into the lav mic and check if the audio is being captured clearly. Adjust the microphone placement and volume levels as needed.
It's worth noting that the latest iPhone models may require a lightning to USB-C adapter if they don't have a built-in lightning port. Additionally, some lav mics may require a dedicated app for advanced audio control and customization.
Overall, connecting a lightning-enabled lav mic to your iPhone is a simple and efficient way to enhance your audio recording capabilities.

4、 Using a wireless lav mic system with iPhone receiver
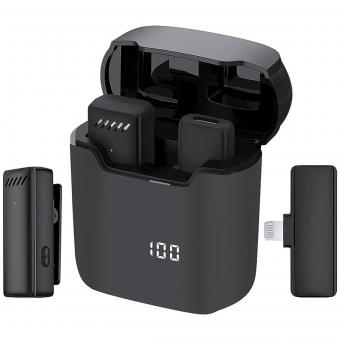
Using a wireless lav mic system with an iPhone receiver is a convenient way to capture high-quality audio for your videos or recordings. Here's how you can connect a lav mic to your iPhone:
1. Choose a wireless lav mic system: Look for a wireless lav mic system that is compatible with iPhones. There are various options available in the market, so make sure to choose one that suits your needs and budget.
2. Set up the receiver: Once you have your wireless lav mic system, connect the receiver to your iPhone. Most systems use a lightning connector or a headphone jack adapter to connect to the iPhone. Make sure the receiver is securely plugged in.
3. Pair the lav mic with the receiver: Turn on the lav mic and the receiver. They should automatically pair with each other. If not, follow the instructions provided with your specific system to pair them manually.
4. Position the lav mic: Clip the lav mic onto your clothing, ensuring it is close to your mouth for optimal audio quality. Make sure the mic is securely attached and positioned correctly.
5. Test the audio: Open your preferred recording app on your iPhone and start recording. Speak into the lav mic to test the audio quality. Adjust the mic position if needed to achieve the best sound.
6. Monitor the audio: Some wireless lav mic systems come with a headphone jack on the receiver. You can plug in headphones to monitor the audio in real-time and make any necessary adjustments.
Remember to check the battery life of your wireless lav mic system before recording to ensure uninterrupted usage. Additionally, it's always a good idea to test the audio quality before important recordings or events.
Using a wireless lav mic system with an iPhone receiver provides you with the flexibility to capture professional-grade audio without the hassle of wires. It is a popular choice among content creators, vloggers, journalists, and anyone who needs high-quality audio on the go.
