How To Fit Tripod ?
To fit a tripod, first extend the legs by unlocking the leg locks and pulling them out to the desired height. Make sure the legs are evenly spread apart for stability. Then, attach the camera mounting plate to the tripod head by aligning the plate with the screw on the head and tightening it securely. Place the camera on the mounting plate and secure it using the camera's tripod socket. Adjust the position and angle of the camera as needed by loosening the tripod head controls. Finally, ensure that the tripod is stable and balanced before using it for photography or videography.
1、 Adjusting tripod legs for stability
Adjusting tripod legs for stability is an essential step in ensuring that your camera remains steady and secure during photography or videography sessions. To fit a tripod properly, follow these steps:
1. Extend the legs: Start by unlocking the leg locks and extending each leg to the desired height. Most tripods have multiple leg sections that can be adjusted independently. Make sure to extend the legs evenly to maintain balance.
2. Position the tripod: Place the tripod on a stable surface, such as the ground or a flat platform. Ensure that the tripod is level by using a bubble level or the built-in level indicator on some tripods. Adjust the leg lengths if necessary to achieve a level position.
3. Lock the legs: Once the tripod is positioned correctly, lock the legs in place by tightening the leg locks. These locks are usually located near the top of each leg and can be tightened by twisting or flipping them, depending on the tripod model.
4. Spread the legs: To increase stability, spread the tripod legs apart. Most tripods have a center column that can be extended or retracted to adjust the height. Lowering the center column can provide additional stability, especially in windy conditions.
5. Fine-tune the adjustments: After setting up the tripod, check for any wobbling or instability. If needed, make small adjustments to the leg lengths or reposition the tripod slightly to ensure a secure and stable setup.
It's important to note that different tripods may have specific instructions or features that require additional adjustments. Always refer to the manufacturer's instructions for your specific tripod model.
In recent years, there have been advancements in tripod design to enhance stability. Some tripods now feature innovative leg locking mechanisms, such as twist locks or lever locks, which provide quicker and more secure adjustments. Additionally, certain tripods come with spiked feet or rubberized grips to improve stability on different surfaces. These advancements aim to provide photographers and videographers with more reliable and versatile tripod options.
Remember, a properly fitted tripod is crucial for capturing sharp and steady images or videos. Taking the time to adjust the tripod legs for stability will greatly improve the quality of your shots and ensure a more enjoyable shooting experience.
2、 Mounting camera securely on tripod head
To mount a camera securely on a tripod head, follow these steps:
1. Start by extending the tripod legs to a comfortable height and ensure that the tripod is stable on the ground. Make sure the tripod head is level.
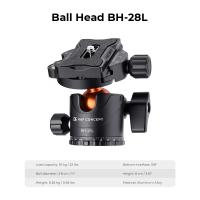
2. Locate the mounting plate on the tripod head. This plate usually has a screw that fits into the camera's tripod socket. Attach the plate securely to the camera by aligning the screw with the socket and tightening it.
3. Once the plate is attached, locate the quick-release mechanism on the tripod head. This mechanism allows you to easily attach and detach the camera from the tripod. Slide the plate into the quick-release mechanism and ensure it locks securely in place.
4. Double-check that the camera is securely attached by gently tugging on it. It should not move or wobble.
5. Adjust the camera's position on the tripod head by loosening the appropriate knobs or levers. This will allow you to tilt, pan, or rotate the camera to the desired angle.
6. Once the camera is positioned correctly, tighten the knobs or levers to secure it in place. Be careful not to overtighten, as this may damage the tripod or camera.
From a latest point of view, some tripods now come with additional features such as built-in levels or bubble indicators, which can help ensure that the camera is perfectly level. Additionally, some tripods have a weight hook at the center column, allowing you to hang a bag or other weight for added stability. It is also worth considering using a remote shutter release or a timer function to minimize camera shake when taking photos. Overall, the key is to ensure that the camera is securely mounted on the tripod head to avoid any accidental falls or damage.
3、 Balancing weight distribution on tripod
To fit a tripod properly, it is important to consider the balancing weight distribution. This ensures stability and prevents the tripod from tipping over. Here's a step-by-step guide on how to achieve proper weight distribution on a tripod:
1. Extend the tripod legs: Start by extending the legs of the tripod to a comfortable height. Make sure all the leg locks are securely tightened to prevent any wobbling.
2. Attach the camera: Mount your camera securely onto the tripod head. Ensure that the camera is properly aligned and tightened onto the mounting plate. This will prevent any movement or slippage during use.
3. Adjust the center column: If your tripod has a center column, adjust it to the desired height. However, it is generally recommended to keep the center column as low as possible to maintain stability.
4. Position the weight: To achieve proper weight distribution, position the weight of your camera and any additional accessories evenly over the tripod. This means distributing the weight across all three legs rather than having it concentrated on one side.
5. Use a counterbalance: If you have a heavy camera or lens, you may need to use a counterbalance to achieve proper weight distribution. This can be done by attaching a weight, such as a sandbag or a camera bag, to the tripod's center hook. This will help stabilize the tripod and prevent it from tipping over.
It is worth noting that the latest point of view on weight distribution is to use a tripod with a higher load capacity than the weight of your camera and accessories. This provides an extra margin of stability and reduces the risk of the tripod tipping over, especially in windy conditions or when using heavy equipment.
In conclusion, fitting a tripod involves extending the legs, attaching the camera securely, adjusting the center column, positioning the weight evenly, and using a counterbalance if necessary. Following these steps will help achieve proper weight distribution and ensure a stable and secure setup for your camera.
4、 Using tripod height adjustments for desired framing
Using tripod height adjustments for desired framing is an essential skill for any photographer or videographer. It allows you to achieve the perfect composition and ensure that your subject is properly framed within the shot. Here's a step-by-step guide on how to fit a tripod and make the necessary height adjustments:
1. Set up your tripod: Start by extending the tripod legs and ensuring that they are securely locked in place. Make sure the tripod is on a stable surface to prevent any wobbling or movement during your shoot.
2. Adjust the tripod height: Most tripods have adjustable legs that can be extended or retracted to change the height. Determine the desired height for your shot based on the framing you want to achieve. If you're shooting a subject that is taller, you may need to extend the legs fully. Conversely, if you're shooting a subject that is lower, you may need to retract the legs partially.
3. Use the center column: Some tripods also have a center column that can be extended to further increase the height. This can be useful when shooting from a higher vantage point or when you need to capture a wider scene. However, be cautious as extending the center column too much can compromise stability.
4. Level the tripod: Ensure that your tripod is level by using a bubble level or the built-in level indicator on some tripods. This will help you avoid any tilted or crooked shots.
5. Fine-tune the height: Once you have set the initial height, take a moment to evaluate the framing through your camera's viewfinder or LCD screen. Make any necessary adjustments to the tripod height to achieve the desired composition.
It's important to note that the latest point of view in tripod usage is the incorporation of innovative features such as quick-release mechanisms, lightweight materials, and compact designs. These advancements make it easier than ever to fit and adjust tripods for desired framing. Additionally, some tripods now come with smartphone mounts, allowing for more versatility in capturing shots from different angles and heights.
In conclusion, mastering the skill of fitting a tripod and using its height adjustments is crucial for achieving the desired framing in your photography or videography. By following these steps and considering the latest advancements in tripod technology, you can enhance your shooting experience and capture stunning visuals.















There are no comments for this blog.