How To Install Endoscope Camera On Pc ?
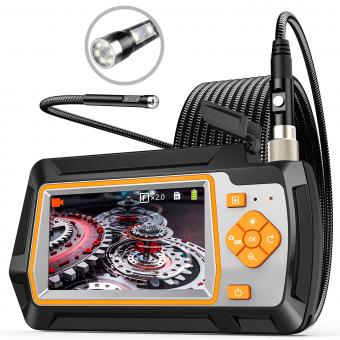
To install an endoscope camera on a PC, you will need to follow these steps:
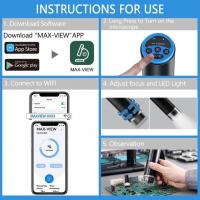
1. Start by connecting the endoscope camera to your PC using the provided USB cable.
2. Once connected, wait for your PC to recognize the camera. It may automatically install the necessary drivers, or you may need to install them manually.
3. If the drivers are not installed automatically, you can usually find them on the manufacturer's website. Download the appropriate drivers for your camera model and install them on your PC.
4. After the drivers are installed, you can open the software that came with the endoscope camera or use a third-party software that is compatible with your camera.
5. Launch the software and select the endoscope camera as the video source. You should now be able to view the live feed from the camera on your PC.
6. Depending on the software, you may have additional features such as capturing images or recording videos from the endoscope camera.
Remember to consult the user manual or manufacturer's instructions for specific guidance on installing and using your particular endoscope camera model.
1、 Check system requirements for endoscope camera installation on PC
To install an endoscope camera on a PC, you can follow these steps:
1. Check system requirements: Before installing the endoscope camera on your PC, it is important to ensure that your computer meets the necessary system requirements. These requirements may vary depending on the specific camera model, so it is advisable to refer to the user manual or the manufacturer's website for accurate information. Generally, you will need a PC with a USB port, a compatible operating system (such as Windows or macOS), and sufficient processing power and memory.
2. Connect the camera: Once you have confirmed that your PC meets the system requirements, you can connect the endoscope camera to your computer. Most endoscope cameras come with a USB cable that you can use to establish the connection. Simply plug one end of the USB cable into the camera and the other end into an available USB port on your PC.
3. Install the software: Some endoscope cameras require specific software to be installed on your PC in order to function properly. Check the user manual or the manufacturer's website for any software downloads or installation instructions. Follow the provided steps to install the software on your PC.
4. Configure the camera: After the software installation is complete, you may need to configure the camera settings. This can include adjusting the resolution, frame rate, or other camera-specific settings. Refer to the user manual or the software documentation for guidance on how to configure the camera.
5. Test the camera: Once the installation and configuration are done, you can test the endoscope camera on your PC. Open the software that came with the camera or any compatible imaging software on your computer. The camera should be recognized and display a live feed on your PC screen. You can then use the camera for various applications such as medical examinations, industrial inspections, or even exploring hard-to-reach areas.
It is important to note that the installation process may vary depending on the specific endoscope camera model and the software provided by the manufacturer. Always refer to the user manual or the manufacturer's website for accurate and up-to-date installation instructions.
2、 Download and install the necessary software for endoscope camera
To install an endoscope camera on your PC, you will need to follow a few steps. The first step is to download and install the necessary software for the endoscope camera. This software allows your PC to recognize and interact with the camera.
To begin, you can visit the manufacturer's website or search for the specific software required for your endoscope camera model. Look for a download link or a support section where you can find the software. Make sure to download the software that is compatible with your PC's operating system.
Once the software is downloaded, locate the installation file and double-click on it to start the installation process. Follow the on-screen instructions to complete the installation. After the installation is complete, you may need to restart your PC for the changes to take effect.
Once your PC has restarted, connect the endoscope camera to your PC using the provided USB cable. Your PC should automatically detect the camera and install any necessary drivers. If prompted, follow the on-screen instructions to complete the driver installation.
Once the camera is successfully installed, you can open the software you downloaded earlier. The software should have a user-friendly interface that allows you to view and capture images or videos from the endoscope camera. You may need to adjust some settings within the software to optimize the camera's performance.
It is important to note that the installation process may vary slightly depending on the brand and model of your endoscope camera. Therefore, it is always recommended to refer to the user manual or contact the manufacturer for specific instructions.
In conclusion, installing an endoscope camera on your PC involves downloading and installing the necessary software, connecting the camera to your PC, and adjusting the settings within the software. By following these steps, you should be able to use your endoscope camera on your PC and explore the world of endoscopy from a new perspective.
3、 Connect the endoscope camera to the PC via USB
To install an endoscope camera on a PC, you can follow these steps:
1. Connect the endoscope camera to the PC via USB: Most endoscope cameras come with a USB cable that allows you to connect it directly to your computer. Locate the USB port on the camera and plug it into an available USB port on your PC.
2. Install the necessary software: Some endoscope cameras require specific software to be installed on your PC in order to view the images or videos captured by the camera. Check the manufacturer's website or the documentation that came with the camera for any software downloads or installation instructions. Follow the prompts to install the software on your PC.
3. Launch the software and connect the camera: Once the software is installed, launch it on your PC. Connect the endoscope camera to the USB port and wait for the software to detect the camera. In most cases, the software will automatically recognize the camera and display the live feed on your PC screen.
4. Adjust settings and start using the camera: Depending on the software, you may have options to adjust settings such as brightness, contrast, and resolution. Explore the software interface to familiarize yourself with the available features and customize the camera settings according to your needs.
5. Capture and save images or videos: With the endoscope camera connected and the software running, you can now start capturing images or videos. Use the software controls to capture and save the desired content to your PC's storage.
It's important to note that the installation process may vary depending on the specific endoscope camera model and the software provided by the manufacturer. Always refer to the user manual or manufacturer's instructions for accurate installation guidance.
4、 Configure camera settings and permissions on the PC
To install an endoscope camera on your PC, you will need to follow a few steps. Here is a guide on how to do it:
1. Check the system requirements: Before installing the endoscope camera, make sure your PC meets the minimum system requirements. This typically includes having a USB port and compatible operating system.
2. Connect the camera to your PC: Plug the endoscope camera into a USB port on your PC. Ensure that the connection is secure.
3. Install the necessary software: Some endoscope cameras come with their own software that needs to be installed on your PC. Insert the installation CD or download the software from the manufacturer's website. Follow the on-screen instructions to complete the installation process.
4. Configure camera settings and permissions on the PC: Once the software is installed, you may need to configure the camera settings and permissions on your PC. This can usually be done through the software's settings menu. Adjust the resolution, frame rate, and other settings according to your preferences.
5. Grant camera permissions: Depending on your operating system, you may need to grant camera permissions to the software. This is typically done through the PC's settings or security options. Make sure to allow the software access to the camera.
6. Test the camera: After completing the installation and configuration process, test the endoscope camera to ensure it is working properly. Open the software and check if the camera feed is displayed correctly on your PC.
It's important to note that the installation process may vary slightly depending on the specific endoscope camera model and software. Always refer to the manufacturer's instructions for the most accurate installation steps.
In the latest point of view, advancements in technology have made it easier to install endoscope cameras on PCs. Some newer models may even offer plug-and-play functionality, eliminating the need for software installation. Additionally, wireless endoscope cameras are becoming more popular, allowing for easy connection to PCs via Wi-Fi or Bluetooth. These advancements provide users with more convenience and flexibility when using endoscope cameras on their PCs.
