How To Install Wifi Security Cameras ?
To install WiFi security cameras, first, choose the location where you want to install the camera. Ensure that it has a power outlet nearby and a strong WiFi signal. Next, mount the camera using the provided brackets or screws. Connect the camera to a power source using the included power adapter. Then, download the camera's mobile app and create an account. Follow the app's instructions to connect the camera to your WiFi network. Once connected, you can customize the camera's settings, such as motion detection and recording preferences, through the app. Finally, test the camera by accessing the live feed on your mobile device or computer to ensure it is working properly.
1、 Camera Placement and Coverage
When it comes to installing WiFi security cameras, proper camera placement and coverage are crucial for maximizing their effectiveness. Here's a step-by-step guide on how to install WiFi security cameras and ensure optimal coverage:
1. Determine the areas to be monitored: Start by identifying the key areas that require surveillance. This could include entry points, driveways, backyards, or any other vulnerable spots.
2. Choose the right cameras: Select WiFi security cameras that are suitable for both indoor and outdoor use, depending on your requirements. Consider factors such as resolution, night vision capabilities, and weather resistance.
3. Position the cameras strategically: Place the cameras at a height that provides a clear view of the desired area. Ensure they are mounted securely to prevent tampering or theft.
4. Consider camera angles: Adjust the camera angles to cover the widest possible area. Avoid obstructions such as trees, walls, or other objects that may hinder the camera's field of view.
5. Test the WiFi signal strength: Before finalizing the camera placement, check the WiFi signal strength in the chosen locations. Weak signals can result in poor video quality or connectivity issues. Consider using WiFi range extenders if needed.
6. Set up the cameras: Follow the manufacturer's instructions to connect the cameras to your WiFi network. This typically involves downloading a mobile app, scanning a QR code, and configuring the camera settings.
7. Configure motion detection and alerts: Enable motion detection on the cameras to receive alerts whenever movement is detected. Adjust the sensitivity levels to avoid false alarms caused by pets, trees, or other non-threatening factors.
8. Monitor and manage the cameras: Install the necessary software or mobile apps to access the camera feeds remotely. This allows you to monitor your property from anywhere and manage camera settings as needed.
In recent years, advancements in technology have made WiFi security cameras more accessible and user-friendly. Many cameras now offer features like two-way audio, facial recognition, and cloud storage options. Additionally, some cameras are equipped with artificial intelligence algorithms that can differentiate between humans, animals, and other objects, reducing false alarms.
Remember to regularly update the camera firmware to ensure optimal performance and security. By following these steps and staying up-to-date with the latest advancements, you can install WiFi security cameras effectively and enhance the security of your property.
2、 Network Configuration and Connectivity
To install WiFi security cameras, follow these steps:
1. Choose the right camera: Select a WiFi security camera that suits your needs. Consider factors such as resolution, field of view, night vision, and weather resistance.
2. Determine camera placement: Identify the areas you want to monitor and ensure the camera has a clear line of sight. Consider factors like power source availability and WiFi signal strength.
3. Set up the camera: Follow the manufacturer's instructions to set up the camera. Typically, this involves connecting the camera to a power source and downloading the camera's app on your smartphone or computer.
4. Connect to WiFi: Use the camera's app to connect it to your WiFi network. Enter your network's SSID and password, and the camera will establish a connection. Ensure that the camera is within range of your WiFi router for a stable connection.
5. Configure camera settings: Once connected, access the camera's settings through the app. Set up features like motion detection, recording schedules, and notifications. Adjust camera angles and focus to optimize surveillance.
6. Test the camera: Verify that the camera is functioning properly by testing its live feed and recording capabilities. Ensure that the camera is capturing the desired areas and that the video quality meets your expectations.
7. Secure your network: Protect your WiFi security cameras by securing your network. Change the default camera password, enable encryption on your WiFi router, and regularly update the camera's firmware to ensure it has the latest security patches.
It's worth noting that the latest advancements in WiFi security cameras include features like AI-powered motion detection, facial recognition, and cloud storage options. These technologies enhance the camera's ability to detect and alert you of potential threats, while also providing convenient access to recorded footage from anywhere.
3、 Camera Installation and Mounting
Installing WiFi security cameras can provide you with peace of mind and added security for your home or business. With advancements in technology, setting up these cameras has become easier than ever. Here is a step-by-step guide on how to install WiFi security cameras:
1. Choose the right location: Determine the areas you want to monitor and select suitable locations for your cameras. Consider factors such as coverage, visibility, and accessibility.
2. Check your WiFi signal strength: Ensure that the WiFi signal is strong enough in the chosen locations. Weak signals can result in poor video quality or connectivity issues. Consider using WiFi range extenders if needed.
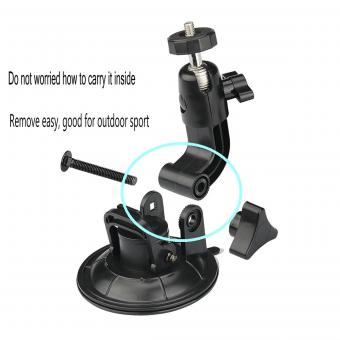
3. Mount the cameras: Use the mounting brackets provided with the cameras to securely attach them to walls, ceilings, or other surfaces. Ensure that the cameras are positioned at the desired angle and height for optimal coverage.
4. Connect the cameras to power: Most WiFi security cameras require a power source. Connect the cameras to a power outlet using the provided power cables. Consider using surge protectors to safeguard against power surges.
5. Connect the cameras to your WiFi network: Follow the manufacturer's instructions to connect the cameras to your WiFi network. This typically involves using a smartphone app or a computer to scan for available networks and enter your WiFi credentials.
6. Configure camera settings: Once connected, access the camera settings through the manufacturer's app or web interface. Set up features such as motion detection, recording schedules, and notifications to suit your needs.
7. Test the cameras: After installation, test the cameras to ensure they are functioning properly. Check the video quality, motion detection, and remote access capabilities.
It is important to note that the specific installation process may vary depending on the brand and model of your WiFi security cameras. Always refer to the manufacturer's instructions for detailed guidance.
In recent years, advancements in technology have made WiFi security camera installation even more user-friendly. Many cameras now offer simplified setup processes, such as QR code scanning or voice-guided installation. Additionally, some cameras are designed for easy DIY installation, eliminating the need for professional assistance.
Overall, installing WiFi security cameras can be a straightforward process. By following these steps and staying up to date with the latest instructions from the manufacturer, you can enjoy the benefits of enhanced security and peace of mind.
4、 Power Supply and Wiring
Installing WiFi security cameras requires careful consideration of power supply and wiring. Here is a step-by-step guide on how to install WiFi security cameras, with a focus on power supply and wiring.
1. Determine camera placement: Before starting the installation process, decide where you want to place your WiFi security cameras. Consider areas that require surveillance and ensure they are within the range of your WiFi network.
2. Check power source options: WiFi security cameras can be powered through different methods, including batteries, solar panels, or electrical outlets. Choose the power source that suits your needs and camera specifications.
3. Connect to power source: If you opt for an electrical outlet, ensure that it is easily accessible near the camera's location. Use appropriate power cables and adapters to connect the camera to the power source. If using batteries or solar panels, follow the manufacturer's instructions for installation.
4. Run cables: If your WiFi security camera requires a wired connection, run the necessary cables from the camera to your router or network switch. Conceal the cables as much as possible to maintain a clean and professional installation.
5. Connect to the network: Once the power supply and wiring are in place, connect the camera to your WiFi network. Follow the camera's instructions to establish a secure connection.
6. Test the camera: After installation, test the camera to ensure it is functioning properly. Check the video feed, adjust settings, and verify that the camera is capturing the desired area.
It is important to stay updated with the latest advancements in WiFi security camera technology. Newer models may offer wireless power options or improved wiring solutions, reducing the complexity of installation. Always refer to the manufacturer's instructions for specific guidance on power supply and wiring for your WiFi security cameras.


