How To Make Tripod ?
To make a tripod, you will need three sturdy and equal-length poles or sticks. Start by gathering the poles and removing any sharp edges or branches. Then, lay the poles on the ground in a triangle shape, with the ends meeting at a central point. Make sure the poles are evenly spaced apart. Next, tie the poles together at the central point using a strong rope or cord. You can use a simple knot or a more secure lashing technique to ensure stability. Once the poles are securely fastened together, stand the tripod upright and adjust the legs as needed to ensure balance. Your homemade tripod is now ready to be used for various purposes, such as supporting a camera, hanging a lantern, or even as a cooking stand.
1、 Choosing the right materials for a DIY tripod
Choosing the right materials for a DIY tripod is crucial to ensure stability and durability. While there are various materials that can be used, it is important to consider factors such as weight, strength, and cost.
One of the most common materials used for DIY tripods is aluminum. Aluminum is lightweight, affordable, and offers decent strength. It is widely available and easy to work with, making it a popular choice for DIY enthusiasts. However, it may not be as sturdy as other materials, especially for heavier camera setups.
Another option is carbon fiber, which is known for its high strength-to-weight ratio. Carbon fiber tripods are lightweight, yet incredibly strong and rigid. They are ideal for professional photographers who require stability and portability. However, carbon fiber tripods tend to be more expensive compared to aluminum ones.
For those looking for a budget-friendly option, PVC pipes can be used to construct a DIY tripod. PVC is lightweight, readily available, and inexpensive. However, it may not provide the same level of stability and durability as aluminum or carbon fiber.
In recent years, there has been a growing interest in using 3D-printed materials for DIY tripods. 3D-printed tripods offer customization options and can be tailored to specific camera setups. However, the strength and stability of 3D-printed tripods may vary depending on the quality of the printing material and technique used.
Ultimately, the choice of materials for a DIY tripod depends on individual needs and preferences. It is important to consider factors such as weight, strength, stability, and cost when selecting the right materials for your DIY project.
2、 Step-by-step guide to assembling a homemade tripod
Step-by-step guide to assembling a homemade tripod:
1. Gather the materials: To make a homemade tripod, you will need three sturdy and equal-length sticks or poles, a strong cord or rope, and a few small hooks or clips.
2. Prepare the sticks: Ensure that the sticks are of the same length and free from any sharp edges or splinters. You can smooth them out using sandpaper if necessary.
3. Determine the height: Decide how tall you want your tripod to be. Measure and mark the desired height on each stick.
4. Attach the sticks: Take the three sticks and tie them together at the top using a strong cord or rope. Make sure the knots are secure and tight.
5. Spread the legs: Spread the legs of the tripod outwards, forming a stable base. Adjust the angle of the legs to ensure stability on uneven surfaces.
6. Secure the legs: Attach small hooks or clips near the bottom of each leg. These will help keep the legs in place and prevent them from sliding or collapsing.
7. Test the stability: Gently shake the tripod to ensure it is stable and secure. Make any necessary adjustments to the knots or leg angles if needed.
8. Mount your camera or device: Once the tripod is assembled and stable, you can attach your camera or device to the top using a tripod mount or adapter.
It's important to note that while a homemade tripod can be a cost-effective solution, it may not provide the same level of stability and adjustability as a commercially available tripod. Additionally, homemade tripods may not be suitable for heavy or expensive equipment. Always exercise caution and consider the weight and value of your camera or device when using a homemade tripod.
3、 Adjusting and stabilizing your tripod for optimal use
Adjusting and stabilizing your tripod for optimal use is essential to ensure steady and sharp photographs or videos. Here's a step-by-step guide on how to make a tripod:
1. Extend the legs: Start by unlocking the leg locks and extending each leg to your desired height. Make sure all three legs are extended evenly to maintain stability.
2. Adjust the center column: If your tripod has a center column, adjust its height according to your needs. However, it's generally recommended to keep the center column as low as possible to minimize vibrations.
3. Level the tripod: Use the built-in bubble level or a separate leveling tool to ensure your tripod is perfectly level. This is crucial for capturing straight and balanced shots.
4. Secure the tripod head: Attach your camera or video head securely to the tripod using the appropriate mounting plate. Make sure it is tightened properly to avoid any accidental movement.
5. Balance the camera: Adjust the camera's position on the tripod head to achieve proper balance. This is particularly important when using heavy lenses or when shooting in windy conditions.
6. Stabilize the tripod: To further enhance stability, hang a weight or bag from the center hook of the tripod. This will help reduce vibrations caused by external factors like wind or accidental bumps.
7. Use a remote shutter release: Minimize camera shake by using a remote shutter release or the self-timer function on your camera. This prevents any movement caused by pressing the shutter button.
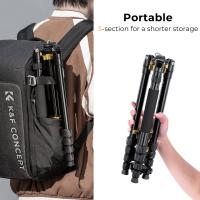
8. Consider the latest advancements: Tripods have evolved over time, and newer models often come with features like carbon fiber construction for lightweight yet sturdy support, adjustable leg angles for shooting on uneven terrain, and built-in stabilizers for added stability.
Remember, adjusting and stabilizing your tripod is crucial for capturing sharp and professional-looking images. Take the time to set it up correctly, and you'll be rewarded with better results in your photography or videography endeavors.
4、 Understanding different tripod head types and their functions
Understanding different tripod head types and their functions is essential for photographers and videographers looking to achieve stability and versatility in their shots. While tripods provide a stable base for cameras, the tripod head is what allows for precise positioning and control. Here, we will explore the various tripod head types and their functions.
1. Ball Head: This is the most common type of tripod head, featuring a ball and socket joint that allows for smooth and quick adjustments in any direction. It offers flexibility and ease of use, making it suitable for a wide range of photography genres.
2. Pan/Tilt Head: This type of head provides separate controls for panning (horizontal movement) and tilting (vertical movement). It offers precise control over composition and is particularly useful for landscape and architectural photography.
3. Gimbal Head: Primarily used for wildlife and sports photography, a gimbal head allows for smooth and balanced movement of heavy telephoto lenses. It provides stability and enables photographers to track fast-moving subjects with ease.
4. Fluid Head: Commonly used in video production, a fluid head utilizes a hydraulic system to provide smooth and controlled movements. It allows for precise panning and tilting, making it ideal for capturing cinematic shots.
5. Geared Head: This type of head features gears that allow for precise adjustments in multiple directions. It is commonly used in architectural and studio photography, where precise positioning is crucial.
6. Pistol Grip Head: With a handle that resembles a pistol grip, this head type offers quick and intuitive adjustments. It is popular among photographers who require speed and convenience, such as street and event photographers.
7. Three-Way Head: This head type provides separate controls for panning, tilting, and leveling. It offers precise adjustments and is commonly used in studio and product photography.
It is important to choose a tripod head that suits your specific needs and shooting style. Consider factors such as weight capacity, ease of use, and the type of photography or videography you engage in. Additionally, staying updated with the latest advancements in tripod head technology can help you make informed decisions when investing in equipment.
