How To Make Usb Endoscope Work Win7 ?
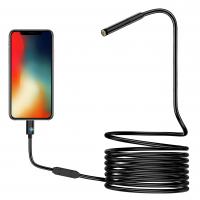
To make a USB endoscope work on Windows 7, you need to follow these steps:
1. Connect the USB endoscope to your computer's USB port.
2. Wait for Windows 7 to recognize the device and automatically install the necessary drivers. If the drivers are not automatically installed, you may need to download and install them manually from the manufacturer's website.
3. Once the drivers are installed, open the software or application that came with the USB endoscope.
4. In the software, select the USB endoscope as the video source.
5. Adjust any settings or preferences in the software, such as resolution or brightness, if needed.
6. Start using the USB endoscope by viewing the live video feed on your computer screen.
Note: The specific steps may vary depending on the brand and model of your USB endoscope. It is recommended to refer to the user manual or contact the manufacturer for detailed instructions.
1、 Check compatibility and drivers for USB endoscope on Win7.
To make a USB endoscope work on Windows 7, you need to ensure compatibility and install the necessary drivers. Here's a step-by-step guide to help you get started:
1. Check compatibility: Before purchasing a USB endoscope, make sure it is compatible with Windows 7. Check the product specifications or contact the manufacturer to confirm compatibility.
2. Install drivers: Most USB endoscopes require specific drivers to function properly. These drivers enable the computer to recognize and communicate with the endoscope. Visit the manufacturer's website and search for the latest drivers compatible with Windows 7. Download and install the drivers according to the provided instructions.
3. Connect the endoscope: Once the drivers are installed, connect the USB endoscope to an available USB port on your computer. Windows 7 should automatically detect the device and install any additional drivers if required.
4. Launch the software: Some USB endoscopes come with their own software for capturing and viewing images or videos. If your endoscope includes software, launch it and follow the instructions to start using the device. If not, you can use third-party software like VLC media player or AMCap to view the endoscope's feed.
5. Test and adjust settings: After connecting the endoscope and launching the software, test the device by inserting it into the desired area and checking if the feed is displayed correctly. Adjust the settings within the software to optimize the image quality, brightness, and other parameters as needed.
It's important to note that technology and compatibility can change over time. Therefore, it's always recommended to refer to the latest information and instructions provided by the manufacturer or consult online forums for any specific issues or updates related to using a USB endoscope on Windows 7.
2、 Install necessary software for USB endoscope on Win7.
To make a USB endoscope work on Windows 7, you need to install the necessary software. Here are the steps to do so:
1. Start by connecting the USB endoscope to your computer's USB port. Make sure it is securely plugged in.
2. Once connected, Windows 7 should automatically detect the device and attempt to install the necessary drivers. However, in some cases, it may fail to do so.
3. If Windows fails to install the drivers automatically, you will need to manually install them. To do this, you will need to visit the manufacturer's website and download the latest drivers for your specific USB endoscope model.
4. Once you have downloaded the drivers, locate the file on your computer and double-click on it to start the installation process. Follow the on-screen instructions to complete the installation.
5. After the drivers are installed, you may need to restart your computer for the changes to take effect.
6. Once your computer has restarted, open the software that came with your USB endoscope. This software will allow you to view and capture images or videos from the endoscope.
7. Make sure the USB endoscope is properly connected and turned on. The software should detect the device and display the live feed from the endoscope.
8. You can now use the USB endoscope to inspect hard-to-reach areas, capture images or videos, and perform various tasks that require visual inspection.
It is important to note that the steps may vary slightly depending on the specific USB endoscope model and the software provided by the manufacturer. Always refer to the user manual or documentation that came with your USB endoscope for detailed instructions.
Additionally, it is recommended to keep your operating system and drivers up to date to ensure compatibility and optimal performance.
3、 Connect USB endoscope to Win7 and ensure proper connection.
To make a USB endoscope work on Windows 7, you need to follow a few steps to ensure a proper connection and functionality. Here's a guide on how to do it:
1. Plug in the USB endoscope: Connect the USB endoscope to your computer's USB port. Make sure the endoscope is properly inserted and secured.
2. Install the necessary drivers: In most cases, Windows 7 will automatically detect and install the required drivers for the USB endoscope. However, if it doesn't, you may need to manually install the drivers. Check the manufacturer's website for the latest drivers compatible with Windows 7 and download them. Once downloaded, run the installer and follow the on-screen instructions to install the drivers.
3. Launch the endoscope software: After the drivers are installed, you'll need to launch the software that came with the USB endoscope. This software allows you to view the live feed from the endoscope and capture images or videos. If the endoscope didn't come with any software, you can try using third-party software like VLC media player or AMCap.
4. Check the connection: Once the software is launched, make sure the USB endoscope is properly connected and recognized by the computer. You should see a live feed from the endoscope on your screen. If not, try reconnecting the endoscope or restarting your computer.
5. Adjust settings: Depending on the software you're using, you may have options to adjust the brightness, contrast, or other settings of the endoscope. Experiment with these settings to get the best image quality.
It's important to note that the steps may vary slightly depending on the specific USB endoscope model and software you're using. Always refer to the manufacturer's instructions for the most accurate and up-to-date information.
In conclusion, connecting a USB endoscope to Windows 7 requires plugging in the endoscope, installing the necessary drivers, launching the software, checking the connection, and adjusting the settings as needed. By following these steps, you should be able to make your USB endoscope work on Windows 7 and ensure a proper connection.
4、 Adjust settings and permissions for USB endoscope on Win7.
To make a USB endoscope work on Windows 7, you need to adjust the settings and permissions to ensure proper functionality. Here's a step-by-step guide to help you get started:
1. Connect the USB endoscope to your computer's USB port. Make sure it is securely plugged in.
2. Open the "Device Manager" by right-clicking on the "Computer" icon on your desktop and selecting "Manage." In the Computer Management window, click on "Device Manager" in the left-hand pane.
3. Look for the USB endoscope under the "Imaging Devices" or "Cameras" category. It may be listed as a generic device or with a specific name. Right-click on it and select "Properties."
4. In the Properties window, go to the "Driver" tab and click on "Update Driver." Follow the on-screen instructions to search for and install the latest driver for your USB endoscope. If you have the driver installation CD that came with the endoscope, you can also use it to install the driver.
5. Once the driver is installed, go to the "Permissions" tab in the Properties window. Make sure that the "Allow" option is selected for all the listed permissions. This will ensure that the USB endoscope has the necessary access to function properly.
6. Click "OK" to save the changes and exit the Properties window.
7. Open the software or application that came with your USB endoscope. It should now be able to detect and display the live feed from the endoscope.
It's important to note that the steps may vary slightly depending on the specific model and brand of your USB endoscope. Always refer to the user manual or manufacturer's website for detailed instructions and the latest software updates.
In addition to adjusting settings and permissions, it's also recommended to keep your Windows 7 operating system up to date with the latest updates and patches. This will ensure compatibility with newer devices and improve overall system security and stability.








There are no comments for this blog.