How To Record With Wireless Microphone ?
To record with a wireless microphone, you will need a few key components. First, ensure that your wireless microphone is properly charged or has fresh batteries. Next, connect the wireless receiver to your recording device, such as a camera, audio recorder, or computer. Make sure the receiver is turned on and set to the same frequency as the microphone. Position the microphone close to the sound source for optimal audio quality. Finally, start recording on your device and monitor the audio levels to ensure proper recording levels. Remember to test the setup beforehand to ensure everything is working correctly.
1、 Choosing the Right Wireless Microphone System for Recording
Choosing the Right Wireless Microphone System for Recording
Recording with a wireless microphone can provide you with the freedom to move around while capturing high-quality audio. However, it is essential to choose the right wireless microphone system for recording to ensure optimal performance and reliability. Here are some key factors to consider when selecting a wireless microphone system for recording:
1. Frequency Range: Check the frequency range of the wireless microphone system to ensure it is compatible with your recording environment. It is crucial to choose a system that operates within a frequency range that is not congested with other wireless devices to avoid interference.
2. Signal Quality: Look for a wireless microphone system that offers excellent signal quality. This includes low noise levels, minimal dropouts, and a strong and stable signal transmission. Digital wireless systems are becoming increasingly popular due to their superior signal quality and resistance to interference.
3. Range and Coverage: Consider the range and coverage of the wireless microphone system. If you need to record in larger spaces or outdoor environments, choose a system with a longer range to ensure reliable signal transmission.
4. Battery Life: Check the battery life of the wireless microphone system, especially if you plan on recording for extended periods. Look for systems with long-lasting batteries or the option to use rechargeable batteries.
5. Compatibility: Ensure that the wireless microphone system is compatible with your recording equipment. Check if it uses the same connectors and if it can be easily integrated into your existing setup.
6. User-Friendly Features: Look for wireless microphone systems that offer user-friendly features such as easy setup, intuitive controls, and clear display screens. These features can make the recording process more efficient and convenient.
7. Budget: Consider your budget when choosing a wireless microphone system. While it is important to invest in a high-quality system, there are options available at various price points to suit different budgets.
In conclusion, selecting the right wireless microphone system for recording involves considering factors such as frequency range, signal quality, range and coverage, battery life, compatibility, user-friendly features, and budget. By carefully evaluating these factors, you can ensure that you choose a wireless microphone system that meets your recording needs and delivers excellent audio quality.

2、 Setting Up and Pairing the Wireless Microphone with Receiver
To record with a wireless microphone, you need to first set up and pair the microphone with the receiver. Here is a step-by-step guide on how to do it:
1. Choose the right wireless microphone: There are various types of wireless microphones available, such as handheld, lavalier, or headset microphones. Select the one that suits your recording needs.
2. Check the frequency compatibility: Ensure that the wireless microphone and receiver operate on compatible frequencies. This is crucial to avoid interference and ensure a clear audio signal.
3. Power on the microphone and receiver: Insert fresh batteries into both the microphone and receiver. Turn them on and make sure they are functioning properly.
4. Set the receiver to the correct channel: Most wireless microphone systems have multiple channels to choose from. Select a channel that is not being used by other devices in the vicinity to prevent interference.
5. Pair the microphone with the receiver: Follow the manufacturer's instructions to pair the microphone with the receiver. This usually involves pressing a sync button on both devices or entering a specific code.
6. Test the audio signal: Speak or sing into the microphone and check if the audio is being received by the receiver. Adjust the microphone's volume if necessary.
7. Connect the receiver to your recording device: Depending on your setup, you may need to connect the receiver to a mixer, audio interface, or directly to your recording device using an appropriate cable.
8. Monitor the audio: Use headphones or speakers connected to your recording device to monitor the audio signal and ensure it is being recorded properly.
It is important to note that technology is constantly evolving, and new wireless microphone systems may have additional features or different setup procedures. Always refer to the manufacturer's instructions for the specific model you are using to ensure the best recording experience.
3、 Adjusting Microphone Placement and Levels for Optimal Recording
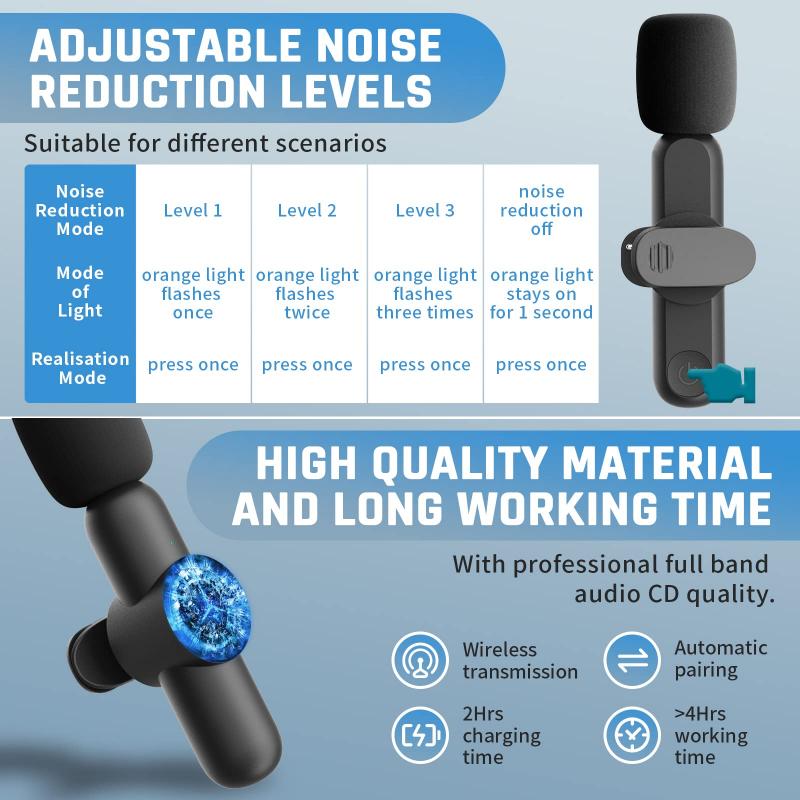
To record with a wireless microphone, there are a few key steps you need to follow. First and foremost, it is important to adjust the microphone placement and levels for optimal recording. This will ensure that you capture clear and high-quality audio.
1. Choose the right microphone: Select a wireless microphone that suits your recording needs. Consider factors such as the type of recording (vocal, instrumental, etc.), the environment, and the range of the microphone.
2. Set up the receiver: Connect the receiver to your recording device or sound system. Make sure it is properly powered and that the transmitter and receiver are on the same frequency.
3. Adjust microphone placement: Position the microphone at an appropriate distance from the sound source. Experiment with different angles and distances to find the best placement for optimal sound capture. Avoid placing the microphone too close to avoid distortion or too far to prevent a weak signal.
4. Check microphone levels: Use the gain control on the receiver or recording device to adjust the microphone levels. Start with a low gain setting and gradually increase it until you achieve a balanced and clear sound. Be cautious not to set the levels too high, as it can result in clipping or distortion.
5. Monitor the audio: Use headphones or speakers to monitor the audio while recording. This will help you identify any issues with the sound quality or levels and make necessary adjustments in real-time.
In recent years, advancements in wireless microphone technology have led to improved sound quality, increased range, and reduced interference. Some wireless microphones now offer automatic frequency selection and interference detection, making the setup process easier and more efficient.
Remember, it is essential to test and adjust the microphone placement and levels before recording to ensure the best possible sound quality. Experiment with different settings and techniques to find what works best for your specific recording needs.
4、 Troubleshooting Wireless Microphone Interference or Signal Dropouts
Troubleshooting Wireless Microphone Interference or Signal Dropouts
Wireless microphones are a convenient tool for recording audio without the hassle of cables. However, they can sometimes be prone to interference or signal dropouts, which can negatively impact the recording quality. Here are some troubleshooting steps to help you overcome these issues and ensure a smooth recording experience.
1. Check for frequency conflicts: Wireless microphones operate on specific frequencies, and if there are other devices nearby using the same frequency range, it can cause interference. Use a frequency scanner or spectrum analyzer to identify any conflicts and switch to a clear frequency.
2. Keep distance from potential interference sources: Certain electronic devices like Wi-Fi routers, cell phones, or even fluorescent lights can cause interference. Maintain a safe distance from these sources to minimize signal dropouts.
3. Use diversity receivers: Diversity receivers have multiple antennas that help capture the strongest signal and reduce the chances of dropouts. Consider investing in a diversity receiver system for improved performance.
4. Ensure line-of-sight between transmitter and receiver: Obstacles like walls or other physical barriers can weaken the wireless signal. Position the transmitter and receiver in a way that allows for a clear line-of-sight connection.
5. Check battery levels: Low battery levels can cause signal dropouts. Always use fresh batteries or ensure that rechargeable batteries are fully charged before recording.
6. Update firmware: Some wireless microphone systems have firmware updates available that can improve performance and address any known issues. Check the manufacturer's website for any available updates and install them as necessary.
7. Consider using digital wireless systems: Digital wireless systems are less susceptible to interference and offer better signal stability compared to analog systems. They utilize advanced encryption techniques and frequency hopping technology to ensure a reliable connection.
It's important to note that wireless microphone technology is constantly evolving, and new advancements are being made to address interference and signal dropout issues. Staying updated with the latest developments in wireless microphone technology can help you make informed decisions and improve your recording experience.












There are no comments for this blog.