How To Set Camera Stand ?
To set up a camera stand, first, unfold the legs of the stand and ensure they are securely locked in place. Adjust the height of the stand by loosening the locking mechanism and extending or retracting the legs as needed. Once the desired height is achieved, tighten the locking mechanism to secure the legs in place. Attach the camera to the stand by screwing it onto the mounting plate or head of the stand. Make sure the camera is securely attached. Adjust the angle and position of the camera by loosening the knobs or levers on the stand's head and moving it accordingly. Once the camera is positioned as desired, tighten the knobs or levers to lock it in place. Test the stability of the stand by gently shaking it to ensure it is secure. Make any necessary adjustments to ensure stability. Finally, double-check that the camera is level and aligned correctly before starting to use it.
1、 Adjusting the height and angle of the camera stand
To set up a camera stand, you need to follow a few steps to ensure that it is properly adjusted for the desired height and angle. Here's a guide on how to set up a camera stand:
1. Choose a stable location: Find a flat and stable surface to place your camera stand. This will ensure that it remains steady during use and prevents any accidental falls or movements.
2. Extend the legs: Most camera stands have adjustable legs that can be extended or retracted. Start by loosening the leg locks and extending the legs to the desired height. Make sure all the legs are extended evenly to maintain stability.
3. Lock the legs: Once you have set the desired height, tighten the leg locks to secure the legs in place. This will prevent the stand from collapsing or wobbling during use.
4. Adjust the center column: Many camera stands have a center column that can be raised or lowered to further adjust the height. Loosen the center column lock and adjust it to the desired height. Once set, tighten the lock to secure the column in place.
5. Attach the camera: Most camera stands have a mounting plate or head where you can attach your camera. Make sure to securely attach the camera to the stand using the appropriate mounting mechanism.
6. Adjust the angle: To adjust the angle of the camera, loosen the tilt lock and tilt the camera head up or down as needed. Once you have set the desired angle, tighten the lock to secure the camera in place.
7. Fine-tune the adjustments: Once the camera is mounted and the height and angle are set, you can make any necessary fine-tuning adjustments. This may include adjusting the tripod legs slightly or repositioning the camera head for the perfect shot.
Remember to always check the stability of the camera stand before leaving it unattended. Additionally, consider using a remote shutter release or a self-timer function to minimize any camera shake when taking photos.
2、 Securing the camera to the stand
Securing the camera to the stand is an essential step in setting up a camera stand. It ensures that the camera remains stable and steady during use, preventing any unwanted movement or vibrations that could affect the quality of the footage or images captured. Here's a step-by-step guide on how to securely attach your camera to a stand:
1. Choose the appropriate camera mount: Depending on the type of camera you have, you may need to use a specific mount or adapter to attach it to the stand. Make sure you have the correct mount that is compatible with your camera model.
2. Locate the mounting screw: Most cameras have a threaded hole on the bottom for attaching to a stand. This is usually a standard 1/4-inch screw size. Locate this screw hole on your camera.
3. Align the camera with the stand: Place the camera on the stand and align the mounting screw hole with the screw hole on the stand's mounting plate. Ensure that the camera is facing the desired direction.
4. Insert the mounting screw: Take the mounting screw and insert it into the camera's screw hole. Use a coin or screwdriver to tighten it securely. Make sure it is tightened enough to hold the camera firmly in place but avoid overtightening to prevent damage.
5. Check stability: Once the camera is attached, gently shake the stand to check if the camera is securely fastened. If there is any movement or wobbling, tighten the mounting screw further.
6. Adjust the camera angle: Most camera stands allow for adjustments in height, tilt, and rotation. Use the stand's adjustment knobs or levers to position the camera at the desired angle and lock it in place.
By following these steps, you can securely attach your camera to a stand and ensure that it remains stable throughout your photography or videography session. Remember to always double-check the tightness of the mounting screw before starting to use the camera to avoid any accidents or damage.
3、 Balancing the weight distribution on the camera stand
To set up a camera stand properly, it is important to ensure that the weight distribution is balanced. This will help prevent the stand from tipping over and ensure stability while capturing images or videos. Here's a step-by-step guide on how to balance the weight distribution on a camera stand:
1. Start by attaching the camera to the stand's mounting plate. Make sure it is securely fastened to avoid any accidents.
2. Adjust the height of the stand according to your preference. Most camera stands have adjustable legs that can be extended or retracted. Ensure that all legs are at the same height to maintain stability.
3. Position the camera stand on a flat and stable surface. Avoid placing it on uneven ground or surfaces that may cause it to wobble.
4. Once the camera stand is set up, check the bubble level on the stand's head. This will help you determine if the stand is level or if adjustments are needed.
5. To balance the weight distribution, adjust the position of the camera on the mounting plate. Slide it forward or backward until you find the center of gravity. This will help distribute the weight evenly and prevent the stand from tipping over.
6. If your camera stand has a counterbalance system, adjust it accordingly. This will help offset the weight of the camera and make it easier to tilt or pan smoothly.
7. Double-check the stability of the camera stand by gently pushing it from different angles. If it feels wobbly or unsteady, readjust the weight distribution until it feels secure.
It is important to note that different camera stands may have specific instructions or features that require additional steps. Always refer to the manufacturer's guidelines for your specific camera stand model.
In recent years, advancements in camera stand technology have led to the development of more innovative features. Some camera stands now come with built-in electronic leveling systems that automatically balance the weight distribution. These systems use sensors to detect any imbalance and make real-time adjustments to ensure stability. Additionally, some camera stands have motorized heads that can be controlled remotely, allowing for precise movements and adjustments.
Overall, balancing the weight distribution on a camera stand is crucial for stability and safety. By following these steps and considering the latest advancements in camera stand technology, you can ensure a secure and reliable setup for your photography or videography needs.
4、 Using additional accessories for stability and flexibility
To set up a camera stand, there are a few steps you can follow. However, to enhance stability and flexibility, you can also use additional accessories. Here's how you can do it:
1. Choose a suitable location: Find a flat and stable surface to place your camera stand. This will ensure that your shots are steady and free from unwanted movements.
2. Extend the legs: Most camera stands come with adjustable legs. Extend them to the desired height, making sure they are securely locked in place. This will provide stability and prevent the stand from toppling over.
3. Attach the camera: Depending on the type of camera stand you have, there may be different ways to attach your camera. The most common method is to use a quick-release plate. Attach the plate to the bottom of your camera and then slide it into the mount on the stand. Make sure it is securely fastened to avoid any accidents.
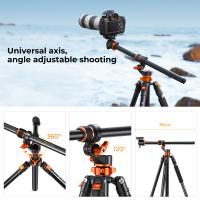
4. Adjust the angle: Most camera stands allow you to adjust the angle of the camera. This is useful for capturing shots from different perspectives. Use the knobs or levers on the stand to tilt or pan the camera as desired.
To enhance stability and flexibility, you can consider using additional accessories:
1. Tripod weights: If you are shooting in windy conditions or on uneven surfaces, tripod weights can help stabilize the stand. These weights can be attached to the legs or center column of the stand, providing extra stability.
2. Ball head mount: A ball head mount allows for smooth and precise adjustments of the camera angle. It offers greater flexibility compared to traditional pan-tilt heads, allowing you to quickly change the camera's position.
3. Gimbal stabilizer: For videography or capturing smooth panning shots, a gimbal stabilizer can be a valuable accessory. It helps eliminate camera shake and provides stability while moving.
4. Rubber feet or spikes: Depending on the surface you are shooting on, you can use rubber feet or spikes to improve stability. Rubber feet are ideal for indoor use, while spikes are useful for outdoor shooting on soft ground.
By using these additional accessories, you can enhance the stability and flexibility of your camera stand, allowing you to capture high-quality shots from various angles and in different conditions.










There are no comments for this blog.