How To Set Wireless Microphone ?
To set up a wireless microphone, first, ensure that the microphone and receiver are both turned on and have fresh batteries. Then, connect the receiver to the sound system using an audio cable. Next, use the controls on the receiver to select the appropriate frequency channel for the microphone. Finally, turn on the microphone and test it to ensure that it is working properly. Adjust the volume levels as needed to achieve the desired sound quality.
1、 Selecting the right wireless microphone system
How to set wireless microphone:
Setting up a wireless microphone system can be a bit tricky, but with the right steps, it can be done easily. Here are the steps to set up a wireless microphone system:
Step 1: Choose the right wireless microphone system. There are different types of wireless microphone systems available in the market, so it is important to choose the one that suits your needs. Consider factors such as range, frequency, and compatibility with your equipment.
Step 2: Connect the receiver to your sound system. The receiver is the device that receives the signal from the wireless microphone. Connect the receiver to your sound system using the appropriate cables.
Step 3: Turn on the receiver and microphone. Make sure that both the receiver and microphone are turned on and that they are on the same frequency.
Step 4: Test the microphone. Speak into the microphone and check if the sound is coming through the sound system. Adjust the volume and other settings as needed.
Step 5: Secure the microphone. Make sure that the microphone is securely attached to the person using it. This will prevent it from falling off or getting damaged.
Selecting the right wireless microphone system:
When selecting a wireless microphone system, it is important to consider the following factors:
1. Range: The range of the wireless microphone system is an important factor to consider. If you need to move around a lot while using the microphone, you will need a system with a longer range.
2. Frequency: The frequency of the wireless microphone system is also important. Make sure that the system you choose is compatible with your equipment and that it does not interfere with other wireless devices in the area.
3. Battery life: The battery life of the wireless microphone system is also important. Make sure that the system you choose has a long battery life so that you do not have to replace the batteries frequently.
4. Durability: The durability of the wireless microphone system is also important. Make sure that the system you choose is sturdy and can withstand regular use.
5. Price: Finally, consider the price of the wireless microphone system. Choose a system that fits your budget and offers good value for money.
In conclusion, setting up a wireless microphone system requires careful consideration of the right equipment and proper setup. When selecting a wireless microphone system, consider factors such as range, frequency, battery life, durability, and price.

2、 Connecting the wireless microphone receiver
How to set up a wireless microphone is a common question for those who are new to using this type of audio equipment. The first step is to ensure that you have all the necessary components, including the wireless microphone transmitter, receiver, and any cables or adapters required for your specific setup.
Once you have all the components, the next step is to connect the wireless microphone receiver to your audio system. This can typically be done using a standard audio cable, such as an XLR or 1/4 inch cable. It is important to ensure that the receiver is connected to the correct input on your audio system, as this will ensure that the microphone signal is properly routed.
Once the receiver is connected, you can then turn on the wireless microphone transmitter and ensure that it is properly synced with the receiver. This may involve pressing a button on the transmitter or receiver to initiate the syncing process.
Finally, it is important to test the wireless microphone to ensure that it is working properly. This can be done by speaking into the microphone and checking that the audio signal is being properly transmitted to your audio system.
In terms of the latest point of view, it is worth noting that many modern wireless microphones now come with advanced features such as automatic frequency selection and interference detection. These features can help to ensure that your wireless microphone setup is reliable and free from interference, even in crowded or noisy environments.

3、 Pairing the wireless microphone transmitter
Pairing the wireless microphone transmitter is an essential step in setting up a wireless microphone system. The process involves synchronizing the transmitter with the receiver to ensure that the audio signal is transmitted wirelessly without any interference or dropouts. Here are the steps to follow when pairing a wireless microphone transmitter:
1. Turn on the receiver and the transmitter: Ensure that both the receiver and the transmitter are turned on and have fresh batteries.
2. Set the frequency: Set the frequency of the transmitter to match that of the receiver. This is usually done by selecting a channel on the transmitter that corresponds to the channel on the receiver.
3. Sync the transmitter and receiver: Press the sync button on the receiver and the transmitter simultaneously. This will initiate the pairing process, and the two devices will sync automatically.
4. Test the microphone: Once the pairing process is complete, test the microphone to ensure that it is working correctly. Speak into the microphone and check if the audio is being transmitted wirelessly without any interference or dropouts.
It is worth noting that some wireless microphone systems come with automatic pairing features that eliminate the need for manual syncing. These systems use advanced technologies such as infrared or Bluetooth to pair the transmitter and receiver automatically. Therefore, it is essential to read the user manual carefully to understand the pairing process for your specific wireless microphone system.
4、 Adjusting microphone settings for optimal sound quality
How to set wireless microphone:
1. Turn on the wireless microphone and receiver: Make sure both the wireless microphone and receiver are turned on and have fresh batteries.
2. Connect the receiver to the sound system: Connect the receiver to the sound system using the appropriate cables.
3. Pair the microphone and receiver: Follow the manufacturer's instructions to pair the microphone and receiver. This usually involves pressing a button on both devices.
4. Test the microphone: Test the microphone by speaking into it and adjusting the volume on the receiver until you get the desired sound level.
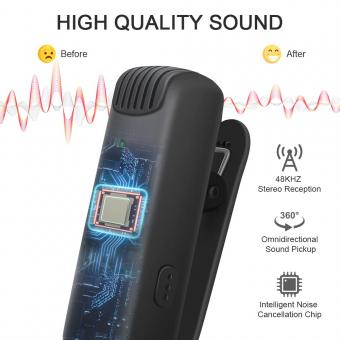
5. Adjust the microphone sensitivity: Most wireless microphones have a sensitivity setting that can be adjusted to optimize sound quality. Experiment with different settings until you find the one that works best for your situation.
Adjusting microphone settings for optimal sound quality:
1. Position the microphone correctly: The position of the microphone can have a big impact on sound quality. Make sure the microphone is positioned correctly and is pointing towards the sound source.
2. Adjust the gain: The gain controls the sensitivity of the microphone. Adjust the gain until you get the desired sound level without any distortion.
3. Use a windscreen: If you're recording outside or in a windy environment, use a windscreen to reduce wind noise.
4. Use a pop filter: A pop filter can help reduce popping sounds when recording vocals.
5. Use EQ: Use EQ to adjust the frequency response of the microphone to optimize sound quality.
6. Use compression: Compression can help even out the volume of the recording and make it sound more professional.
7. Test and adjust: Test the microphone in different environments and adjust the settings as needed to get the best sound quality.









There are no comments for this blog.