How To Setup Wifi Ip Camera ?
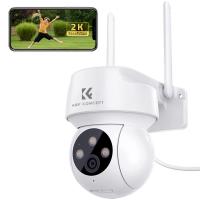
To set up a WiFi IP camera, first, ensure that your camera is compatible with WiFi connectivity. Then, follow these general steps:
1. Power on the camera and connect it to a power source.
2. Install the camera's mobile app or software on your smartphone or computer.
3. Open the app/software and create an account if required.
4. Connect your smartphone or computer to the same WiFi network that you want the camera to connect to.
5. Use the app/software to scan for available cameras on the network.
6. Select your camera from the list and follow the on-screen instructions to connect it to the WiFi network.
7. Provide the necessary WiFi network credentials (SSID and password) when prompted.
8. Wait for the camera to establish a connection with the WiFi network.
9. Once connected, you can access and control the camera remotely through the app/software.
Note: The specific steps may vary depending on the brand and model of your WiFi IP camera. It is recommended to refer to the camera's user manual or manufacturer's website for detailed instructions.
1、 Choosing the right WiFi IP camera for your needs
Choosing the right WiFi IP camera for your needs is crucial to ensure the security and surveillance of your home or office. With the advancements in technology, there are numerous options available in the market, each offering different features and capabilities. Here are some key points to consider when setting up a WiFi IP camera:
1. Resolution: Look for a camera with high-resolution capabilities, such as 1080p or even 4K, to ensure clear and detailed footage.
2. Field of view: Consider the camera's field of view, which determines the area it can cover. A wider field of view is beneficial for larger spaces.
3. Night vision: Opt for a camera with infrared LEDs for clear visibility in low-light conditions or at night.
4. Two-way audio: Some cameras offer two-way audio, allowing you to communicate with people on the other end. This can be useful for monitoring children or pets.
5. Motion detection: Look for cameras with motion detection capabilities, as they can send alerts to your smartphone or email when any movement is detected.
6. Cloud storage: Consider cameras that offer cloud storage options for easy access to recorded footage from anywhere.
7. Mobile app: Ensure that the camera is compatible with a mobile app, allowing you to monitor the feed remotely.
Setting up a WiFi IP camera involves a few steps. First, connect the camera to a power source and ensure it is within range of your WiFi router. Download the camera's mobile app and follow the instructions to connect it to your WiFi network. Once connected, you can customize the camera's settings, such as motion detection sensitivity and recording preferences.
It is important to note that security should be a top priority when setting up a WiFi IP camera. Change the default username and password to a strong, unique combination, and regularly update the camera's firmware to protect against potential vulnerabilities.
In conclusion, choosing the right WiFi IP camera and following the proper setup process is essential for effective surveillance. Consider your specific needs and the latest advancements in technology to make an informed decision.
2、 Connecting the camera to your WiFi network
To set up a WiFi IP camera, follow these steps:
1. Choose a suitable location: Select a location for your camera that provides a good view of the area you want to monitor. Ensure that it is within range of your WiFi network.
2. Power on the camera: Plug in the camera and connect it to a power source. Some cameras may require you to insert batteries or charge them before use.
3. Install the camera app: Download the camera's dedicated app on your smartphone or tablet. Most cameras have their own apps that allow you to control and view the camera's feed.
4. Connect the camera to your WiFi network: Open the app and follow the on-screen instructions to connect the camera to your WiFi network. This usually involves selecting your network from a list and entering the password.
5. Position the camera: Once connected, position the camera in the desired location. Adjust the angle and focus to ensure optimal coverage.
6. Test the connection: Check if the camera is successfully connected to your WiFi network by viewing the camera's feed on your smartphone or tablet. Make sure the video quality is satisfactory and that you can access the camera remotely.
7. Configure additional settings: Depending on the camera model, you may have additional settings to configure, such as motion detection, alerts, or recording options. Explore the app's settings to customize the camera according to your preferences.
It's worth noting that the latest WiFi IP cameras often come with advanced features like two-way audio, night vision, and cloud storage options. These features can enhance the camera's functionality and provide added convenience and security.
3、 Configuring the camera's IP address and network settings
To set up a WiFi IP camera, the first step is to configure the camera's IP address and network settings. This process may vary slightly depending on the specific camera model, but the general steps remain the same.
1. Connect the camera to your router: Use an Ethernet cable to connect the camera to your router. Ensure that the camera is powered on.
2. Access the camera's settings: Open a web browser on a computer connected to the same network as the camera. Enter the camera's IP address in the browser's address bar. This IP address can usually be found in the camera's user manual or on the camera itself.
3. Log in to the camera's interface: Enter the camera's username and password to access its settings. If you haven't changed these credentials, the default username and password can typically be found in the user manual.
4. Configure the network settings: Navigate to the network settings section of the camera's interface. Here, you can set the camera's IP address, subnet mask, default gateway, and DNS server. You can choose to assign a static IP address or use DHCP to automatically obtain an IP address from your router.
5. Connect to WiFi: If your camera supports WiFi, navigate to the wireless settings section and select your WiFi network. Enter the network password to establish a wireless connection.
6. Save and apply the settings: Once you have configured the network settings, save the changes and apply them. The camera will restart and connect to the network using the new settings.
7. Disconnect the Ethernet cable: After the camera has successfully connected to the WiFi network, disconnect the Ethernet cable from the camera and router.
It's important to note that the specific steps may vary depending on the camera model and manufacturer. Always refer to the camera's user manual for detailed instructions. Additionally, it's recommended to keep the camera's firmware up to date to ensure optimal performance and security.
4、 Setting up remote access to view the camera's feed
To set up a WiFi IP camera, follow these steps:
1. Choose a suitable location: Select a location where you want to install the camera. Ensure it has a power outlet nearby and a stable WiFi signal.
2. Connect the camera to power: Plug the camera into a power outlet using the provided power adapter. Make sure it is receiving power and turned on.
3. Connect the camera to your WiFi network: Most WiFi IP cameras have a setup wizard that guides you through the process. Use your smartphone or computer to connect to the camera's WiFi network (usually named after the camera's brand). Open a web browser and enter the camera's IP address to access the setup wizard. Follow the on-screen instructions to connect the camera to your home WiFi network.
4. Install the camera's software: Some cameras require you to install specific software on your computer or smartphone to access the camera's feed remotely. Follow the manufacturer's instructions to download and install the software.
5. Configure remote access: Once the camera is connected to your WiFi network, you can set up remote access to view the camera's feed from anywhere. This typically involves creating an account with the camera's manufacturer and configuring the camera's settings to enable remote access. Follow the manufacturer's instructions to complete this step.
6. Test the remote access: After setting up remote access, use a different network (such as your mobile data) to ensure you can view the camera's feed from outside your home network. Open the camera's software or app, log in to your account, and check if you can see the live feed.
It's important to note that the specific steps may vary depending on the brand and model of your WiFi IP camera. Always refer to the manufacturer's instructions for detailed guidance.
In the latest point of view, many WiFi IP cameras now offer simplified setup processes, such as QR code scanning or automatic network detection, making the installation and configuration even easier. Additionally, some cameras also support voice assistants like Amazon Alexa or Google Assistant, allowing you to control and view the camera's feed using voice commands.
