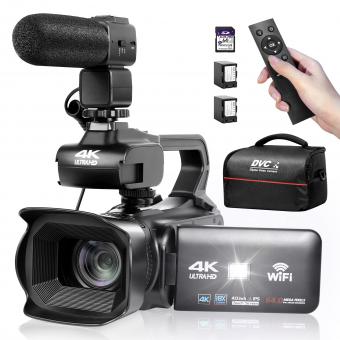
How To Use Camcorder As Webcam Using Hdmi ?
To use a camcorder as a webcam using HDMI, you will need an HDMI capture card or an HDMI-to-USB video capture device. Connect the HDMI output of your camcorder to the HDMI input of the capture card or device. Then, connect the capture card or device to your computer via USB. Install any necessary drivers or software for the capture card or device. Once everything is connected and set up, you can select the camcorder as your webcam in your video conferencing or streaming software. Adjust the settings and preferences as needed, and you should be able to use your camcorder as a webcam for high-quality video capture.
1、 Connecting camcorder to computer via HDMI for webcam functionality.
To use a camcorder as a webcam using HDMI, you will need a few things:
1. Camcorder with HDMI output: Ensure that your camcorder has an HDMI output port. Most modern camcorders have this feature.
2. HDMI cable: Get an HDMI cable that matches the HDMI output port on your camcorder and the HDMI input port on your computer. Make sure it is long enough to reach from your camcorder to your computer.
3. HDMI capture card: You will need an HDMI capture card to connect your camcorder to your computer. This device converts the HDMI signal from your camcorder into a format that your computer can recognize as a webcam.
4. Software: Install software that allows you to use your camcorder as a webcam. Many video conferencing apps and streaming platforms have built-in webcam functionality. You may also need to install drivers for your HDMI capture card.
Once you have all the necessary equipment, follow these steps:
1. Connect one end of the HDMI cable to the HDMI output port on your camcorder and the other end to the HDMI input port on your HDMI capture card.
2. Connect the HDMI capture card to your computer via USB.
3. Turn on your camcorder and set it to the appropriate mode for video output.
4. Open the software you want to use for webcam functionality and select your camcorder as the video source.
5. Adjust the settings in the software to optimize the video quality and audio input from your camcorder.
6. Start using your camcorder as a webcam for video conferencing, live streaming, or any other application that requires webcam functionality.
It's worth noting that some camcorders may have limitations when used as webcams, such as limited battery life or overheating issues with prolonged use. Additionally, the quality of the video may vary depending on the capabilities of your camcorder and HDMI capture card.
2、 Configuring camcorder settings for webcam use through HDMI connection.
To use a camcorder as a webcam using an HDMI connection, you will need to follow a few steps:
1. Check compatibility: Ensure that your camcorder supports HDMI output and has the capability to function as a webcam. Not all camcorders have this feature, so refer to your camcorder's user manual or manufacturer's website for information.
2. Connect the camcorder: Connect one end of the HDMI cable to the HDMI output port on your camcorder and the other end to the HDMI input port on your computer or laptop. Make sure both devices are powered on.
3. Configure camcorder settings: Access the settings menu on your camcorder and navigate to the HDMI output settings. Select the option to enable HDMI output for webcam use. The exact steps may vary depending on the camcorder model, so refer to the user manual for specific instructions.
4. Set up video conferencing software: Install and open the video conferencing software of your choice on your computer. Go to the settings or preferences menu within the software and select the camcorder as the video input device. The software should detect the camcorder as a webcam.
5. Adjust settings: Depending on the software, you may have additional options to adjust video quality, resolution, and other settings. Experiment with these settings to achieve the desired video output.
It's important to note that not all camcorders are designed to function as webcams, so the availability of this feature may vary. Additionally, some camcorders may require specific drivers or software to be installed on your computer for proper functionality. Always refer to the user manual or manufacturer's website for the most up-to-date information and instructions.

3、 Selecting camcorder as webcam input in video conferencing software.
To use a camcorder as a webcam using HDMI, you will need a few things:
1. Camcorder with HDMI output: Ensure that your camcorder has an HDMI output port. Most modern camcorders have this feature.
2. HDMI capture card: You will need an HDMI capture card to connect your camcorder to your computer. This device acts as an intermediary between your camcorder and computer, converting the HDMI signal into a format that can be recognized by your computer.
3. Video conferencing software: Install video conferencing software on your computer. Popular options include Zoom, Microsoft Teams, Skype, and Google Meet.
Once you have these components, follow these steps:
1. Connect your camcorder to the HDMI capture card using an HDMI cable.
2. Connect the HDMI capture card to your computer using a USB cable.
3. Open the video conferencing software on your computer.
4. In the video conferencing software settings, select the HDMI capture card as the video input device. The exact steps may vary depending on the software you are using.
5. Start your video call or meeting, and your camcorder will now be recognized as the webcam input.
It's worth noting that using a camcorder as a webcam can provide higher video quality compared to built-in webcams on laptops or desktops. However, it may require additional setup and equipment. Additionally, make sure your camcorder is fully charged or connected to a power source to avoid any interruptions during your video call.

4、 Adjusting camcorder settings for optimal webcam performance.
To use a camcorder as a webcam using HDMI, you will need to follow a few steps to ensure optimal performance. Here is a guide on how to do it:
1. Check compatibility: Ensure that your camcorder has an HDMI output port and that your computer has an HDMI input port. Most modern camcorders and computers have these ports, but it's always good to double-check.
2. Connect the camcorder to the computer: Use an HDMI cable to connect the HDMI output port of your camcorder to the HDMI input port of your computer. Make sure both devices are turned off before making the connection.
3. Power on the camcorder: Turn on your camcorder and set it to the appropriate mode for using it as a webcam. This mode is usually called "PC" or "Webcam" mode. Consult your camcorder's manual for specific instructions on how to enable this mode.
4. Adjust camcorder settings: Once the camcorder is in webcam mode, you may need to adjust some settings for optimal performance. These settings can include resolution, frame rate, and autofocus. Use the camcorder's menu or settings options to make these adjustments.
5. Set up the webcam software: On your computer, open the webcam software or the video conferencing application you plan to use. Go to the settings or preferences section and select your camcorder as the video input device. The software should detect the camcorder as a webcam.
6. Test and adjust: Finally, test your camcorder as a webcam by starting a video call or recording a video. Check the video quality, audio, and overall performance. If needed, make further adjustments to the camcorder settings or the webcam software settings until you achieve the desired results.
It's important to note that not all camcorders are designed to be used as webcams, so it's always recommended to check your camcorder's manual or manufacturer's website for specific instructions and compatibility information. Additionally, the latest point of view may include advancements in technology that make it easier to use a camcorder as a webcam, such as the availability of dedicated software or firmware updates that enhance compatibility and performance.


![J12 Mini-projector Outdoor-filmprojector met 100 inch-projectorscherm, 1080P, compatibel met tv-stick, videogames, HDMI, USB, TF, VGA, AUX, AV [Amerikaanse regelgeving] J12 Mini-projector Outdoor-filmprojector met 100 inch-projectorscherm, 1080P, compatibel met tv-stick, videogames, HDMI, USB, TF, VGA, AUX, AV [Amerikaanse regelgeving]](https://img.kentfaith.de/cache/catalog/products/de/GW01.0172/GW01.0172-1-340x340.jpg)
