How To Use Digital Microscope On Computer ?
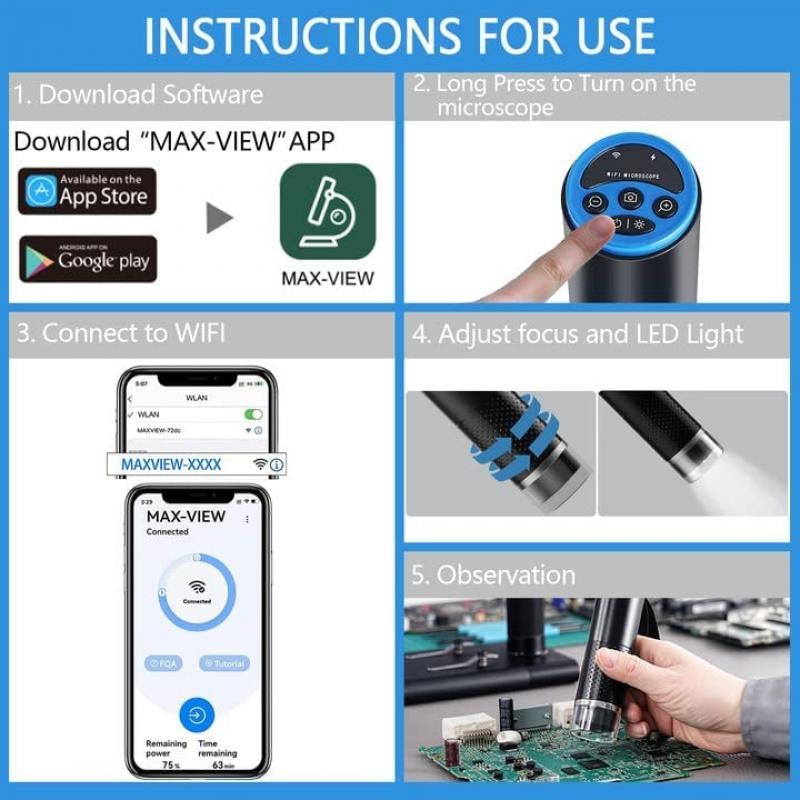
To use a digital microscope on a computer, you typically need to follow these steps:
1. Connect the digital microscope to your computer using a USB cable or any other appropriate connection method.
2. Install any necessary software or drivers that come with the digital microscope. This may involve inserting a CD or downloading the software from the manufacturer's website.
3. Once the software is installed, open it on your computer.
4. Turn on the digital microscope and adjust the focus and magnification settings as needed.
5. Place the object you want to examine under the microscope lens.
6. Use the software controls to capture images or videos of the object, adjust the lighting, or make any other necessary adjustments.
7. Save or export the captured images or videos to your computer for further analysis or documentation.
Remember to consult the user manual or manufacturer's instructions specific to your digital microscope for detailed guidance on its usage and any additional features it may have.
1、 Connecting the digital microscope to your computer
Connecting the digital microscope to your computer is a relatively simple process that allows you to view and capture high-resolution images and videos of microscopic objects. Here is a step-by-step guide on how to use a digital microscope on your computer:
1. Check the compatibility: Ensure that your digital microscope is compatible with your computer's operating system. Most digital microscopes are compatible with Windows and Mac systems.
2. Install the software: Many digital microscopes come with their own software that needs to be installed on your computer. Insert the installation CD or download the software from the manufacturer's website and follow the on-screen instructions to install it.
3. Connect the microscope: Connect the digital microscope to your computer using the USB cable provided. Make sure the microscope is powered on.
4. Launch the software: Open the software on your computer. It should automatically detect the connected microscope. If not, check the connection and restart the software.
5. Adjust settings: Use the software to adjust the settings of the digital microscope. This may include adjusting the focus, zoom level, brightness, and contrast.
6. Capture images and videos: Once the microscope is connected and the settings are adjusted, you can start capturing images and videos of the microscopic objects. Use the software's capture button to take pictures or record videos.
7. Save and analyze: After capturing the images or videos, save them to your computer for further analysis or sharing. The software may also provide additional features for measuring and analyzing the captured data.
It is important to note that the specific steps may vary depending on the brand and model of your digital microscope. Therefore, it is recommended to refer to the user manual or contact the manufacturer for detailed instructions.
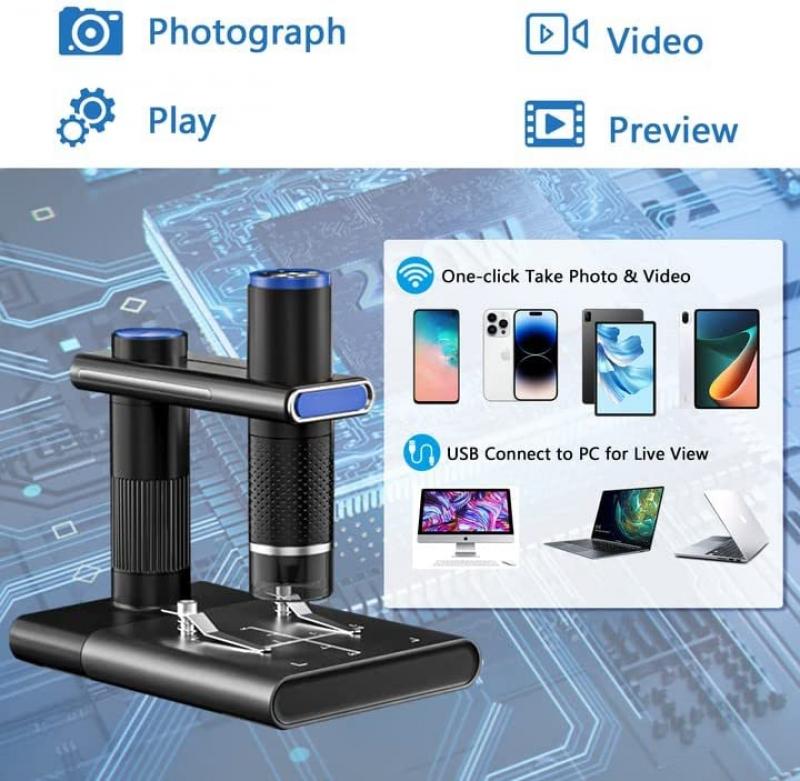
In recent years, advancements in digital microscope technology have led to the development of wireless digital microscopes. These microscopes can be connected to your computer via Wi-Fi or Bluetooth, eliminating the need for a physical USB connection. The setup process for wireless digital microscopes may differ slightly, but the basic principles remain the same.
2、 Installing the necessary software for the digital microscope
To use a digital microscope on a computer, you need to follow a few steps. The first step is to install the necessary software for the digital microscope. This software allows your computer to communicate with the microscope and display the images or videos captured by it.
To install the software, you typically need to insert the installation CD that comes with the microscope into your computer's CD drive. If your computer doesn't have a CD drive, you can usually download the software from the manufacturer's website.
Once the software is installed, you can connect the digital microscope to your computer using a USB cable. Make sure the microscope is powered on before connecting it to the computer.
After connecting the microscope, launch the software on your computer. The software should detect the microscope and display a live feed from the microscope's camera. You can then adjust the focus, zoom level, and other settings to capture the desired images or videos.
It's worth noting that some digital microscopes may have specific software requirements or compatibility issues with certain operating systems. Therefore, it's always a good idea to check the manufacturer's instructions or website for any specific software recommendations or updates.
In conclusion, using a digital microscope on a computer involves installing the necessary software, connecting the microscope to the computer, and launching the software to view and capture images or videos.

3、 Adjusting the settings and focus of the digital microscope
To use a digital microscope on a computer, you need to follow a few steps. The first step is to connect the digital microscope to your computer using a USB cable. Once connected, your computer should recognize the microscope as a new device and install any necessary drivers.
Next, you will need to open the software that came with the digital microscope or download a compatible software from the manufacturer's website. This software will allow you to view and capture images from the microscope on your computer screen.
After opening the software, you may need to adjust the settings of the digital microscope. This can include adjusting the brightness, contrast, and color balance to optimize the image quality. Some software also allows you to adjust the magnification level and focus of the microscope.
To adjust the focus, you can use the focus wheel or knob on the digital microscope itself. Turning the wheel clockwise or counterclockwise will move the lens closer to or further away from the object you are observing. You can also use the software to fine-tune the focus by clicking on the focus button and adjusting the slider.
It is important to note that the latest digital microscopes often come with advanced features such as auto-focus and image stabilization. These features can greatly enhance the user experience and make it easier to capture clear and detailed images.
In conclusion, using a digital microscope on a computer involves connecting the microscope, opening the software, adjusting the settings, and focusing the microscope. The latest digital microscopes offer advanced features that make it easier to obtain high-quality images.

4、 Capturing and saving images or videos with the digital microscope
Capturing and saving images or videos with a digital microscope is a straightforward process that allows you to document and analyze your observations. Here's a step-by-step guide on how to use a digital microscope on a computer:
1. Connect the digital microscope to your computer: Most digital microscopes come with a USB cable that allows you to connect it to your computer. Plug one end of the cable into the microscope and the other end into a USB port on your computer.
2. Install the necessary software: Some digital microscopes require specific software to be installed on your computer. Check the manufacturer's instructions or website to download and install the appropriate software.
3. Launch the software: Once the software is installed, launch it on your computer. The software will detect the connected digital microscope and display the live feed from the microscope's camera.
4. Adjust the settings: Use the software to adjust the microscope's settings such as brightness, contrast, and zoom level. These settings can enhance the quality of the images or videos you capture.
5. Capture images or videos: To capture an image, simply click on the "Capture" or "Snapshot" button in the software. To record a video, click on the "Record" or "Start" button. The captured images or videos will be saved to a designated folder on your computer.
6. Review and save your captures: After capturing an image or video, review it in the software to ensure it meets your requirements. If satisfied, save the file to a location of your choice on your computer.
7. Analyze and share your captures: Once saved, you can analyze the captured images or videos using image analysis software or share them with colleagues or peers for further discussion or collaboration.
It's worth noting that the latest digital microscopes may offer additional features such as measurement tools, image stitching, or 3D imaging capabilities. Familiarize yourself with the specific features of your digital microscope and software to make the most of its capabilities.
