How To Use Dji Nd Filters ?
To use DJI ND filters, follow these steps:
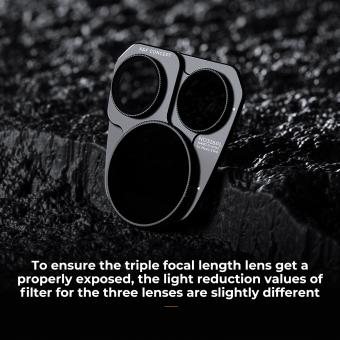
1. Choose the right ND filter for your shooting conditions. ND filters come in different strengths, from ND4 to ND1000, and each one reduces the amount of light that enters the camera by a specific amount.
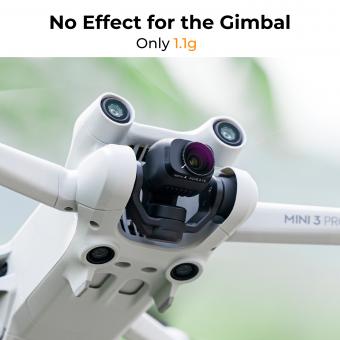
2. Attach the ND filter to your DJI drone's camera. Most DJI drones have a gimbal that allows you to easily attach and remove filters.
3. Adjust your camera settings. When using an ND filter, you'll need to adjust your camera's settings to compensate for the reduced light. This may include adjusting the shutter speed, ISO, and aperture.
4. Start shooting. Once you've attached the ND filter and adjusted your camera settings, you're ready to start shooting. ND filters are particularly useful for capturing smooth, cinematic footage in bright daylight conditions.
5. Experiment with different filters and settings. ND filters can be used in a variety of shooting conditions, so don't be afraid to experiment with different filters and camera settings to achieve the desired effect.
1、 Types of DJI ND filters and their uses
How to use DJI ND filters:
1. Choose the right filter: DJI ND filters come in different strengths, from ND4 to ND64. The higher the number, the darker the filter. Choose the right filter based on the lighting conditions and the effect you want to achieve.
2. Attach the filter: DJI ND filters are designed to attach directly to the camera lens of your drone. Simply screw the filter onto the lens and make sure it is securely attached.
3. Adjust camera settings: Once the filter is attached, adjust the camera settings to compensate for the reduced light. This may include adjusting the shutter speed, ISO, and aperture.
4. Shoot: With the filter attached and the camera settings adjusted, you are ready to start shooting. Experiment with different filters and settings to achieve the desired effect.
Types of DJI ND filters and their uses:
1. ND4: This filter reduces light by two stops and is ideal for cloudy or overcast days.
2. ND8: This filter reduces light by three stops and is ideal for partly cloudy days.
3. ND16: This filter reduces light by four stops and is ideal for sunny days.
4. ND32: This filter reduces light by five stops and is ideal for bright sunny days.
5. ND64: This filter reduces light by six stops and is ideal for extremely bright conditions, such as snow or water.
The use of ND filters has become increasingly popular among drone photographers and videographers. They allow for greater control over exposure and can help create stunning, cinematic footage. It is important to choose the right filter for the lighting conditions and to adjust camera settings accordingly.
2、 Installing and removing DJI ND filters
Installing and removing DJI ND filters is a simple process that can greatly enhance the quality of your aerial photography and videography. ND filters, or neutral density filters, are designed to reduce the amount of light entering the camera lens, allowing you to capture more balanced and natural-looking footage in bright conditions.
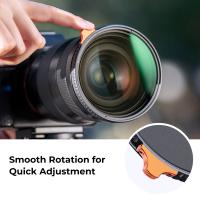
To install a DJI ND filter, first remove the lens cover from your drone's camera. Then, simply screw the filter onto the lens in a clockwise direction until it is securely in place. To remove the filter, turn it counterclockwise until it comes loose, then carefully lift it off the lens.
It's important to choose the right ND filter for the lighting conditions you'll be shooting in. DJI offers a range of ND filters with different levels of light reduction, from ND4 to ND64. The higher the number, the more light the filter will block. For example, an ND16 filter is ideal for shooting in bright sunlight, while an ND4 filter is better suited for slightly overcast conditions.
It's also important to keep your ND filters clean and free from scratches, as any imperfections can affect the quality of your footage. Use a microfiber cloth to gently wipe the filter clean, and store it in a protective case when not in use.
Overall, using DJI ND filters can greatly improve the quality of your aerial photography and videography, allowing you to capture stunning footage in a variety of lighting conditions.
3、 Adjusting camera settings with DJI ND filters
How to use DJI ND filters:
1. Choose the right ND filter: DJI offers a range of ND filters with different levels of light reduction. Choose the filter that suits the lighting conditions and the effect you want to achieve.
2. Attach the filter to the camera: DJI ND filters are designed to be easily attached to the camera lens. Simply screw the filter onto the lens and ensure it is securely attached.
3. Adjust camera settings: Once the ND filter is attached, adjust the camera settings to compensate for the reduced light. This may include adjusting the shutter speed, aperture, and ISO.
4. Capture your shot: With the ND filter and camera settings adjusted, you are ready to capture your shot. Experiment with different settings and filters to achieve the desired effect.
Adjusting camera settings with DJI ND filters:
DJI ND filters are an essential tool for capturing high-quality footage in bright lighting conditions. By reducing the amount of light entering the camera lens, ND filters allow you to use slower shutter speeds and wider apertures, resulting in smoother, more cinematic footage.
When using ND filters, it is important to adjust the camera settings to compensate for the reduced light. This may include increasing the shutter speed to avoid overexposure, opening up the aperture to achieve a shallow depth of field, and adjusting the ISO to maintain the desired exposure.
The latest point of view on using ND filters is that they are an essential tool for any serious videographer or photographer. With the ability to capture stunning footage in even the brightest lighting conditions, ND filters are a must-have accessory for anyone looking to take their photography or videography to the next level.
4、 Tips for capturing better footage with DJI ND filters
Tips for capturing better footage with DJI ND filters:
1. Understand the purpose of ND filters: ND filters are used to reduce the amount of light entering the camera lens, allowing you to use slower shutter speeds and wider apertures in bright conditions. This helps to create a more cinematic look to your footage.
2. Choose the right ND filter: DJI offers a range of ND filters with different levels of light reduction. Choose the filter that best suits the lighting conditions you are shooting in.
3. Use manual camera settings: When using ND filters, it's important to use manual camera settings to ensure that the exposure is correct. Set your shutter speed and aperture manually, and adjust the ISO as needed.
4. Use the correct camera mode: When shooting with ND filters, it's best to use manual or aperture priority mode. This gives you more control over the exposure and allows you to achieve the desired look.
5. Practice with different filters: Experiment with different ND filters to see how they affect your footage. This will help you to understand which filters work best in different lighting conditions.
6. Use a gimbal: When shooting with ND filters, it's important to use a gimbal to ensure smooth and stable footage. DJI offers a range of gimbals that are compatible with their drones and cameras.
7. Edit your footage: After shooting with ND filters, it's important to edit your footage to ensure that the colors and exposure are correct. Use editing software to adjust the brightness, contrast, and color balance as needed.
In conclusion, using ND filters can greatly improve the quality of your footage, but it's important to understand how to use them correctly. By following these tips, you can capture stunning footage that looks professional and cinematic.









There are no comments for this blog.