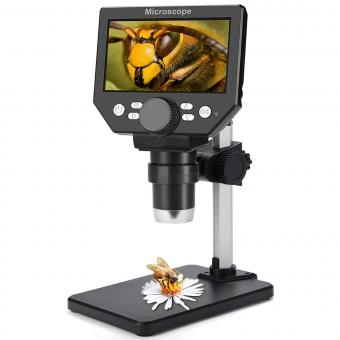
How To Use Light Microscope Step By Step ?
To use a light microscope, follow these steps:
1. Place the microscope on a stable surface and ensure it is plugged in or has fresh batteries.
2. Turn on the light source and adjust the intensity if necessary.
3. Place the specimen on a clean glass slide and cover it with a coverslip.
4. Use the coarse adjustment knob to lower the stage to its lowest position.
5. Select the lowest magnification objective lens (usually 4x) and rotate it into position.
6. Look through the eyepiece and use the coarse adjustment knob to raise the stage until the specimen comes into focus.
7. Use the fine adjustment knob to further refine the focus.
8. Once the specimen is in focus, switch to higher magnification objective lenses (10x, 40x, or 100x) by rotating the nosepiece.
9. Use the fine adjustment knob to bring the specimen into focus at each magnification level.
10. Observe and analyze the specimen, adjusting the focus and magnification as needed.
11. When finished, turn off the light source, remove the slide, and clean the microscope if necessary.
Remember to handle the microscope with care and follow any specific instructions provided by the manufacturer.
1、 Setting up the microscope
Setting up a light microscope involves several steps to ensure proper usage and accurate observations. Here is a step-by-step guide on how to set up a light microscope:
1. Choose a suitable location: Find a clean, well-lit area with a stable surface to place the microscope. Avoid areas with excessive vibrations or direct sunlight, as they can affect the quality of observations.
2. Clean the microscope: Use a soft, lint-free cloth to wipe the lenses, eyepieces, and stage. This removes any dust or debris that may interfere with the clarity of the images.
3. Plug in the microscope: Connect the power cord to a power outlet and switch on the microscope. Some microscopes may have a power switch on the base or arm.
4. Adjust the light source: Most light microscopes have a built-in light source, usually located beneath the stage. Adjust the intensity of the light using the light control knob or switch until it provides sufficient illumination for your observations.
5. Set the magnification: Rotate the objective lens turret to select the desired magnification level. Start with the lowest magnification objective (usually 4x or 10x) and gradually increase as needed.
6. Focus the specimen: Place a prepared slide on the stage and secure it using the stage clips or mechanical stage controls. Look through the eyepiece and use the coarse focus knob to bring the specimen into rough focus. Then, use the fine focus knob to achieve a clear, sharp image.
7. Observe and adjust: Once the specimen is in focus, observe it carefully. If necessary, make further adjustments to the focus, lighting, or magnification to enhance the clarity and detail of the image.
8. Document and analyze: If desired, capture images or record observations using a camera or digital imaging system. Analyze the specimen using appropriate techniques or software.
It is important to consult the microscope's user manual for specific instructions and to follow any additional guidelines provided by the manufacturer. Additionally, keep in mind that advancements in technology may introduce new features or variations in microscope setup, so staying updated with the latest information is recommended.
2、 Preparing the specimen
Preparing the specimen is an essential step in using a light microscope. Here is a step-by-step guide on how to prepare the specimen for observation under a light microscope:
1. Obtain the specimen: Collect the sample you wish to observe. This can be a small piece of tissue, a drop of liquid, or a small organism.
2. Fixation: If the specimen is living, it needs to be fixed to preserve its structure. This can be done by immersing the specimen in a fixative solution, such as formaldehyde or ethanol. Fixation helps prevent decay and maintains the integrity of the specimen.
3. Dehydration: In some cases, the specimen needs to be dehydrated to remove water content. This is typically done by gradually replacing the water with alcohol or acetone. Dehydration helps prepare the specimen for embedding in a solid medium.
4. Embedding: The dehydrated specimen is embedded in a solid medium, such as paraffin wax or resin. This provides support and allows for thin sectioning of the specimen.
5. Sectioning: Using a microtome, the embedded specimen is sliced into thin sections. These sections are then mounted onto glass slides for observation.
6. Staining: Staining is often used to enhance the contrast and visibility of the specimen. Different stains can be used to highlight specific structures or cellular components. Common stains include hematoxylin and eosin (H&E), which stains nuclei blue and cytoplasm pink.
7. Coverslipping: A coverslip is placed over the stained specimen to protect it and prevent distortion. A mounting medium, such as a clear resin, is used to secure the coverslip in place.
It is important to note that the specific steps and techniques may vary depending on the type of specimen and the purpose of observation. Additionally, advancements in technology have led to the development of new techniques, such as immunohistochemistry and fluorescent labeling, which allow for more specific and detailed observations.
3、 Adjusting the focus and magnification
To adjust the focus and magnification of a light microscope, follow these step-by-step instructions:
1. Start by placing the slide you want to observe on the stage of the microscope. Use the stage clips to secure the slide in place.
2. Turn on the light source of the microscope. Adjust the intensity of the light to a comfortable level for viewing.
3. Look through the eyepiece and adjust the interpupillary distance by moving the eyepieces closer or further apart until you see a single, circular field of view.
4. Begin with the lowest magnification objective lens (usually 4x or 10x) in position. Use the coarse adjustment knob to bring the specimen into rough focus. This knob moves the stage up and down.
5. Once the specimen is roughly in focus, use the fine adjustment knob to bring it into sharp focus. This knob moves the stage very slightly, allowing for precise focusing.
6. If you need to increase the magnification, rotate the nosepiece to switch to a higher magnification objective lens (e.g., 40x or 100x). Use the coarse adjustment knob to bring the specimen into rough focus again, and then use the fine adjustment knob for sharp focus.
7. To enhance the clarity of the image, you can adjust the diaphragm or iris control to control the amount of light passing through the specimen. Opening the diaphragm will increase the brightness, while closing it will decrease it.
8. Finally, observe the specimen through the eyepiece and make any necessary adjustments to the focus or magnification to obtain a clear and detailed image.
It is important to note that these instructions may vary slightly depending on the specific model of the light microscope being used. Always refer to the manufacturer's instructions for the microscope you are using for the most accurate guidance.

4、 Observing and analyzing the specimen
Observing and analyzing a specimen using a light microscope is a fundamental technique in biology and other scientific fields. Here is a step-by-step guide on how to use a light microscope for this purpose:
1. Prepare the microscope: Start by placing the microscope on a stable surface and ensuring it is clean and in good working condition. Adjust the light source to provide optimal illumination.
2. Prepare the specimen: Prepare the specimen by placing it on a glass slide. If necessary, add a drop of water or a mounting medium to help preserve the specimen and provide a clear view.
3. Adjust the objective lens: Begin with the lowest magnification objective lens (usually 4x or 10x) and position it over the specimen. Use the coarse adjustment knob to bring the specimen into focus, then fine-tune the focus using the fine adjustment knob.
4. Increase magnification: Once the specimen is in focus, switch to a higher magnification objective lens (e.g., 40x or 100x) to observe finer details. Refocus using the fine adjustment knob as needed.
5. Analyze the specimen: Observe the specimen carefully, noting its structure, shape, and any other relevant features. Take note of any abnormalities or interesting observations.
6. Capture images: If desired, use a camera attachment or smartphone adapter to capture images or videos of the specimen for further analysis or documentation.
7. Clean up: After observing and analyzing the specimen, remove the slide from the microscope stage and clean it properly. Turn off the microscope and store it in a safe place.
It is important to note that the latest advancements in microscopy technology, such as confocal microscopy and super-resolution microscopy, offer even higher resolution and more detailed analysis of specimens. These techniques can provide researchers with a deeper understanding of cellular structures and processes.


