How To Use Mike For Youtube ?
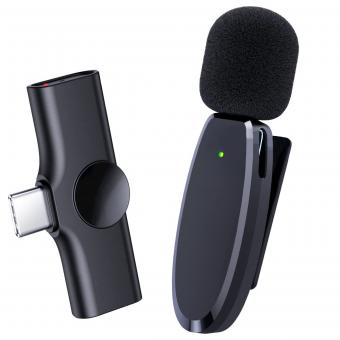
To use a microphone for YouTube, you will need to connect it to your computer or recording device. Most microphones will connect via USB or an audio jack. Once connected, you will need to select the microphone as your audio input source in your recording software or YouTube settings. It is important to test the microphone and adjust the volume levels to ensure that your audio is clear and balanced. Additionally, consider using a pop filter or windscreen to reduce unwanted noise and improve the overall quality of your audio.
1、 Choosing the Right Microphone for YouTube Videos
Choosing the Right Microphone for YouTube Videos is crucial to ensure that your content is of high quality and professional. There are several types of microphones available in the market, and each one has its own unique features and benefits. However, the most commonly used microphones for YouTube videos are the condenser and dynamic microphones.
If you are just starting out on YouTube, you can use your smartphone's built-in microphone or a basic USB microphone. However, if you want to take your content to the next level, investing in a high-quality microphone is a must. A condenser microphone is ideal for recording vocals and acoustic instruments, while a dynamic microphone is perfect for recording loud sounds such as drums and electric guitars.
When choosing a microphone, it is important to consider your budget, the type of content you create, and the environment you record in. For example, if you record in a noisy environment, a directional microphone with a cardioid polar pattern will help reduce background noise.
In addition to choosing the right microphone, it is also important to use it correctly. Make sure to position the microphone close to your mouth or instrument, and adjust the gain levels to avoid distortion. You can also use a pop filter to reduce plosives and a shock mount to reduce vibrations.
In conclusion, using the right microphone for YouTube videos is essential to produce high-quality content. Consider your budget, content type, and recording environment when choosing a microphone, and use it correctly to achieve the best results.
2、 Setting Up Your Microphone for Optimal Sound Quality
Setting Up Your Microphone for Optimal Sound Quality is the key to producing high-quality audio content for YouTube. The first step is to choose the right microphone for your needs. There are many types of microphones available, including USB, XLR, and shotgun microphones. USB microphones are the easiest to use and are ideal for beginners, while XLR microphones offer more advanced features and better sound quality. Shotgun microphones are great for recording audio in noisy environments.
Once you have chosen your microphone, it's important to set it up correctly. This involves positioning the microphone at the right distance from your mouth, adjusting the gain and volume levels, and reducing background noise. You can use a pop filter to reduce plosives and a shock mount to reduce vibrations and handling noise.
When recording, it's important to speak clearly and at a consistent volume. Avoid moving around too much or touching the microphone, as this can cause unwanted noise. You can also use editing software to remove any unwanted noise or improve the overall sound quality.
In addition to setting up your microphone, it's important to consider the acoustics of your recording environment. A quiet room with minimal echo and reverberation will produce the best sound quality. You can use acoustic foam or blankets to absorb sound and reduce echo.
Overall, setting up your microphone for optimal sound quality requires attention to detail and a willingness to experiment. With the right equipment and techniques, you can produce high-quality audio content for YouTube that will engage and entertain your audience.
3、 Tips for Recording Clear Audio with Your Microphone
Tips for Recording Clear Audio with Your Microphone:
1. Choose the right microphone: There are different types of microphones available in the market, such as condenser, dynamic, and ribbon. Choose the one that suits your needs and budget.
2. Position the microphone correctly: The position of the microphone plays a crucial role in recording clear audio. Place the microphone close to your mouth, but not too close that it picks up breathing sounds.
3. Use a pop filter: A pop filter helps to reduce the popping sounds that occur when you pronounce words with 'p', 'b', and 't'. It also helps to reduce the wind noise.
4. Reduce background noise: Background noise can ruin your recording. Try to record in a quiet room or use noise-cancelling software.
5. Monitor your audio: Use headphones to monitor your audio while recording. This will help you to identify any issues with the audio quality.
6. Edit your audio: After recording, edit your audio to remove any unwanted noise or improve the overall quality.
How to use mike for YouTube:
1. Choose the right microphone: As mentioned earlier, choose the microphone that suits your needs and budget. For YouTube videos, a condenser microphone is a good choice.
2. Connect the microphone to your computer: Most microphones come with a USB cable that you can use to connect to your computer.
3. Set up your recording software: Use software such as Audacity or Adobe Audition to record your audio.
4. Position the microphone correctly: Place the microphone close to your mouth, but not too close that it picks up breathing sounds.
5. Monitor your audio: Use headphones to monitor your audio while recording. This will help you to identify any issues with the audio quality.
6. Edit your audio: After recording, edit your audio to remove any unwanted noise or improve the overall quality.
7. Upload your video: Once you have recorded and edited your audio, upload your video to YouTube. Make sure to add a title, description, and tags to help your video rank higher in search results.
4、 Editing Your Audio for a Professional Sound
How to use mike for YouTube:
Using a microphone for YouTube is essential if you want to produce high-quality audio content. Here are some tips on how to use a microphone for YouTube:
1. Choose the right microphone: There are many types of microphones available, including USB, condenser, and dynamic microphones. Choose the one that suits your needs and budget.
2. Position the microphone correctly: The position of the microphone is crucial for good audio quality. Place the microphone close to your mouth, but not too close that it picks up breathing sounds.
3. Adjust the gain: The gain controls the sensitivity of the microphone. Adjust it to get the right level of volume without distortion.
4. Use a pop filter: A pop filter helps to reduce popping sounds when you say words with plosives like "p" and "b."
5. Test the audio quality: Before recording, test the audio quality to ensure that it is clear and free from background noise.
Editing Your Audio for a Professional Sound:
Editing your audio is just as important as recording it. Here are some tips on how to edit your audio for a professional sound:
1. Use a digital audio workstation (DAW): A DAW is software that allows you to record, edit, and mix audio. Use it to edit your audio and add effects like EQ, compression, and reverb.
2. Remove background noise: Use noise reduction tools to remove background noise from your audio.
3. Cut out unwanted parts: Remove any parts of the audio that are not necessary or add no value to the content.
4. Normalize the audio: Normalize the audio to ensure that the volume is consistent throughout the recording.
5. Export in the right format: Export the audio in a format that is suitable for your needs, such as MP3 or WAV.
In conclusion, using a microphone and editing your audio are essential for producing high-quality audio content for YouTube. Follow these tips to ensure that your audio is clear, professional, and engaging for your audience.
