How To Use Nd Filter For Video ?
To use an ND filter for video, follow these steps:
1. Choose the right ND filter: ND filters come in different strengths, such as ND2, ND4, ND8, etc. Select the appropriate filter based on the amount of light reduction you need.
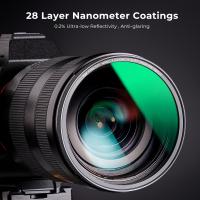
2. Attach the filter: Screw or mount the ND filter onto the front of your camera lens. Ensure it is securely attached to avoid any light leaks.
3. Adjust camera settings: With the ND filter in place, you'll need to compensate for the reduced light. Open up your camera's aperture, lower the shutter speed, or increase the ISO to maintain proper exposure.
4. Monitor exposure: Use the camera's built-in light meter or a separate light meter to ensure your video is correctly exposed. Adjust the camera settings as needed.
5. Shoot your video: Once you have set up the ND filter and adjusted the camera settings, start recording your video. Pay attention to the exposure and make any necessary adjustments during filming.
Remember, ND filters are primarily used to control the amount of light entering the camera, allowing you to achieve desired exposure settings and creative effects in your videos.
1、 Understanding ND Filters: Basics and Functionality
Understanding ND Filters: Basics and Functionality
ND filters, or Neutral Density filters, are essential tools for videographers and filmmakers. They are used to control the amount of light entering the camera lens, allowing for greater creative control over exposure and depth of field. Here is a guide on how to use ND filters for video:
1. Determine the strength of the ND filter: ND filters come in different strengths, usually measured in stops. The higher the number of stops, the darker the filter. Choose the appropriate strength based on the lighting conditions and desired effect.
2. Attach the ND filter to the lens: Screw-on filters are the most common type and easily attach to the front of the lens. Make sure it is securely fastened to avoid any light leaks.
3. Adjust the exposure settings: With the ND filter in place, the camera will receive less light. Adjust the exposure settings accordingly to maintain proper exposure. This may involve lowering the shutter speed, opening up the aperture, or increasing the ISO.
4. Control motion blur: One of the main benefits of using an ND filter is the ability to create motion blur in bright conditions. By reducing the amount of light, you can use slower shutter speeds to capture smooth and flowing movements.
5. Enhance depth of field: ND filters also allow for wider apertures in bright conditions, resulting in a shallower depth of field. This can be useful for isolating subjects and creating a more cinematic look.
6. Experiment and practice: ND filters offer a wide range of creative possibilities. Experiment with different strengths and settings to achieve the desired effect. Practice using ND filters in various lighting conditions to become familiar with their functionality.
In recent years, there have been advancements in ND filter technology. Variable ND filters have gained popularity, allowing for adjustable strength by rotating the filter. This provides greater flexibility and convenience, especially when shooting in changing lighting conditions.
Overall, understanding how to use ND filters for video is crucial for achieving professional-looking footage. By controlling light and exposure, videographers can unleash their creativity and capture stunning visuals.
2、 Choosing the Right ND Filter Strength for Video Shooting
Choosing the right ND filter strength for video shooting is crucial to achieve the desired exposure and creative effects. ND filters, or neutral density filters, are essential tools for controlling the amount of light entering the camera lens. They are particularly useful in situations where the available light is too bright, such as shooting in broad daylight or capturing long-exposure shots.
To use an ND filter for video, follow these steps:
1. Determine the desired exposure: Assess the lighting conditions and the effect you want to achieve. If the scene is too bright and you want to maintain a shallow depth of field or use a slower shutter speed, an ND filter is necessary.
2. Choose the appropriate ND filter strength: ND filters come in different strengths, usually measured in stops. The strength you choose depends on the amount of light reduction needed. For example, a 1-stop ND filter reduces the light entering the lens by half, while a 3-stop filter reduces it by eight times.
3. Attach the ND filter to the lens: Screw-on filters are the most common type and easily attach to the front of the lens. Ensure that the filter is securely fastened to avoid any light leaks or movement during shooting.
4. Adjust camera settings: Once the ND filter is attached, adjust the camera settings accordingly. Start by setting the desired aperture and shutter speed, and then adjust the ISO to achieve the correct exposure.
5. Monitor the exposure: Use the camera's built-in light meter or a separate light meter to monitor the exposure. Make any necessary adjustments to the ND filter strength or camera settings to achieve the desired exposure.
It's important to note that the latest point of view on using ND filters for video is the increasing popularity of variable ND filters. These filters allow you to adjust the strength of the filter by rotating it, providing more flexibility in controlling the exposure. Variable ND filters are particularly useful in situations where the lighting conditions change frequently, such as shooting outdoors during the golden hour.
In conclusion, using an ND filter for video shooting involves determining the desired exposure, choosing the appropriate filter strength, attaching the filter to the lens, adjusting camera settings, and monitoring the exposure. The latest trend is the use of variable ND filters for their flexibility in adjusting the strength. Experimenting with different filter strengths and techniques will help you achieve the desired creative effects in your video footage.
3、 Properly Mounting and Attaching an ND Filter to Your Camera
Properly Mounting and Attaching an ND Filter to Your Camera
Using an ND (Neutral Density) filter for video is a great way to control the amount of light entering your camera, allowing you to achieve the desired exposure and creative effects. Here's a step-by-step guide on how to use an ND filter for video:
1. Choose the right ND filter: ND filters come in different strengths, measured in stops. Determine the amount of light reduction you need based on your shooting conditions. For bright outdoor scenes, a higher stop ND filter like ND8 or ND16 may be suitable, while for indoor or low-light situations, a lower stop ND filter like ND2 or ND4 might be sufficient.
2. Mount the filter holder: Many cameras have a filter thread on the front of the lens. Screw the filter holder onto this thread, ensuring it is securely attached.
3. Insert the ND filter: Slide the ND filter into the filter holder. Make sure it is properly aligned and seated securely.
4. Adjust the exposure: With the ND filter in place, you will notice a reduction in the amount of light entering the camera. Adjust your camera's exposure settings accordingly to achieve the desired exposure level.
5. Monitor your footage: While shooting, keep an eye on your footage to ensure the exposure is balanced and the desired effect is achieved. Make any necessary adjustments to the ND filter or exposure settings as needed.
6. Remove the filter: Once you have finished shooting, carefully remove the ND filter from the filter holder. Store it in a protective case to prevent any damage.
It's worth noting that some cameras may require specific filter adapters or holders, so it's important to check your camera's compatibility before purchasing an ND filter. Additionally, newer cameras may offer built-in electronic ND filters, which can be controlled directly from the camera's menu.
In conclusion, using an ND filter for video can greatly enhance your footage by allowing you to control the amount of light entering your camera. By properly mounting and attaching the ND filter, adjusting exposure settings, and monitoring your footage, you can achieve the desired exposure and creative effects in your videos.
4、 Adjusting Camera Settings to Compensate for ND Filter
Using an ND (Neutral Density) filter for video can greatly enhance the quality of your footage by allowing you to control the amount of light entering the camera. Here's a step-by-step guide on how to use an ND filter for video:
1. Choose the right ND filter: ND filters come in different strengths, usually measured in stops. Determine the amount of light reduction you need based on the shooting conditions and select the appropriate filter.
2. Attach the filter: Screw the ND filter onto the front of your camera lens. Make sure it is securely attached to avoid any light leaks.
3. Adjust camera settings: With the ND filter in place, you'll need to compensate for the reduced light. Start by adjusting the ISO setting. Lowering the ISO will help maintain image quality and reduce noise. Next, adjust the aperture to control the depth of field. A wider aperture (lower f-stop number) will create a shallower depth of field, while a narrower aperture (higher f-stop number) will increase the depth of field.
4. Set the shutter speed: Since the ND filter reduces the amount of light entering the camera, you'll need to decrease the shutter speed to maintain proper exposure. The exact shutter speed will depend on the lighting conditions and the desired effect. Generally, a shutter speed of double the frame rate is recommended for smooth motion blur.
5. Monitor exposure: Use the camera's built-in light meter or a separate light meter to ensure proper exposure. Adjust the settings as needed to achieve the desired exposure level.
Remember, using an ND filter requires some experimentation and practice to achieve the desired results. It's important to monitor exposure and make adjustments accordingly. Additionally, keep in mind that the latest point of view may include advancements in technology, such as electronic ND filters that can be adjusted remotely or in-camera software that simulates the effect of an ND filter.
