How To Use Polarized Light Microscope ?
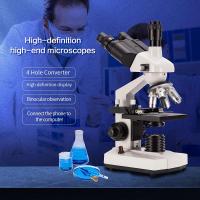
To use a polarized light microscope, first ensure that the microscope is properly set up and calibrated. Place the specimen on the stage and adjust the focus using the coarse and fine focus knobs. Next, insert the polarizer and analyzer filters into the light path. Rotate the polarizer to obtain the desired level of polarization. Adjust the condenser and diaphragm to optimize the illumination. Finally, observe the specimen through the eyepiece and make any necessary adjustments to enhance the contrast and visibility of the sample.
1、 Principles of polarized light microscopy
The polarized light microscope is a powerful tool used in various scientific fields, including geology, materials science, and biology. It allows researchers to examine the optical properties of samples by analyzing the interaction of polarized light with the sample's structure. Here is a step-by-step guide on how to use a polarized light microscope:
1. Sample Preparation: Prepare your sample by mounting it on a glass slide and covering it with a coverslip. Ensure that the sample is thin enough for light to pass through.
2. Adjust the Polarizers: The polarized light microscope consists of two polarizers: the polarizer located beneath the sample stage and the analyzer located above the objective lens. Start by aligning the polarizers parallel to each other.
3. Observe with Crossed Polarizers: Place the sample on the microscope stage and focus on the area of interest using the coarse and fine focus knobs. Rotate the analyzer to 90 degrees relative to the polarizer. This configuration is known as crossed polarizers.
4. Observe Birefringence: Rotate the stage or the sample to observe changes in the sample's appearance. Birefringence, the property of materials to split light into two perpendicular polarizations, will cause the sample to appear colorful or exhibit interference patterns.
5. Use Compensators: To enhance the visibility of birefringent structures, such as minerals, use compensators. These are specialized plates that introduce controlled phase shifts to the polarized light. They can be inserted between the polarizer and the sample or between the sample and the analyzer.
6. Capture Images: If desired, use a camera attached to the microscope to capture images or record videos of the sample. This allows for documentation and further analysis.
It is important to note that the principles of polarized light microscopy are constantly evolving. Recent advancements include the use of digital imaging techniques, such as polarized light microscopy combined with fluorescence, to provide more detailed information about the sample's structure and composition. Additionally, new software and algorithms are being developed to automate the analysis of polarized light microscopy images, making it easier and faster to extract valuable information from the samples.

2、 Setting up a polarized light microscope
Setting up a polarized light microscope involves several steps to ensure accurate and effective imaging. Here is a guide on how to set up and use a polarized light microscope:
1. Start by assembling the microscope: Attach the polarizer to the light source, typically located beneath the stage. Place the analyzer above the objective lens. Ensure that both the polarizer and analyzer are aligned perpendicular to each other.
2. Adjust the condenser: Position the condenser so that it focuses light onto the sample. Adjust the condenser diaphragm to control the amount of light passing through.
3. Insert the sample: Place the sample on the stage and secure it using stage clips or other appropriate methods. Ensure that the sample is flat and properly oriented.
4. Adjust the focus: Use the coarse and fine focus knobs to bring the sample into focus. Polarized light microscopes often have a Bertrand lens, which can be used to observe the sample in different focal planes.
5. Observe the sample: Rotate the stage to observe the sample under different angles of polarized light. This can reveal different optical properties and structures within the sample.
6. Analyze the sample: Use the analyzer to control the amount of polarized light reaching the eyepiece. By rotating the analyzer, you can observe changes in the sample's appearance and optical properties.
7. Capture images: If desired, use a camera or digital imaging system to capture images of the sample. This allows for further analysis and documentation.
It is important to note that the specific setup and usage instructions may vary depending on the model and manufacturer of the polarized light microscope. Therefore, it is recommended to consult the microscope's user manual for detailed instructions.
In recent years, advancements in polarized light microscopy have led to the development of new techniques and applications. For example, polarized light microscopy combined with digital image processing and analysis software allows for quantitative measurements of birefringence and other optical properties. Additionally, polarized light microscopy is increasingly being used in materials science, geology, and biological research to study the structural and chemical properties of various samples. These advancements have expanded the capabilities and potential applications of polarized light microscopy, making it a valuable tool in scientific research and analysis.

3、 Adjusting the polarizer and analyzer for optimal imaging
To use a polarized light microscope effectively, it is crucial to adjust the polarizer and analyzer for optimal imaging. Here is a step-by-step guide on how to do so:
1. Start by setting up the microscope and ensuring that it is properly aligned. Make sure the light source is correctly positioned and focused on the sample.
2. Begin by adjusting the polarizer, which is located below the stage. Rotate it until it is perpendicular to the light path. This will block any unpolarized light from reaching the sample.
3. Next, adjust the analyzer, which is located above the objective lens. Rotate it until it is parallel to the polarizer. This will allow the polarized light to pass through the sample and reach the eyepiece.
4. Look through the eyepiece and observe the sample. If the image appears too dark or lacks contrast, rotate the analyzer slightly to adjust the intensity of the polarized light. This will enhance the visibility of the sample's features.
5. To further enhance the image, you can use additional techniques such as adding retardation plates or using different types of polarizers. These techniques can provide more detailed information about the sample's optical properties.
It is important to note that the latest advancements in polarized light microscopy have led to the development of more sophisticated techniques. For example, some microscopes now offer automated polarizer and analyzer adjustment, allowing for faster and more precise imaging. Additionally, advanced imaging software can be used to analyze and quantify the polarized light data obtained from the microscope.
In conclusion, adjusting the polarizer and analyzer is essential for optimal imaging with a polarized light microscope. By following the steps outlined above, you can ensure that the sample is properly illuminated and that its features are clearly visible.

4、 Identifying birefringent materials using polarized light microscopy
To use a polarized light microscope for identifying birefringent materials, follow these steps:
1. Set up the microscope: Begin by placing the polarizer below the sample stage and the analyzer above the objective lens. Ensure that the polarizer and analyzer are perpendicular to each other.
2. Adjust the lighting: Use a bright and uniform light source, such as a halogen lamp, to illuminate the sample. Adjust the intensity of the light to achieve optimal visibility.
3. Insert the sample: Place the sample on the stage and secure it in place. Ensure that the sample is thin enough for light to pass through it.
4. Observe under crossed polarizers: Rotate the analyzer to a position perpendicular to the polarizer. Look through the eyepiece and adjust the focus until the sample is clear. The sample will appear dark against a bright background.
5. Rotate the sample: Gradually rotate the sample stage while observing the sample. Birefringent materials will exhibit changes in color or brightness as the sample is rotated. This phenomenon is known as interference colors.
6. Determine the optical properties: Use a conoscopic lens or a compensator to further analyze the birefringence of the sample. This will help determine the refractive indices and the orientation of the optical axes.
7. Compare with known materials: Consult reference materials or databases to compare the observed interference colors and optical properties with known birefringent materials. This will aid in identifying the sample.
It is worth noting that advancements in polarized light microscopy have led to the development of more sophisticated techniques. For example, digital imaging and software analysis can now be used to quantify birefringence and automate the identification process. Additionally, polarized light microscopy can be combined with other techniques, such as fluorescence microscopy, to provide more comprehensive information about the sample.
