How To Use Trail Cameras ?
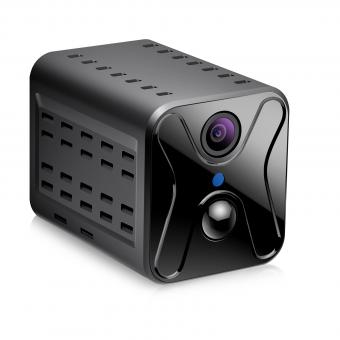
To use trail cameras, first, select a suitable location where you want to monitor wildlife or capture images. Ensure it is an area frequented by animals. Then, mount the camera securely on a tree or post using straps or screws. Adjust the camera angle and position to capture the desired area.
Next, insert batteries and a memory card into the camera. Set the camera to the desired mode, such as photo or video, and adjust settings like resolution, sensitivity, and trigger speed. Some cameras may have additional features like time-lapse or burst mode.
Once the camera is set up, turn it on and test it to ensure it is functioning correctly. Make sure the camera is properly concealed to avoid scaring away animals. Leave the camera undisturbed for a period of time, typically a few days or weeks, depending on your preference.
After the monitoring period, retrieve the camera and remove the memory card. Transfer the images or videos to a computer or other device for viewing and analysis. Review the captured footage to study wildlife behavior, identify species, or simply enjoy the images.
1、 Setting up a trail camera for optimal wildlife monitoring
Setting up a trail camera for optimal wildlife monitoring is a crucial step in capturing accurate and valuable data. Trail cameras have become increasingly popular among wildlife enthusiasts, researchers, and hunters due to their ability to provide valuable insights into animal behavior and habitat usage. Here's a guide on how to use trail cameras effectively:
1. Choose the right location: Selecting the appropriate location is vital for capturing wildlife activity. Look for areas with high animal traffic, such as game trails, water sources, or feeding areas. Consider the camera's field of view and ensure it covers the desired area adequately.
2. Mounting the camera: Securely mount the camera to a tree or post using straps or mounting brackets. Ensure it is stable and positioned at the right height to capture the desired field of view. Avoid placing it too high, as it may result in missed or distant shots.
3. Adjust camera settings: Familiarize yourself with the camera's settings and adjust them accordingly. Set the desired resolution, image or video mode, and trigger speed. Some cameras offer advanced features like time-lapse or burst mode, which can be useful for specific monitoring purposes.
4. Test and check battery life: Before leaving the camera unattended, test it to ensure it is functioning correctly. Check the battery life and consider using lithium batteries for longer-lasting power, especially in extreme weather conditions.
5. Regularly check and maintain: Visit the camera periodically to retrieve data, change batteries, and ensure it is functioning correctly. Inspect the camera for any damage or interference that may affect its performance.
6. Analyze and interpret data: Once you have collected a significant amount of data, analyze it to gain insights into wildlife behavior, population dynamics, or habitat usage. This information can be valuable for conservation efforts, research projects, or hunting strategies.
It's worth noting that the latest advancements in trail camera technology have introduced features like wireless connectivity and cellular capabilities, allowing real-time data transmission and remote monitoring. These advancements have revolutionized wildlife monitoring, making it more efficient and accessible.
In conclusion, setting up a trail camera for optimal wildlife monitoring involves careful consideration of location, camera settings, and regular maintenance. By following these steps and staying updated with the latest technological advancements, you can enhance your wildlife monitoring experience and contribute to the understanding and conservation of our natural world.
2、 Adjusting camera settings for capturing clear images and videos
Adjusting camera settings for capturing clear images and videos is crucial when using trail cameras. These cameras are designed to capture wildlife activity in remote areas, and understanding how to optimize their settings will greatly enhance the quality of the footage obtained.
Firstly, it is important to adjust the resolution settings of the camera. Higher resolution settings will result in clearer and more detailed images and videos. However, keep in mind that higher resolution files take up more storage space, so it is essential to balance the desired quality with available memory.
Secondly, consider adjusting the camera's sensitivity settings. This will determine how easily the camera is triggered by motion or heat. Finding the right sensitivity level is crucial to avoid false triggers caused by wind, vegetation, or small animals. Experiment with different sensitivity levels to find the optimal setting for your specific location and purpose.
Additionally, adjusting the camera's exposure settings can help capture clear images and videos in different lighting conditions. Most trail cameras have an automatic exposure mode, but manually adjusting the exposure can be beneficial in challenging lighting situations. This will prevent overexposed or underexposed footage, ensuring better visibility of the subject.
Lastly, consider the placement of the camera. Positioning the camera at the right height and angle is essential for capturing clear images and videos. Ensure that the camera is securely mounted and leveled to avoid blurry or distorted footage.
In conclusion, adjusting camera settings is crucial for capturing clear images and videos with trail cameras. By optimizing resolution, sensitivity, exposure, and placement, you can enhance the quality of your footage and gain valuable insights into wildlife activity. Stay updated with the latest advancements in trail camera technology to make the most of your wildlife monitoring experience.
3、 Choosing the right location to maximize trail camera effectiveness
Choosing the right location to maximize trail camera effectiveness is crucial for capturing the desired wildlife footage or monitoring specific areas. Here's a guide on how to use trail cameras effectively:
1. Research and scout: Before setting up your trail camera, research the target species and their habits. Look for signs such as tracks, droppings, or feeding areas. This will help you determine the best location to place your camera.
2. Consider the environment: Take into account the terrain, vegetation, and weather conditions of the area. Animals tend to follow specific paths or use certain areas for feeding, drinking, or resting. Placing your camera near these areas will increase your chances of capturing wildlife activity.
3. Positioning: Mount the camera at the right height and angle. Aim it slightly downward to capture the animal's entire body and minimize false triggers from wind or vegetation movement. Ensure the camera is securely attached to a tree or post, and position it facing north or south to avoid direct sunlight interference.
4. Test and adjust: Before leaving the camera unattended, test it to ensure it is capturing the desired area and angle. Make any necessary adjustments to the camera's sensitivity, trigger speed, or detection range to optimize its performance.
5. Maintenance: Regularly check and maintain your trail camera. Clear any vegetation that may obstruct the lens or trigger the camera unnecessarily. Also, replace batteries and memory cards as needed to avoid missing out on important footage.
6. Analyze and learn: Once you have collected footage, review it to understand animal behavior, patterns, and movement. This knowledge will help you make informed decisions about camera placement in the future.
In recent years, advancements in trail camera technology have introduced features like wireless connectivity and smartphone integration. These allow users to remotely monitor and control their cameras, providing real-time updates and reducing the need for frequent visits to the camera site.
Remember, respecting wildlife and their habitats is essential. Always follow local regulations and ethical guidelines when using trail cameras.
4、 Understanding the different types of trail camera triggers
Understanding the different types of trail camera triggers is essential for effectively using trail cameras in wildlife monitoring and research. Trail cameras are valuable tools that allow us to capture images and videos of wildlife in their natural habitats without disturbing them. The trigger is the mechanism that activates the camera to start recording when an animal passes by. There are several types of triggers commonly used in trail cameras.
1. Motion Trigger: This is the most common type of trigger and relies on detecting movement within the camera's field of view. When an animal moves in front of the camera, the motion trigger activates the camera to start recording. It is important to position the camera correctly to ensure optimal coverage of the area.
2. Heat Trigger: Some trail cameras use heat sensors to detect changes in temperature. When an animal's body heat is detected, the camera is triggered to start recording. This type of trigger is particularly useful for capturing images of nocturnal animals that may not be easily detected by motion triggers alone.
3. Time-Lapse Trigger: This trigger captures images or videos at predetermined intervals, regardless of whether there is any movement detected. It is useful for monitoring changes in vegetation, weather patterns, or capturing images of animals that may not trigger the motion or heat triggers.
To effectively use trail cameras, it is important to consider the specific needs of your research or monitoring project. Understanding the different types of triggers and their capabilities will help you choose the most appropriate camera for your needs. Additionally, it is crucial to properly position the camera, ensuring it is at the right height and angle to capture the desired area effectively.
In recent years, advancements in trail camera technology have led to the development of more sophisticated triggers. For example, some cameras now combine multiple triggers, such as motion and heat, to increase accuracy and reduce false triggers. Additionally, wireless trail cameras have become increasingly popular, allowing for real-time transmission of images and videos to a remote location.
In conclusion, understanding the different types of trail camera triggers is crucial for effectively using trail cameras in wildlife monitoring and research. By selecting the appropriate trigger and positioning the camera correctly, you can capture valuable data and gain insights into the behavior and ecology of wildlife in their natural habitats.
