How To View Specimen Under Microscope ?
To view a specimen under a microscope, first, prepare the specimen by placing it on a glass slide and covering it with a coverslip. Adjust the focus of the microscope by turning the coarse and fine focus knobs until the image becomes clear. Start with the lowest magnification objective lens and gradually increase the magnification as needed. Use the stage controls to move the slide and position the specimen in the center of the field of view. Adjust the lighting by adjusting the intensity of the light source or using the condenser controls. Finally, observe the specimen through the eyepiece and make any necessary adjustments to the focus or lighting to obtain a clear and detailed view.
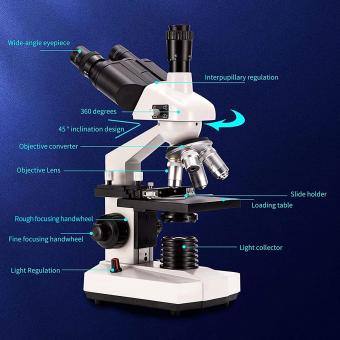
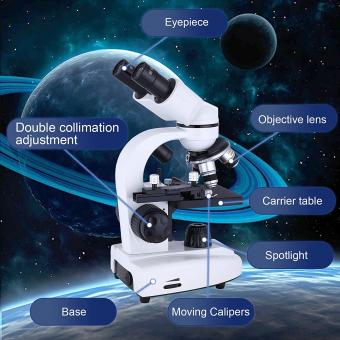
1、 Microscope Types and Parts
To view a specimen under a microscope, follow these steps:
1. Prepare the specimen: Start by collecting the specimen you want to observe. It can be a small organism, a tissue sample, or even a thin slice of a larger object. Ensure that the specimen is clean and free from any debris.
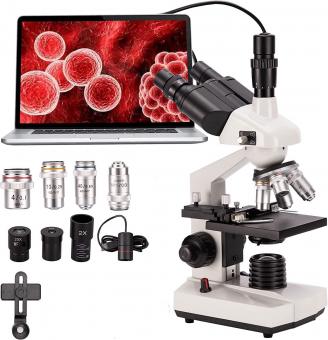
2. Choose the appropriate microscope: There are several types of microscopes available, including compound microscopes, stereo microscopes, and electron microscopes. Select the one that best suits your needs. Compound microscopes are commonly used for observing small, transparent specimens, while stereo microscopes are ideal for larger, opaque objects.
3. Set up the microscope: Place the microscope on a stable surface and adjust the lighting. Turn on the microscope and adjust the focus using the coarse and fine adjustment knobs. Start with the lowest magnification objective lens and gradually increase the magnification as needed.
4. Prepare the slide: If your specimen is not already on a slide, carefully place it on a clean glass slide. Add a drop of water or a mounting medium to help preserve the specimen and prevent it from drying out.
5. Place the slide on the stage: Gently place the slide on the stage of the microscope and secure it using the stage clips or slide holder. Make sure the specimen is centered under the objective lens.
6. Focus the image: Look through the eyepiece and adjust the focus using the coarse and fine adjustment knobs until the specimen comes into clear view. If necessary, adjust the lighting or move the slide slightly to improve the image quality.
7. Observe and record: Once the specimen is in focus, observe its details and characteristics. You can use the microscope's built-in camera or attach a digital camera to capture images or record videos for further analysis or documentation.
Remember to handle the microscope and the specimen with care to avoid any damage. Additionally, always follow the manufacturer's instructions and safety guidelines when using a microscope.
In recent years, advancements in microscopy technology have led to the development of more sophisticated microscopes. For example, confocal microscopes use laser scanning to capture high-resolution images of specimens, allowing for three-dimensional visualization. Super-resolution microscopes, such as stimulated emission depletion (STED) and structured illumination microscopy (SIM), have also emerged, enabling researchers to observe structures at the nanoscale level. These advancements have revolutionized various fields, including biology, medicine, and materials science, by providing researchers with unprecedented insights into the microscopic world.

2、 Preparing Specimens for Microscopy
To view a specimen under a microscope, it is important to properly prepare the sample to ensure clear and accurate observations. Here is a step-by-step guide on how to prepare specimens for microscopy:
1. Collect the specimen: Depending on the type of specimen you are studying, it may need to be collected from its natural environment or obtained from a laboratory source. Ensure that the specimen is fresh and intact for optimal viewing.
2. Fixation: Fixation is the process of preserving the specimen's structure and preventing decay. This is typically done by immersing the specimen in a fixative solution, such as formaldehyde or ethanol. The fixative should be chosen based on the type of specimen and the intended observations.
3. Dehydration: After fixation, the specimen needs to be dehydrated to remove water and replace it with a substance that is compatible with the microscope. This is usually done by gradually immersing the specimen in a series of alcohol solutions with increasing concentrations.
4. Clearing: Clearing is the process of making the specimen transparent to allow light to pass through it. This is achieved by immersing the dehydrated specimen in a clearing agent, such as xylene or cedarwood oil. The choice of clearing agent depends on the type of specimen and the desired observations.
5. Mounting: Once the specimen is cleared, it needs to be mounted on a slide for observation. A small amount of mounting medium, such as a resin or glycerin jelly, is applied to the slide, and the specimen is carefully placed on top. A coverslip is then gently lowered onto the specimen to protect it and prevent distortion.
6. Labeling: It is important to label the slide with relevant information, such as the specimen's name, date of preparation, and any additional details that may be useful for future reference.
7. Microscopy: Finally, the prepared slide can be placed under a microscope for observation. Adjust the focus and magnification settings as needed to obtain a clear image of the specimen.
It is worth noting that the latest advancements in microscopy techniques, such as confocal microscopy and super-resolution microscopy, have revolutionized the field by providing higher resolution and more detailed images. These techniques often require additional sample preparation steps, such as fluorescent labeling or immunostaining, to enhance specific features of the specimen. Therefore, it is important to stay updated with the latest protocols and technologies to maximize the potential of microscopy in your research or observations.

3、 Adjusting Microscope Settings for Optimal Viewing
To view a specimen under a microscope, it is important to adjust the microscope settings for optimal viewing. Here is a step-by-step guide on how to do so:
1. Start by placing the specimen on a glass slide and securing it with a coverslip. Ensure that the specimen is properly prepared and mounted to provide clear visibility.
2. Begin with the lowest magnification objective lens. This will allow you to locate and focus on the specimen easily. Use the coarse adjustment knob to bring the specimen into rough focus.
3. Once the specimen is roughly in focus, use the fine adjustment knob to bring it into sharp focus. This will help you see the finer details of the specimen.
4. Adjust the lighting conditions. Most microscopes have a built-in light source, which can be adjusted using a control knob. Ensure that the light is evenly distributed and not too bright or too dim. Adjusting the diaphragm can help control the amount of light passing through the specimen.
5. If your microscope has multiple objective lenses, gradually increase the magnification by rotating the nosepiece. Refocus the specimen using the fine adjustment knob after each change in magnification.
6. Take your time to observe the specimen carefully. Move the slide around using the mechanical stage controls to explore different areas of the specimen.
7. If necessary, adjust the condenser to enhance the contrast and clarity of the specimen. This can be done by moving the condenser up or down or adjusting the aperture diaphragm.
It is important to note that the specific steps for adjusting microscope settings may vary depending on the type and model of the microscope. Therefore, it is always recommended to refer to the manufacturer's instructions for your specific microscope model.
In recent years, advancements in microscope technology have led to the development of digital microscopes. These microscopes allow for easy viewing and capturing of images and videos of specimens. Some digital microscopes even offer features like autofocus and image analysis, making it easier to view and analyze specimens.
4、 Techniques for Focusing and Centering Specimens
To view a specimen under a microscope, it is essential to follow proper techniques for focusing and centering. These techniques ensure that the specimen is in clear focus and positioned correctly for observation. Here is a step-by-step guide on how to view a specimen under a microscope:
1. Start by placing the specimen on a glass slide and adding a drop of mounting medium or water to keep it in place.
2. Place the slide on the stage of the microscope and secure it using the stage clips.
3. Begin with the lowest magnification objective lens (usually 4x or 10x) and lower the stage as far as it will go.
4. Look through the eyepiece and use the coarse adjustment knob to raise the stage until the specimen comes into view. This knob moves the stage up and down, allowing you to focus on the specimen.
5. Once the specimen is visible, use the fine adjustment knob to sharpen the focus. This knob makes small adjustments to the focus and helps to achieve a clear image.
6. If the specimen is not centered, use the stage controls to move it into the center of the field of view. These controls typically consist of knobs that move the stage horizontally and vertically.
7. Once the specimen is in focus and centered, you can increase the magnification by rotating the nosepiece to switch to a higher power objective lens.
It is important to note that different microscopes may have slight variations in their controls and mechanisms. Therefore, it is always recommended to refer to the manufacturer's instructions for specific guidance.
In recent years, advancements in microscopy technology have led to the development of digital microscopes. These microscopes often come with built-in cameras and software that allow for easy viewing and capturing of images. Additionally, some microscopes now offer features like autofocus and auto-centering, which simplify the process of focusing and centering specimens.
Overall, mastering the techniques for focusing and centering specimens is crucial for obtaining clear and accurate observations under a microscope. Regular practice and familiarity with the microscope's controls will help improve proficiency in this essential skill.


