How To Connect Sony Camcorder To Computer ?
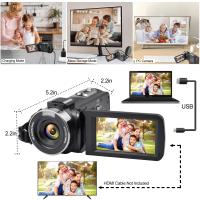
To connect a Sony camcorder to a computer, you will need a USB cable that is compatible with your camcorder model. Locate the USB port on your camcorder and connect one end of the USB cable to it. Then, locate a USB port on your computer and connect the other end of the cable to it. Once the connection is established, turn on your camcorder and set it to the appropriate mode for transferring files. Your computer should recognize the camcorder as a removable storage device, and you can access the files by opening the appropriate folder or using video editing software.
1、 USB Connection: Using a USB cable to connect the camcorder.
To connect a Sony camcorder to a computer, you can use a USB connection. This method allows you to transfer videos and photos from your camcorder to your computer for editing, storage, or sharing purposes.
To begin, you will need a USB cable that is compatible with your Sony camcorder. Most Sony camcorders use a standard USB Type-A to USB Type-B cable. Ensure that your computer has a USB port available for connection.
First, power on your camcorder and set it to the appropriate mode for USB connection. This mode is usually called "PC" or "Computer" mode and can be found in the settings or menu options of your camcorder.
Next, connect one end of the USB cable to the USB port on your computer and the other end to the USB port on your camcorder. Once the connection is established, your computer should recognize the camcorder as a removable storage device.
Open the file explorer on your computer and navigate to the camcorder's storage. You should be able to access the videos and photos stored on your camcorder. From here, you can copy and paste the files to your computer's hard drive or any desired location.
It is important to note that some newer Sony camcorders may also support wireless connectivity options such as Wi-Fi or NFC. These methods allow for more convenient and wireless transfer of files between the camcorder and computer. However, the USB connection method remains the most common and reliable way to connect a Sony camcorder to a computer.
2、 HDMI Connection: Connecting the camcorder to the computer via HDMI.
To connect a Sony camcorder to a computer, one of the most common methods is through an HDMI connection. This allows for high-quality video and audio transfer between the camcorder and the computer.
First, ensure that both the camcorder and the computer have an HDMI port. Most modern camcorders and computers have this port, but it's always good to double-check. If either device doesn't have an HDMI port, you may need to consider alternative connection methods.
Once you've confirmed the presence of HDMI ports, connect one end of the HDMI cable to the HDMI output port on the camcorder. The HDMI port on the camcorder is usually labeled as "HDMI Out" or something similar. Then, connect the other end of the HDMI cable to the HDMI input port on the computer. The HDMI port on the computer is typically labeled as "HDMI In" or "HDMI Input."
After the physical connection is established, turn on both the camcorder and the computer. The computer should automatically detect the camcorder and configure the necessary settings. If not, you may need to adjust the input source on the computer to recognize the camcorder.
Once the connection is established, you can transfer videos and other media files from the camcorder to the computer. This allows for easy editing, sharing, and storage of your recorded footage.
It's worth noting that technology is constantly evolving, and new connection methods may emerge in the future. Therefore, it's always a good idea to consult the user manual or the manufacturer's website for the latest instructions and recommendations on connecting your specific Sony camcorder to a computer.
3、 Wi-Fi Connection: Establishing a wireless connection between the camcorder and computer.
To connect a Sony camcorder to a computer, you have two main options: using a USB cable or establishing a Wi-Fi connection. In this response, we will focus on the Wi-Fi connection method.
Wi-Fi Connection: Establishing a wireless connection between the camcorder and computer has become increasingly popular due to its convenience and flexibility. Here are the steps to connect your Sony camcorder to a computer via Wi-Fi:
1. Ensure that both your camcorder and computer are connected to the same Wi-Fi network.
2. On your camcorder, navigate to the settings menu and select the Wi-Fi option.
3. Enable the Wi-Fi function on your camcorder and wait for it to detect available networks.
4. Select your Wi-Fi network from the list and enter the password if prompted.
5. On your computer, open the Wi-Fi settings and connect to the same network as your camcorder.
6. Download and install the appropriate software or app provided by Sony for your camcorder model on your computer.
7. Launch the software or app and follow the on-screen instructions to establish the connection between your camcorder and computer.
8. Once the connection is established, you can transfer files, control the camcorder remotely, or stream live footage directly to your computer.
It is important to note that the specific steps may vary depending on the model of your Sony camcorder and the software or app you are using. Therefore, it is recommended to refer to the user manual or the official Sony website for detailed instructions tailored to your specific device.
In conclusion, establishing a Wi-Fi connection between your Sony camcorder and computer provides a convenient way to transfer files and control your camcorder remotely. It eliminates the need for physical cables and allows for greater flexibility in capturing and managing your footage.
4、 Firewire Connection: Using a Firewire cable to connect the camcorder.
To connect a Sony camcorder to a computer, one of the most common methods is using a Firewire connection. This method allows for high-speed data transfer and is widely supported by both Sony camcorders and computers.
To establish a Firewire connection, you will need a Firewire cable that is compatible with your camcorder and computer. Most Sony camcorders use a 4-pin Firewire connector, while computers typically have a 6-pin or 9-pin Firewire port. Therefore, you may need an adapter or a cable with different connectors on each end.
Once you have the appropriate cable, follow these steps to connect your Sony camcorder to your computer:
1. Ensure that both your camcorder and computer are turned off.
2. Connect one end of the Firewire cable to the Firewire port on your camcorder.
3. Connect the other end of the cable to the Firewire port on your computer.
4. Turn on your camcorder and set it to "Playback" or "VCR" mode.
5. Turn on your computer and wait for it to recognize the camcorder.
6. If prompted, install any necessary drivers or software for your camcorder.
7. Once the connection is established, you can transfer videos or access the camcorder's storage from your computer.
It's worth noting that Firewire connections have become less common in recent years, as many newer computers no longer include Firewire ports. In such cases, you may need to use alternative methods like USB or HDMI connections, depending on the available ports on your camcorder and computer.
