How To Fit Wifi Security Camera ?
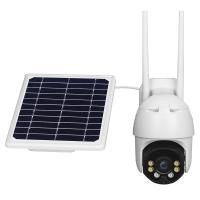
To fit a WiFi security camera, first, choose a suitable location for installation that provides a clear view of the area you want to monitor. Ensure that the camera is within the range of your WiFi network. Next, mount the camera securely using the provided brackets or mounts. Connect the camera to a power source, either through a power adapter or via a power over Ethernet (PoE) connection. Follow the manufacturer's instructions to connect the camera to your WiFi network. This usually involves using a mobile app or a web interface to scan for available networks and enter the WiFi credentials. Once connected, configure the camera settings, such as motion detection sensitivity and recording options, according to your preferences. Finally, test the camera to ensure it is functioning properly and adjust the positioning if necessary.
1、 Positioning and Mounting
Positioning and mounting a WiFi security camera is crucial to ensure optimal coverage and effectiveness. Here's a step-by-step guide on how to fit a WiFi security camera:
1. Choose the right location: Identify the areas you want to monitor and select suitable locations for your cameras. Consider factors like visibility, range, and power source availability.
2. Check WiFi signal strength: Before mounting the camera, ensure that the chosen location has a strong WiFi signal. Weak signals can result in poor video quality or intermittent connectivity. Use a WiFi analyzer app to check the signal strength.
3. Mounting options: Depending on the camera model, you can choose between wall mounting, ceiling mounting, or using a stand. Ensure the mounting surface is sturdy and can support the weight of the camera.
4. Adjust the camera angle: Position the camera at an angle that covers the desired area. Aim for a wide field of view while avoiding obstructions like walls or trees that may interfere with the camera's line of sight.
5. Secure the camera: Use screws or brackets provided with the camera to securely attach it to the mounting surface. Ensure it is tightly fixed to prevent any movement or tampering.
6. Connect to power: Plug the camera into a power source. If possible, opt for a power outlet near the camera to avoid long cables that can be easily tampered with.
7. Connect to WiFi: Follow the camera's instructions to connect it to your WiFi network. Ensure you have the correct WiFi credentials and that the camera is within range of the router.
8. Test the camera: Once connected, test the camera's functionality by accessing the live feed on your smartphone or computer. Adjust the camera angle if necessary.
It's worth noting that the latest point of view in WiFi security cameras is the integration of advanced features like motion detection, two-way audio, and cloud storage. These features enhance the camera's effectiveness and provide additional security measures. Additionally, some cameras now offer AI-powered facial recognition, which can help identify known individuals and send alerts for unrecognized faces.
Remember to regularly update the camera's firmware to ensure it has the latest security patches and features.
2、 Network Configuration and Connectivity
To fit a WiFi security camera, you need to follow a few steps to ensure proper network configuration and connectivity. Here's a guide on how to do it:
1. Choose the right camera: Select a WiFi security camera that suits your needs. Consider factors like resolution, field of view, and night vision capabilities.
2. Position the camera: Determine the best location for your camera. It should have a clear view of the area you want to monitor and be within range of your WiFi network.
3. Connect to power: Plug the camera into a power outlet using the provided power adapter. Ensure a stable power source to avoid interruptions.
4. Install the camera app: Download the camera's app on your smartphone or tablet. Most cameras have dedicated apps that allow you to control and monitor the camera remotely.
5. Connect to WiFi: Open the app and follow the instructions to connect the camera to your WiFi network. Enter your network's SSID and password when prompted. Some cameras have a QR code that you can scan to automatically connect.
6. Adjust camera settings: Once connected, you can customize the camera's settings through the app. This includes adjusting motion detection sensitivity, setting up alerts, and configuring recording options.
7. Test the camera: After completing the setup, test the camera to ensure it's working properly. Check the live feed on your smartphone or tablet to verify the camera's view and adjust its position if necessary.
It's important to note that WiFi security cameras can be vulnerable to hacking if not properly secured. To enhance security, make sure to use strong passwords for your WiFi network and camera app, enable two-factor authentication if available, and regularly update the camera's firmware.
Additionally, consider using a virtual private network (VPN) to encrypt your camera's video feed and protect it from unauthorized access.
3、 Power Supply and Backup
To fit a WiFi security camera, you will need to follow a few steps. Here is a guide on how to do it:
1. Choose the right camera: Before starting the installation process, make sure you have selected a WiFi security camera that suits your needs. Consider factors such as resolution, field of view, and night vision capabilities.
2. Determine the camera placement: Decide where you want to install the camera. It should be strategically placed to cover the desired area while ensuring it is not easily accessible to potential intruders.
3. Install the camera bracket: Use the provided bracket to mount the camera securely. Ensure it is fixed tightly to prevent any movement or tampering.
4. Connect the camera to power: Most WiFi security cameras require a power source. Connect the camera to a power outlet using the provided power adapter. Make sure the power supply is stable and reliable.
5. Connect to WiFi network: Follow the manufacturer's instructions to connect the camera to your WiFi network. This usually involves downloading a mobile app, scanning a QR code, or entering the camera's unique identification number.
6. Configure camera settings: Once connected, access the camera's settings through the mobile app or web interface. Set up features such as motion detection, recording schedules, and notifications.
7. Test the camera: After completing the setup, test the camera to ensure it is functioning properly. Check the live feed, adjust the camera angle if necessary, and verify that the motion detection is working as expected.
Power Supply and Backup:
When it comes to power supply for WiFi security cameras, there are a few options to consider. Most cameras come with a power adapter that needs to be plugged into an electrical outlet. However, this can be limiting if you want to install the camera in an area without easy access to power.
One alternative is to use Power over Ethernet (PoE) technology. This allows you to power the camera using an Ethernet cable, which also provides a stable internet connection. PoE cameras are convenient for outdoor installations or areas where power outlets are scarce.
Another consideration is backup power. In the event of a power outage, you don't want your security camera to be rendered useless. To ensure continuous surveillance, you can invest in a backup power supply such as an uninterruptible power supply (UPS) or a backup battery pack. These devices will keep your camera running even during power disruptions.
In conclusion, fitting a WiFi security camera involves selecting the right camera, installing it properly, connecting it to your WiFi network, and configuring the settings. Additionally, considering the power supply options and having a backup power source will ensure uninterrupted surveillance.
4、 Camera Settings and Configuration
To fit a WiFi security camera, follow these steps:
1. Choose the right location: Determine the areas you want to monitor and select suitable spots for camera placement. Consider factors like coverage, visibility, and accessibility to power outlets.
2. Install the camera bracket: Use screws and a drill to mount the camera bracket securely. Ensure it is level and positioned correctly for optimal coverage.
3. Connect the camera: Most WiFi security cameras come with a power adapter and an Ethernet cable. Connect the camera to a power source and use the Ethernet cable to connect it to your router temporarily.
4. Configure the camera settings: Download the camera's mobile app or access its web interface to configure the settings. Follow the manufacturer's instructions to connect the camera to your WiFi network. Create a strong password for the camera to enhance security.
5. Adjust camera settings: Customize the camera settings according to your preferences. This may include adjusting motion detection sensitivity, setting up alerts, or enabling night vision.
6. Test the camera: Once the camera is connected and configured, test its functionality. Ensure the live feed is working properly and that you can access it remotely through the app or web interface.
7. Mount the camera: Once you are satisfied with the camera's performance, mount it securely on the bracket. Make sure it is positioned correctly and adjust the angle if needed.
8. Monitor and maintain: Regularly check the camera's feed to ensure it is functioning correctly. Keep the camera's firmware up to date to benefit from the latest security enhancements.
In recent years, advancements in WiFi security cameras have made installation and configuration easier. Many cameras now offer simplified setup processes, such as QR code scanning or voice-guided installation. Additionally, some cameras support wireless connectivity, eliminating the need for an Ethernet cable. Always refer to the manufacturer's instructions for the specific camera model you are installing.
