How To Set Up Digital Microscope ?
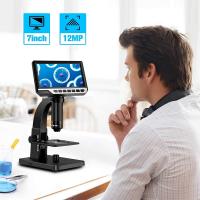
To set up a digital microscope, follow these steps:
1. Unpack the microscope and its accessories from the box.
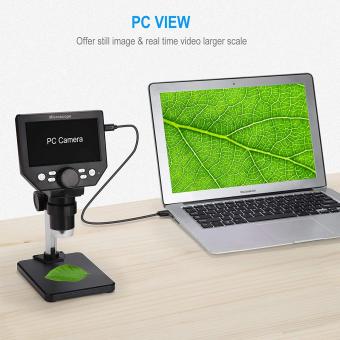
2. Connect the microscope to your computer using the USB cable provided.
3. Install the software that came with the microscope onto your computer.
4. Turn on the microscope and adjust the focus until you can see a clear image.
5. Use the software to adjust the brightness, contrast, and other settings as needed.
6. Start exploring and capturing images or videos of your specimens.
It's important to read the user manual that comes with your digital microscope to ensure you are using it correctly and to its full potential. Additionally, make sure your computer meets the minimum system requirements for the microscope's software.
1、 Connecting the microscope to a computer
How to set up digital microscope:
1. Unpack the microscope and all its components from the box.
2. Connect the microscope to a power source using the provided power cable.
3. Connect the microscope to a computer using a USB cable. Make sure the computer is turned on and has the necessary software installed to operate the microscope.
4. Install any necessary drivers or software that came with the microscope. Follow the instructions provided by the manufacturer to ensure proper installation.
5. Turn on the microscope and adjust the focus and lighting as needed.
6. Open the software on the computer and select the microscope as the input device.
7. Begin using the microscope to view and capture images or videos.
Connecting the microscope to a computer:
When connecting the microscope to a computer, it is important to ensure that the computer has the necessary software and drivers installed to operate the microscope. Some microscopes may require specific software to be downloaded and installed before they can be used. It is also important to use a high-quality USB cable to ensure a stable connection between the microscope and the computer. Additionally, it is recommended to use a computer with a high-quality graphics card to ensure that images and videos captured by the microscope are displayed clearly and accurately. Finally, it is important to follow the manufacturer's instructions carefully when setting up the microscope to ensure that it is properly connected and configured for use.

2、 Installing the necessary software
How to set up digital microscope? The first step is to install the necessary software. Most digital microscopes come with their own software that needs to be installed on your computer. This software allows you to control the microscope and capture images and videos.
To install the software, insert the CD that came with the microscope into your computer's CD drive. Follow the on-screen instructions to install the software. If your microscope didn't come with a CD, you can usually download the software from the manufacturer's website.
Once the software is installed, connect the microscope to your computer using the USB cable that came with it. Turn on the microscope and launch the software. You should see a live image from the microscope on your computer screen.
From here, you can adjust the focus and zoom of the microscope using the software. You can also capture images and videos, and save them to your computer for later analysis.
It's important to note that different microscopes may have slightly different software and installation processes. Be sure to read the user manual that came with your microscope for specific instructions.
In the latest point of view, some digital microscopes now come with Wi-Fi connectivity, allowing you to connect to them wirelessly using your computer or mobile device. This eliminates the need for a USB cable and makes it easier to share images and videos with others.

3、 Adjusting the focus and lighting
How to set up digital microscope:
1. First, assemble the microscope by attaching the base to the arm and then attaching the head to the arm.
2. Connect the microscope to a computer or monitor using the USB cable provided.
3. Install the software that came with the microscope onto your computer.
4. Turn on the microscope and launch the software.
5. Adjust the focus and lighting to get a clear image.
Adjusting the focus and lighting:
1. Start by adjusting the focus. Use the focus knob to move the lens up or down until the image is clear.
2. If the image is still blurry, adjust the lighting. Use the brightness and contrast controls to adjust the lighting until the image is clear and well-lit.
3. Some digital microscopes come with additional features such as zoom, measurement tools, and image capture. Familiarize yourself with these features and how to use them.
4. It is important to keep the lens clean and free of dust or debris. Use a soft, dry cloth to clean the lens and avoid touching it with your fingers.
5. Finally, experiment with different samples and magnifications to get the most out of your digital microscope.
In conclusion, setting up a digital microscope is a straightforward process that requires attention to detail when adjusting the focus and lighting. With the right setup, a digital microscope can be a powerful tool for scientific research, education, and exploration.

4、 Calibrating the microscope
How to set up digital microscope:
1. Unpack the microscope and all its components from the box.
2. Connect the microscope to a computer or laptop using the USB cable provided.
3. Install the software that comes with the microscope onto the computer or laptop.
4. Turn on the microscope and adjust the focus knob until the image is clear.
5. Adjust the lighting to ensure that the specimen is well-lit and visible.
6. Use the software to adjust the magnification and other settings as needed.
Calibrating the microscope:
Calibrating the microscope is an important step to ensure accurate measurements of specimens. To calibrate the microscope, follow these steps:
1. Obtain a calibration slide or a stage micrometer.
2. Place the calibration slide or stage micrometer on the stage of the microscope.
3. Adjust the focus and lighting to obtain a clear image of the calibration slide or stage micrometer.
4. Use the software to measure the distance between the calibration marks on the slide or micrometer.
5. Enter the measurement into the software to calibrate the microscope.
It is important to note that calibration should be done regularly to ensure accurate measurements. Additionally, it is recommended to use a calibration slide or stage micrometer that is traceable to a national standard to ensure the highest level of accuracy.














There are no comments for this blog.