How To Use A Light Microscope Gcse ?
To use a light microscope for GCSE, start by placing the specimen on a clean glass slide. Add a drop of water or a suitable staining solution if necessary. Adjust the light intensity and focus using the coarse and fine focus knobs. Start with the lowest magnification objective lens and gradually increase the magnification as needed. Use the stage controls to move the slide and center the specimen. Finally, observe the specimen through the eyepiece and make any necessary adjustments to improve the focus and clarity of the image.
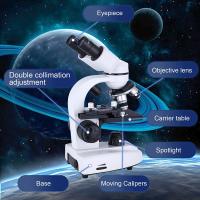
1、 Parts of a light microscope and their functions
How to use a light microscope GCSE:
Using a light microscope is an essential skill for students studying biology at the GCSE level. Here is a step-by-step guide on how to use a light microscope effectively:
1. Set up the microscope: Place the microscope on a flat, stable surface and ensure it is plugged in or has fresh batteries. Adjust the light intensity if necessary.
2. Prepare the slide: Place the specimen you want to observe on a glass slide and add a drop of water or a mounting medium to keep it in place. Cover the specimen with a coverslip.
3. Start with the lowest magnification: Begin with the lowest objective lens (usually 4x or 10x) and use the coarse adjustment knob to bring the specimen into focus. Look through the eyepiece and adjust the focus using the fine adjustment knob until the image is clear.
4. Increase magnification: Once the specimen is in focus, switch to a higher magnification objective lens (e.g., 40x or 100x). Use the fine adjustment knob to refocus the image.
5. Adjust the stage: Move the stage using the stage controls to view different areas of the specimen. Use the mechanical stage controls if available for precise movement.
6. Observe and record: Take your time to observe the specimen carefully. Use the eyepiece graticule or a ruler to measure the size of the specimen if required. Make detailed observations and record your findings.
7. Clean up: After use, remove the slide and clean it with lens paper or a soft cloth. Turn off the microscope and cover it to protect it from dust.
Parts of a light microscope and their functions:
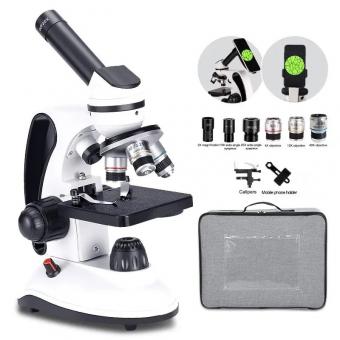
1. Eyepiece (ocular lens): The eyepiece is the lens you look through to observe the specimen. It typically magnifies the image by 10x.
2. Objective lenses: These are the lenses located on the revolving nosepiece. They provide different levels of magnification, such as 4x, 10x, 40x, and 100x.
3. Coarse adjustment knob: This knob is used to bring the specimen into rough focus when using low magnification objectives.
4. Fine adjustment knob: The fine adjustment knob allows for precise focusing of the image when using high magnification objectives.
5. Stage: The stage is where the slide with the specimen is placed. It often has stage clips or a mechanical stage to hold the slide in place and move it smoothly.
6. Condenser: The condenser is located beneath the stage and focuses the light onto the specimen, improving the clarity of the image.
7. Diaphragm: The diaphragm controls the amount of light passing through the condenser. Adjusting it can help optimize the image quality.
8. Light source: The light source, usually an electric bulb, provides illumination for the specimen.
It is important to note that the latest advancements in light microscopy include the use of digital cameras and software to capture and analyze images. These technologies allow for easier sharing of images and more accurate measurements. Additionally, some microscopes now have built-in LED lights, which are more energy-efficient and provide better illumination.

2、 Preparing a slide for observation under a light microscope
Preparing a slide for observation under a light microscope is an essential skill for any student studying biology at the GCSE level. It allows for the examination of small specimens and provides a closer look at their structures and functions. Here is a step-by-step guide on how to use a light microscope for GCSE:
1. Start by collecting the specimen you wish to observe. This can be a thin slice of plant tissue, a drop of pond water, or a prepared slide from a biology kit.
2. Place the specimen on a clean glass slide. If necessary, add a drop of water or a staining solution to enhance visibility.
3. Carefully lower a coverslip onto the specimen. To avoid air bubbles, place one edge of the coverslip on the slide and gently lower it onto the specimen at a slight angle. Slowly lower the coverslip to avoid trapping air bubbles.
4. Clean the microscope lenses using lens paper or a soft cloth. This ensures clear and sharp images.
5. Turn on the light source of the microscope and adjust the intensity to a comfortable level.
6. Place the prepared slide on the stage of the microscope and secure it using the stage clips.
7. Begin with the lowest magnification objective lens (usually 4x or 10x) and use the coarse focus knob to bring the specimen into view. Adjust the focus using the fine focus knob for a clear image.
8. Once the specimen is in focus, switch to higher magnification objective lenses (40x or 100x) to observe finer details. Remember to adjust the focus each time you switch lenses.
9. Use the mechanical stage controls to move the slide and explore different areas of the specimen.
10. Finally, record your observations and draw any structures or features you observe.
It is important to note that the latest advancements in microscopy technology, such as digital microscopes and virtual microscopy, are becoming increasingly popular in educational settings. These tools allow for easier sharing of images and remote learning opportunities. However, the basic principles of preparing a slide and using a light microscope remain the same.

3、 Adjusting the focus and magnification on a light microscope
To use a light microscope for GCSE, it is important to understand how to adjust the focus and magnification. These steps will help you achieve clear and detailed images of your specimen.
1. Start by placing your slide on the stage of the microscope. Use the stage clips to secure it in place.
2. Begin with the lowest magnification objective lens (usually 4x or 10x) in position. This will provide a wider field of view and make it easier to locate your specimen.
3. Look through the eyepiece and use the coarse adjustment knob to move the stage up or down until the specimen comes into view. This knob moves the stage in larger increments, allowing you to quickly bring the specimen into focus.
4. Once the specimen is roughly in focus, use the fine adjustment knob to make small, precise adjustments. This knob moves the stage in smaller increments, allowing you to fine-tune the focus and bring the specimen into sharp clarity.
5. If you need to increase the magnification, rotate the nosepiece to switch to a higher power objective lens (e.g., 40x or 100x). Remember to use the coarse adjustment knob to bring the specimen back into view and then use the fine adjustment knob to achieve a clear focus.
6. It is important to note that higher magnification lenses have a shorter working distance, meaning the space between the objective lens and the slide is smaller. Therefore, you may need to adjust the focus more frequently when using higher magnifications.
7. To enhance the clarity of your image, you can also adjust the diaphragm, which controls the amount of light passing through the specimen. Opening the diaphragm will increase the brightness, while closing it will reduce the amount of light.
It is worth mentioning that the latest advancements in light microscopy, such as digital microscopes, may have additional features and controls. These may include digital zoom, image capture, and software for image analysis. However, the basic principles of adjusting focus and magnification remain the same.
4、 Identifying and describing different types of cells using a light microscope
To use a light microscope for GCSE level studies, follow these steps:
1. Prepare the microscope: Ensure the microscope is clean and in working condition. Adjust the light source to provide adequate illumination.
2. Prepare the slide: Place the specimen on a glass slide and add a drop of water or a suitable staining solution to enhance visibility. Cover the specimen with a coverslip to prevent it from drying out.
3. Adjust the objective lens: Start with the lowest magnification objective lens (usually 4x or 10x) and focus on the specimen using the coarse and fine focus knobs. Once the image is clear, switch to higher magnification lenses (40x or 100x) to observe the specimen in more detail.
4. Identify and describe cells: Observe the specimen under the microscope and identify different types of cells. Use a reference book or online resources to compare the observed cells with known cell types. Describe the shape, size, and any distinguishing features of the cells.
5. Record observations: Draw what you see under the microscope, labeling the different cell types and any notable features. Take notes on the characteristics of each cell type observed.
6. Analyze and interpret: Compare your observations with known cell types and consider the function of the cells in the context of the organism or tissue being studied. Make connections between the structure and function of the cells.
It is important to note that the latest point of view in cell biology emphasizes the dynamic nature of cells and the importance of studying them in their natural environment. Techniques such as live cell imaging and 3D imaging are becoming increasingly popular to study cells in real-time and in more detail. Additionally, advancements in molecular biology techniques allow for the labeling and visualization of specific cellular components, providing further insights into cell structure and function.


