Selfie Ring Light How To Use ?
To use a selfie ring light, first, attach it to your smartphone or camera using the provided clip or mount. Make sure it is securely attached. Then, turn on the ring light by pressing the power button. Adjust the brightness level according to your preference using the control buttons, if available. Position yourself in front of the camera and frame your shot. The ring light will provide even and flattering lighting for your selfies or videos. Experiment with different angles and distances to achieve the desired lighting effect. Once you are satisfied with the lighting, capture your selfie or start recording your video. Remember to turn off the ring light after use to conserve battery power.
1、 Purpose and Function of a Selfie Ring Light
Purpose and Function of a Selfie Ring Light
A selfie ring light is a popular accessory used by individuals who want to enhance the lighting in their selfies and videos. It is a small, portable device that can be easily attached to a smartphone or camera. The main purpose of a selfie ring light is to provide a soft and even illumination on the subject's face, eliminating shadows and creating a flattering effect.
The function of a selfie ring light is quite simple. It consists of a ring of LED lights that emit a continuous, bright light. When turned on, the ring light evenly distributes the light around the subject, resulting in a well-lit and professional-looking photograph or video. The light is usually adjustable, allowing users to control the intensity and warmth of the light to suit their preferences.
One of the latest advancements in selfie ring lights is the introduction of adjustable color temperature settings. This feature allows users to switch between warm and cool lighting tones, giving them more flexibility to create different moods and atmospheres in their photos and videos. Additionally, some selfie ring lights now come with built-in rechargeable batteries, making them more convenient and portable for on-the-go use.
To use a selfie ring light, simply attach it to your smartphone or camera using the provided clip or mount. Once attached, turn on the ring light and adjust the brightness and color temperature settings to your liking. Position yourself in front of the camera and start capturing stunning, well-lit selfies or videos.
In conclusion, the purpose of a selfie ring light is to enhance the lighting in selfies and videos, while the function is to provide a soft and even illumination on the subject's face. With the latest advancements, selfie ring lights now offer adjustable color temperature settings and rechargeable batteries for added convenience.
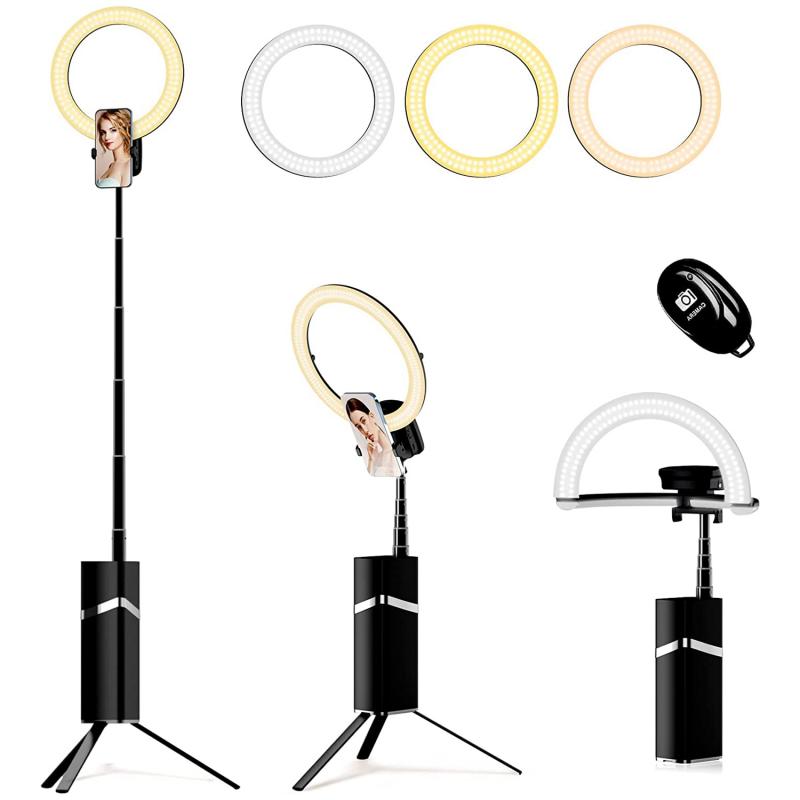
2、 Setting Up and Mounting a Selfie Ring Light
Setting Up and Mounting a Selfie Ring Light
Selfie ring lights have become increasingly popular among social media enthusiasts and content creators. These portable and easy-to-use devices provide a flattering and professional lighting setup for capturing stunning selfies and videos. If you're wondering how to use a selfie ring light, here's a step-by-step guide to help you get started.
1. Choose the right location: Find a well-lit area with a clean background for your selfies. Natural light is ideal, but if it's not available, the selfie ring light will come to your rescue.
2. Set up the tripod: Most selfie ring lights come with a tripod stand. Extend the legs and adjust the height according to your preference. Ensure that the tripod is stable and secure.
3. Attach the ring light: Screw the ring light onto the tripod's mounting plate. Make sure it is tightly secured to prevent any accidents during use.
4. Adjust the light settings: Most selfie ring lights offer adjustable brightness levels and color temperatures. Experiment with different settings to find the perfect lighting for your photos or videos. Some models even come with smartphone apps that allow you to control the light remotely.
5. Mount your phone or camera: If your ring light has a phone holder, attach your smartphone securely. Alternatively, you can mount a camera using a compatible mount. Ensure that your device is positioned in the center of the ring light for even illumination.
6. Position yourself: Stand or sit in front of the ring light, ensuring that your face is well-lit and shadows are minimized. Experiment with different angles and distances to find the most flattering position.
7. Capture your content: Once you're satisfied with the lighting setup, start taking selfies or recording videos. Remember to smile and have fun!
The latest point of view on using selfie ring lights is that they have become an essential tool for content creators, influencers, and even everyday users. With the rise of social media platforms like TikTok and Instagram, people are constantly seeking ways to enhance their visual content. Selfie ring lights provide a professional lighting setup that can make a significant difference in the quality of your photos and videos.
Additionally, advancements in technology have led to the development of more versatile and user-friendly selfie ring lights. Many models now offer features like adjustable color temperatures, wireless control, and even built-in smartphone holders. These advancements make it easier than ever to achieve the perfect lighting for your content.
In conclusion, setting up and using a selfie ring light is a straightforward process. By following these steps and experimenting with different settings, you can elevate your selfies and videos to the next level. So, grab your selfie ring light, find the perfect location, and start capturing stunning content that will impress your followers.
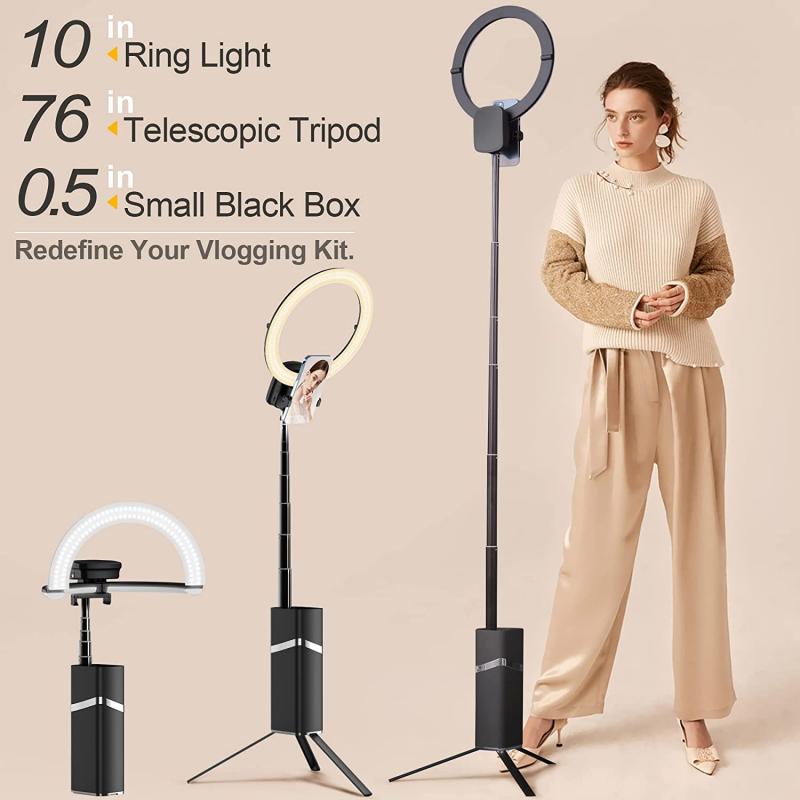
3、 Adjusting Light Intensity and Color Temperature
Selfie ring lights have become increasingly popular among social media enthusiasts and content creators. These portable lighting devices are designed to provide a flattering and well-lit environment for capturing selfies or videos. To make the most of your selfie ring light, it is essential to understand how to adjust the light intensity and color temperature.
Firstly, most selfie ring lights come with adjustable brightness settings. This allows you to control the amount of light emitted by the ring. To use the selfie ring light, simply attach it to your smartphone or camera and turn it on. Then, locate the brightness control button or dial on the ring light. By pressing or rotating this control, you can increase or decrease the light intensity according to your preference. This feature is particularly useful in different lighting conditions, as it enables you to compensate for low light or harsh lighting situations.
Additionally, many selfie ring lights also offer adjustable color temperature settings. Color temperature refers to the warmth or coolness of the light emitted by the ring. Typically, ring lights provide a range of color temperatures, from warm yellow to cool white. Adjusting the color temperature can significantly impact the overall mood and tone of your photos or videos. For instance, a warmer color temperature can create a cozy and intimate atmosphere, while a cooler temperature can give a more professional and crisp look.
It is worth noting that some selfie ring lights now come with advanced features such as remote control or smartphone app integration. These features allow you to adjust the light intensity and color temperature conveniently from a distance or through your phone. This latest point of view enhances the user experience and provides more flexibility in capturing the perfect selfie or video.
In conclusion, using a selfie ring light involves adjusting the light intensity and color temperature. By understanding how to control these settings, you can create well-lit and visually appealing content. With the latest advancements in technology, selfie ring lights now offer additional features that further enhance the user experience. So, whether you are a social media influencer or simply someone who enjoys taking selfies, a selfie ring light can be a valuable tool to elevate your photography or videography skills.

4、 Positioning and Angling the Selfie Ring Light
Positioning and angling the selfie ring light is crucial to achieve the best lighting for your selfies. Here's a step-by-step guide on how to use a selfie ring light effectively:
1. Mount the ring light: Start by attaching the selfie ring light to a stable surface, such as a tripod or a phone holder. Make sure it is securely fastened to prevent any accidents or wobbling during use.
2. Adjust the brightness: Most selfie ring lights come with adjustable brightness settings. Experiment with different levels of brightness to find the one that suits your needs. Generally, a softer, more diffused light works best for selfies.
3. Position the ring light: Place the ring light directly in front of you, ensuring that it is centered and aligned with your face. This will help eliminate any shadows and provide even lighting.
4. Angle the ring light: Tilt the ring light slightly downwards at a 45-degree angle. This will help minimize any harsh shadows under your chin and create a flattering, well-lit effect.
5. Distance from the ring light: Position yourself at a comfortable distance from the ring light. Too close, and the light may be too intense, causing overexposure. Too far, and the light may not have the desired effect. Experiment with different distances to find the sweet spot.
6. Use a diffuser: Some selfie ring lights come with diffusers that can be attached to soften the light further. This can help create a more natural and flattering lighting effect.
7. Experiment with different angles: Don't be afraid to try different angles and positions to find the most flattering lighting for your face. Everyone's features are unique, so what works for one person may not work for another.
Remember, lighting is key when it comes to taking great selfies. By following these steps and experimenting with different settings, you'll be able to achieve the perfect lighting with your selfie ring light.













There are no comments for this blog.